Thursday, July 29, 2010

Java Server Faces (JSF)

Java Server Faces (JSF)
JavaServer Faces (JSF) is a Java based Web application framework that simplifies the development of user interfaces for enterprise Java applications. JSF applications are implemented in Java on the server, and render as web pages back to clients based on their web requests. JSF provides Web application lifecycle management through a controller servlet; and like Swing, JSF provides a rich component model complete with event handling and component rendering. It is based on other Java standards such as Java Servlets and JavaServer Pages, but it provides a higher–level component layer for UI (user interface) development.

The Major Benefits of Java Server Faces Technology:
  • JavaServer Faces architecture makes it easy for the developers to use. In JavaServer Faces technology, user interfaces can be created easily with its built–in UI component library, which handles most of the complexities of user interface management.
  • JavaServer Faces technology offers a clean separation between behavior and presentation.
  • JavaServer Faces technology provides a rich architecture for managing component state, processing component data, validating user input, and handling events.
  • Robust event handling mechanism.
  • Render kit support for different clients.
  • Highly 'pluggable' – components, view handler, etc
JSF LifeCycle
In order for you to understand how the framework masks the underlying request processing nature of the Servlet API and to analyze how Faces processes each request, we’ll go through the JSF request processing lifecycle. This will allow you to build better applications.

A JavaServer Faces page is represented by a tree of UI components, called a view. During the lifecycle, the JavaServer Faces implementation must build the view while considering state saved from a previous submission of the page. When the client submits a page, the JavaServer Faces implementation performs several tasks, such as validating the data input of components in the view and converting input data to types specified on the server side. The JavaServer Faces implementation performs all these tasks as a series of steps in the JavaServer Faces request–response life cycle.

The phases of the JSF application lifecycle are as follows:

  • Restore view
  • Apply request values; process events
  • Process validations; process events
  • Update model values; process events
  • Invoke application; process events
  • Render response
The normal flow of control is shown with solid lines, whereas dashed lines show alternate flows depending on whether a component requests a page redisplay or validation or conversion errors occur.
JSF Life Cycle
Note: Life – cycle handles two kinds of requests:
  • Initial request: A user requests the page for the first time.
  • Postback: A user submits the form contained on a page that was previously loaded into the browser as a result of executing an initial request.
Phase 1 : Restore view
In the RestoreView phase, JSF classes build the tree of UI components for the incoming request.
  • When a request for a JavaServer Faces page is made, such as when a link or a button is clicked, the JavaServer Faces implementation begins the restore view phase.
  • This is one of the trickiest parts of JSF: The JSF framework controller uses the view ID (typically JSP name) to look up the components for the current view. If the view isn’t available, the JSF controller creates a new one. If the view already exists, the JSF controller uses it. The view contains all the GUI components and there is a great deal of state management by JSF to track the status of the view – typically using HTML hidden fields.
  • If the request for the page is an initial request, the JavaServer Faces implementation creates an empty view during this phase. Lifecycle only executes the restore view and render response phases because there is no user input or actions to process.
  • If the request for the page is a postback, a view corresponding to this page already exists. During this phase, the JavaServer Faces implementation restores the view by using the state information saved on the client or the server. Lifecycle continues to execute the remaining phases.
  • Fortunately this is the phase that requires the least intervention by application code.
Phase 2 : ApplyRequest values
During ApplyRequest values, the request parameters are read and their values are used to set the values of the corresponding UI components. This process is called decoding.
  • If the conversion of the value fails, an error message associated with the component is generated and queued on FacesContext. This message will be displayed during the render response phase, along with any validation errors resulting from the process validations phase.
  • If some components on the page have their immediate event handling property is set to true, then the validation, conversion, and events associated with these components takes place in this phase instead of the Process Validations phase. For example, you could have a Cancel button that ignores all values on a form.
Phase 3 : Process validations
The Apply Validations phase triggers calls to all registered validators.
  • The components validate the new values coming from the request against the application's validation rules.
  • Any input can be scanned by any number of validators.
  • These Validators can be pre-defined or defined by the developer.
  • Any validation errors will abort the request–handling process and skip to rendering the response with validation and conversion error messages.
Phase 4 : Update Model Values
The Update Model phase brings a transfer of state from the UI component tree to any and all backing beans, according to the value expressions defined for the components themselves.
  • It is in this phase that converters are invoked to parse string representations of various values to their proper primitive or object types. If the data cannot be converted to the types specified by the bean properties, the life cycle advances directly to the render response phase so that the page is re-rendered with errors displayed.
  • Note: The difference between this phase and Apply Request Values - that phase moves values from client–side HTML form controls to server–side UI components; while in this phase the information moves from the UI components to the backing beans.
Phase 5 : Invoke Application
The Invoke Application phase handles any application-level events. Typically this takes the form of a call to process the action event generated by the submit button that the user clicked.
  • Application level events handled
  • Application methods invoked
  • Navigation outcome calculated

Phase 6 : Render Response
Finally, Render Response brings several inverse behaviors together in one process:
  • Values are transferred back to the UI components from the bean. Including any modifications that may have been made by the bean itself or by the controller.
  • The UI components save their state – not just their values, but other attributes having to do with the presentation itself. This can happen server–side, but by default state is written into the HTML as hidden input fields and thus returns to the JSF implementation with the next request.
  • If the request is a postback and errors were encountered during the apply request values phase, process validations phase, or update model values phase, the original page is rendered during this phase. If the pages contain message or messages tags, any queued error messages are displayed on the page.
Process Events
In this phase, any events that occurred during the previous phase are handled.
  • Each Process Events phase gives the application a chance to handle any events (for example, validation failures) that occurred during the previous phase.
Note: Sometimes, an application might need to redirect to a different web application resource, such as a web service, or generate a response that does not contain JavaServer Faces components. In these situations, the developer must skip the rendering phase (Render Response Phase) by calling FacesContext.responseComplete. This situation is also shown in the diagram, with ProcessEvents pointing to the response arrow.

JSF Setup
Now that we have a general overview of JavaServer Faces and a basic understanding of the JSF lifecycle, let's get started with some code.
There are more than one JSF implementations available in market. Some of them are:

  • Sun (RI) (default)
  • Apache MyFaces
  • IBM
  • Simplica (based on Apache MyFaces)
  • Additionally, there are several 3rd party UI components that should run with any implementation.
For our simple application we use Sun (RI) default implementation.

Before you can dive into a full-fledged example, you must lay some groundwork. i.e., configuring your environment to work with JSF. First, you need to get the JSF library files.

  • jsf-api.jar
  • jsf-impl.jar
You should place these two JSF JAR files (jsf-api.jar and jsf-impl.jar) in the application's classpath, either in the Web app's lib directory or in the server's classpath. The next thing we'll need to do is download the dependencies our simple project will have. Here are the jar files (apart from above two jars) you will need in your WEB-INF/lib:
  • jstl.jar
  • standard.jar
  • commons-beanutils.jar
  • commons-collections.jar
  • commons-digester.jar
  • commons-logging.jar
Alternatively, use Ant or Maven to only include these jars when you are testing.

Note: Even though, JSF applications typically use JSP tags implemented by the JSF implementation, there are no separate tag library descriptor (TLD) files because that information is contained in the jar files.


When working with JSF, you will have a minimum of two XML configuration files, and you will often have even more (ex: tiles.xml). It is important that you become familiar with these config files, as they are the key to the flexibility and loose coupling provided by this architecture.
  • Faces config (faces-config.xml) : JavaServer Faces configuration file. Place this file in the WEB-INF directory. This file lists bean resources and navigation rules.
  • Web config (web.xml): This is your standard Web configuration file.

Wednesday, July 28, 2010

The Agile System Development Life Cycle (SDLC)

The Agile System Development Life Cycle (SDLC)
I'm often asked to over viewing the ideas presented in the  Agile Manifesto and agile techniques such as  Test-Driven Design (TDD),  database re factoring, and  agile change management. One issue that many people seem to struggle with is how all of these ideas fit together, and invariably I found myself sketching one or more pictures which overview the life cycle for agile software development projects.  I typically need one or more pictures because the scope of life cycles change -- some life cycles address just the construction life cycle, some address the full development life cycle, and some even address the full IT life cycle.  Depending on your scope, and how disciplined your approach to agile software development is, you will get different life cycle diagrams.

This article covers:
# 1: The scope of life cycles
# 2: Iteration -1: Pre-project planning
# 3: Iteration 0: Project inception
# 4: Construction iterations
# 5: Release iterations
# 6: Production
# 7: Retirement


1. The Scope of Life Cycles:
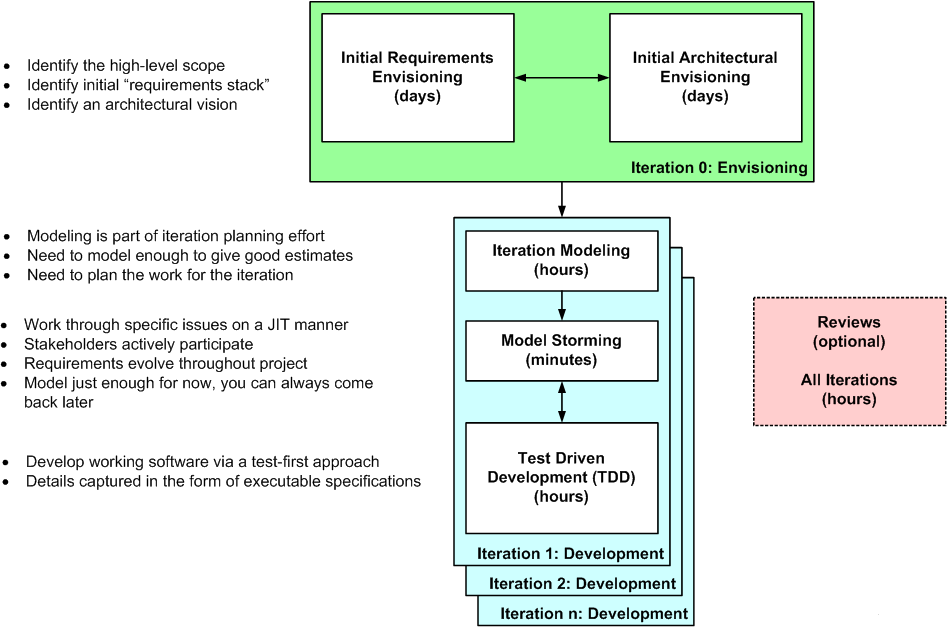
In Enterprise Unified Process (EUP) the scope of life cycles can vary dramatically.  For example, Figure 1 depicts the Scrum construction life cycle whereas Figure 2 depicts an extended version of that diagram which covers the full system development life cycle (SDLC) and Figure 3 extends that further by addressing enterprise-level disciplines via the EUP life cycle.  The points that I'm trying to make are:
  • System development is complicated: Although it's comforting to think that development is as simple as Figure 1 makes it out to be, the fact is that we know that it's not.  If you adopt a development process that doesn't actually address the full development cycle then you've adopted little more than consultant ware in the end.  My experience is that you need to go beyond the construction life cycle of Figure 1 to the full SDLC of Figure 2 (ok, Retirement may not be all that critical) if you're to be successful

  • There's more to IT than development: To be successful at IT you must take a multi-system, multi-life cycle stage view as depicted in Figure 3.  The reality is that organizations have many potential projects in the planning stage (which I'll call Iteration -1 in this article), many in development, and many in production.
Figure 1 uses the terminology of the Scrum methodology.  The rest of this article uses the terminology popularized in the mid-1990s by the Unified Process (Sprint = Iteration, Backlog = Stack, Daily Scrum Meeting = Daily Meeting).  Figure 1 shows how agilists treat requirements like a prioritized stack, pulling just enough work off the stack for the current iteration (in Scrum iterations/sprints are often 30-days long, although this can vary).  At the end of the iteration the system is demoed to the stakeholders to verify that the work that the team promised to do at the beginning of the iteration was in fact accomplished.

The Scrum construction life cycle of Figure 1, although attractive proves to be a bit naive in practice. It's actually the result of initial requirements envisioning early in the project.  You don't only implement requirements during an iteration, you also fix defects (disciplined agile teams have a parallel testing effort during construction iterations where these defects are found), go on holiday, support other teams (perhaps as reviewers of their work), and so on.  So you really need to expand the product backlog into a full work items list.  You also release your system into production, often a complex endeavor.
A more realistic life cycle is captured Figure 2, over viewing the full agile SDLC.  This SDLC is comprised of six phases: Iteration -1, Iteration 0/Warm Up, Construction, Release/End Game, Production, and Retirement.  Although many agile developers may talk at the idea of phases, it's been recognized that processes such as Extreme Programming (XP) and Agile Unified Process (AUP) do in fact have phases.  The Disciplined Agile Delivery (DAD) lifecycle also includes phases (granted, I lead the development of DAD).
Figure 2
Figure 3
Figure 4

On the surface, the agile SDLC of Figure 4 looks very much like a traditional SDLC, but when you dive deeper you quickly discover that this isn't the case.  This is particularly true when you consider the detailed view of Figure 2.  Because the agile SDLC is highly collaborative, iterative, and incremental the roles which people take are much more robust than on traditional projects.  In the traditional world a business analyst created a requirements model that is handed off to an architect  who creates design  models that are handed off to a coder who writes programs which are handed off to a tester and so on.  On an agile project, developers work closely with their stakeholders to understand their needs, they pair together to implement and test their solution, and the solution is shown to the stakeholder for quick feedback.  Instead of specialists handing artifacts to one another, and thereby injecting defects at every step along the way, agile developers are generalizing specialists with full life cycle skills.

2. Iteration-1: Pre-Project Planning
Iteration -1, the “pre-Inception phase” in the Enterprise Unified Process (EUP), is the pre-project aspects of portfolio management.  During this phase you will:
  • Define the business opportunity:  You must consider the bigger business picture and focus on market concerns.  This includes exploring how the new functionality will improve your organization’s presence in the market, how it will impact profitability, and how it will impact the people within your organization.  This exploration effort should be brief, not all projects will make the initial cut so you only want to invest enough effort at this point to get a good “gut feel” for the business potential.  A good strategy is to follow Outside-In Development’s focus on identifying the potential stakeholders and their goals, key information to help identify the scope of the effort.
  • Identify a viable for the project: There are several issues to consider when identifying a potential strategy for the project.  For example, do you build a new system or buy an existing package and modify it?  If you decide to build, do you do so onshore or offshore?  Will the work be solely done by your own development team, by a team from a system integrator (SI), or in partnership with the SI?  What development paradigm – traditional/waterfall, iterative, or agile – will you follow?  Will the team be co-located, near-located within the same geographic region, or far-located around the world?   As you can see there are many combination of strategy available to you, and at this point in time you may only be able to narrow the range of the possibilities but be forced to leave the final decision to the project team in future iterations.
  • Assess the feasibility: During Iteration -1 you will want to do just enough feasibility analysis to determine if it makes sense to invest in the potential project.  Depending on the situation you may choose to invest very little effort in considering feasibility, for many systems just considering these issues for a few minutes is sufficient for now, and for some systems you may choose to invest days if not weeks exploring feasibility.  Many organizations choose to do just a little bit of feasibility analysis during Iteration -1, and then if they decide to fund the project they will invest more effort during Iteration 0.  In my experience you need to consider four issues when exploring feasibility: economic feasibility, technical feasibility, operational feasibility, and political feasibility.   Your feasibility analysis efforts should also produce a list of potential risks and criteria against which to make go/no-go decisions at key milestone points during your project.  Remember that agile teams only have a success rate of 72%, compared to 63% for traditional projects, implying that almost 30% of agile projects are considered failures.  Therefore you should question the feasibility of the project throughout the life cycle to reduce overall project risk.
Iteration -1 activities can and should be as agile as you can possibly make it – you should collaborate with stakeholders who are knowledgeable enough and motivated enough to consider this potential project and invest in just enough effort to decide whether to consider funding the effort further. 

3. Iteration 0/Warm up: Project Initiation
The first week or so of an agile project is often referred to as “Iteration 0” (or "Cycle 0") or in The Eclipse Way the "Warm Up" iteration.  Your goal during this period is to initiate the project by:
  • Garnering initial support and funding for the project: This may have been already achieved via your portfolio management efforts, but realistically at some point somebody is going to ask what are we going to get, how much is it going to cost, and how long is it going to take. You need to be able to provide reasonable, although potentially evolving, answers to these questions if you're going to get permission to work on the project.  You may need to justify your project via a feasibility study.
  • Actively working with stakeholders to initially model the scope of the system: As you see in Figure 5, during Iteration 0 agilists will do some initial requirements modeling with their stakeholders to identify the initial, albeit high-level, requirements for the system.  To promote active stakeholder participation you should use inclusive tools, such as index cards and white boards to do this modeling – our goal is to understand the problem and solution domain, not to create mounds of documentation.  The details of these requirements are modeled on a just in time (JIT) basis in model storming sessions during the development cycles.
  • Starting to build the team: Although your team will evolve over time, at the beginning of a development project you will need to start identifying key team members and start bringing them onto the team.  At this point you will want to have at least one or two senior developers, the project coach/manager, and one or more stakeholder representatives.
  • Modeling an initial architecture for the system: Early in the project you need to have at least a general idea of how you're going to build the system.  Is it a mainframe COBOL application?  A .Net application?  J2EE?  Something else?  As you see in Figure 5, the developers on the project will get together in a room, often around a whiteboard, discuss and then sketch out a potential architecture for the system.  This architecture will likely evolve over time, it will not be very detailed yet (it just needs to be good enough for now), and very little documentation (if any) needs to be written.  The goal is to identify an architectural strategy, not write mounds of documentation.  You will work through the design details later during development cycles in model storming sessions and via TDD.
  • Setting up the environment: You need workstations, development tools, a work area, .. for the team.  You don't need access to all of these resources right away, although at the start of the project you will need most of them.
  • Estimating the project: You'll need to put together an initial estimate for your agile project based on the initial requirements, the initial architecture, and the skills of your team.  This estimate will evolve throughout the project.
Figure 5
4. Construction Iteration:
During construction iterations agilists incrementally deliver high-quality working software which meets the changing needs of our stakeholders, as over viewed in Figure 6.
Figure 6

We achieve this by:
  • Collaborating closely with both our stakeholders and with other developers: We do this to reduce risk through tightening the feedback cycle and by improving communication via closer collaboration.
  • Implementing functionality in priority order: We allow our stakeholders to change the requirements to meet their exact needs as they see fit.  The stakeholders are given complete control over the scope, budget, and schedule – they get what they want and spend as much as they want for as long as they’re willing to do so.
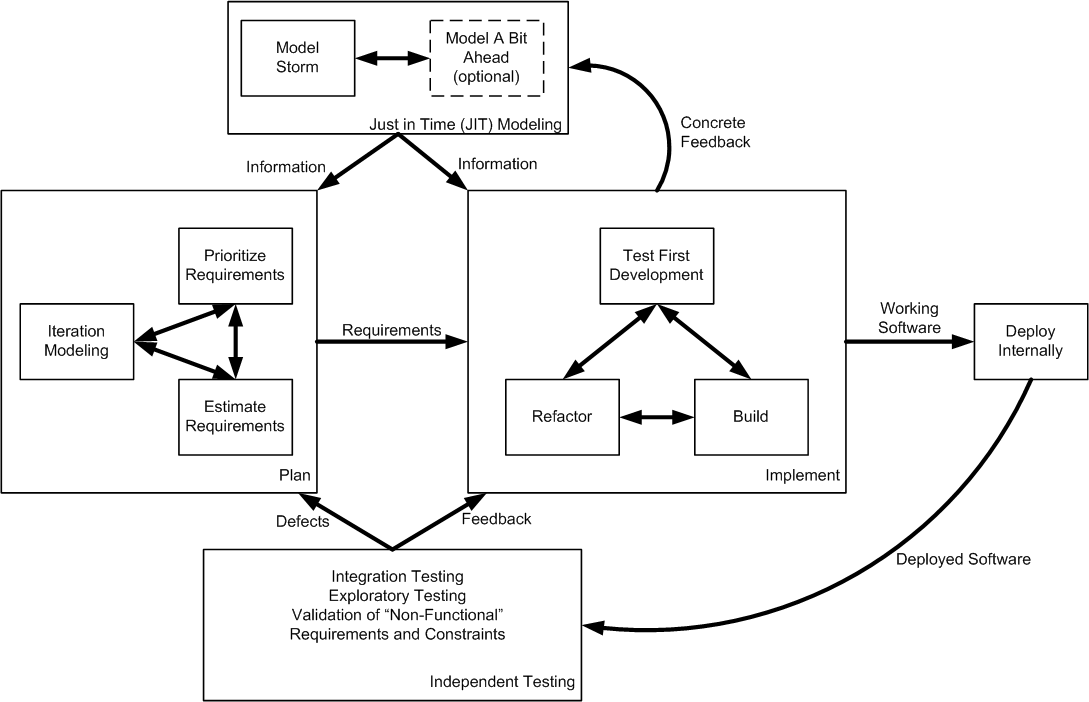
  • Analyzing and designing: We analyze individual requirements by model storming on a just-in-time (JIT) basis for a few minutes before spending several hours or days implementing the requirement.  Guided by our architecture models, often hand-sketched diagrams, we take a highly-collaborative, test-driven design (TDD) approach to development (see Figure 7) where we iteratively write a test and then write just enough production code to fulfill that test.  Sometimes, particularly for complex requirements or for design issues requiring significant forethought, we will model just a bit ahead to ensure that the developers don't need to wait for information.
  • Ensuring quality: Agilists are firm believers in following guidance such as coding conventions and modeling style guidelines.  Furthermore, we refactor our application code and/or our database schema as required to ensure that we have the best design possible.
  • Regularly delivering working software: At the end of each development cycle/iteration you should have a partial, working system to show people.  Better yet, you should be able to deploy this software into a pre-production testing/QA sandbox for system integration testing.  The sooner, and more often, you can do such testing the better.  See Agile Testing and Quality Strategies: Discipline Over Rhetoric for more thoughts.
  • Testing, testing, and yes, testing: As you can see in Figure 8 agilists do a significant amount of testing throughout construction.  As part of construction we do confirmatory testing, a combination of developer testing at the design level and agile acceptance testing at the requirements level.  In many ways confirmatory testing is the agile equivalent of "testing against the specification" because it confirms that the software which we've built to date works according to the intent of our stakeholders as we understand it today. This isn't the complete testing picture: Because we are producing working software on a regular basis, at least at the end of each iteration although ideally more often, we're in a position to deliver that working software to an independent test team for investigative testing.  Investigative testing is done by test professionals who are good at finding defects which the developers have missed.  These defects might pertain to usability or integration problems, sometimes they pertain to requirements which we missed or simply haven't implemented yet, and sometimes they pertain to things we simply didn't think to test for.
Figure 7: Taking "test first" approach to construction
Figure 8: Testing during Construction Iteration
5. Release Iteration(s): The "End Game"
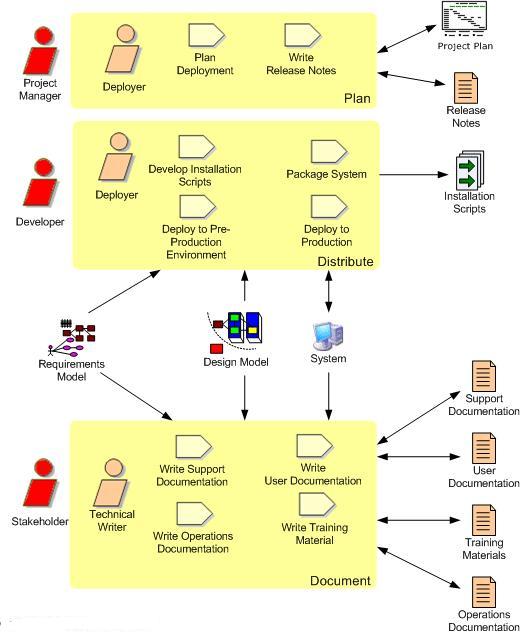
During the release iteration(s), also known as the "end game", we transition the system into production.  Not that for complex systems the end game may prove to be several iterations, although if you've done system and user testing during construction iterations (as indicated by Figure 6) this likely won't be the case.  As you can see in Figure 9, there are several important aspects to this effort:
  • Final testing of the system: Final system and acceptance testing should be performed at this point, although as I pointed out earlier the majority of testing should be done during construction iterations.  You may choose to pilot/beta test your system with a subset of the eventual end users.  Check Full Life Cycle Object-Oriented Testing (FLOOT) method for more thoughts on testing.
  • Rework: There is no value testing the system if you don't plan to act on the defects that you find.  You may not address all defects, but you should expect to fix some of them.
  • Finalization of any system and user documentation: Some documentation may have been written during construction iterations, but it typically isn't finalized until the system release itself has been finalized to avoid unnecessary rework  Note that documentation is treated like any other requirement: it should be costed, prioritized, and created only if stakeholders are willing to invest in it. Agilists believe that if stakeholders are smart enough to earn the money then they must also be smart enough to spend it appropriately.
  • Training.
  • Deploy the system
Figure 9: The AUP Deployment discipline Workflow
6. Production:
The goal of the Production Phase is to keep systems useful and productive after they have been deployed to the user community. This process will differ from organization to organization and perhaps even from system to system, but the fundamental goal remains the same: keep the system running and help users to use it. Shrink-wrapped software, for example, will not require operational support but will typically require a help desk to assist users. Organizations that implement systems for internal use will usually require an operational staff to run and monitor systems.

This phase ends when the release of a system has been slated for retirement or when support for that release has ended. The latter may occur immediately upon the release of a newer version, some time after the release of a newer version, or simply on a date that the business has decided to end support.  This phase typically has one iteration because it applies to the operational lifetime of a single release of your software. There may be multiple iterations, however, if you defined multiple levels of support that your software will have over time.

7. Retirement:
The goal of the Retirement Phase is the removal of a system release from production, and occasionally even the complete system itself, an activity also known as system decommissioning or system sun setting.  Retirement of systems is a serious issue faced by many organizations today as legacy systems are removed and replaced by new systems.  You must strive to complete this effort with minimal impact to business operations.  If you have tried this in the past, you know how complex it can be to execute successfully.  System releases are removed from production for several reasons, including:
  • The system is being complete replaced: It is not uncommon to see homegrown systems for human resource functions being replaced by COTS systems such as SAP or Oracle Financial s.
  • The release is no longer to be supported: Sometimes organizations will have several releases in production at the same time, and over time older releases are dropped.
  • The system no longer needed to support the current business model: A organization may explore a new business area by developing new systems only to discover that it is not cost effective.
  • The system is redundant: Organizations that grow by mergers and/or acquisitions often end up with redundant systems as they consolidate their operations.
  • The system has become obsolete.
In most cases, the retirement of older releases is a handled during the deployment of a newer version of the system and is a relatively simple exercise.  Typically, the deployment of the new release includes steps to remove the previous release.  There are times, however, when you do not retire a release simply because you deploy a newer version.  This may happen if you can not require users to migrate to the new release or if you must maintain an older system for backward compatibility.

New in Spring 3

Changes in Spring 3

The framework modules have been revised and are now managed separately with one source-tree per module jar:
1. org.springframework.aop
2. org.springframework.beans
3. org.springframework.context
4. org.springframework.context.support
5. org.springframework.expression
6. org.springframework.instrument
7. org.springframework.jdbc
8. org.springframework.jms
9. org.springframework.orm
10. org.springframework.oxm
11. org.springframework.test
12. org.springframework.transaction
13. org.springframework.web
14. org.springframework.web.portlet
15. org.springframework.web.servlet
16. org.springframework.web.struts
Note: The spring.jar artifact that contained almost the entire framework is no longer provided.


We are now using a new Spring build system as known from Spring Web Flow 2.0. This gives us:
1. Ivy-based "Spring Build" system
2. consistent deployment procedure
3. consistent dependency management
4. consistent generation of OSGi manifests


Overview of new Features
This is a list of new features for Spring 3.0. We will cover these features in more detail later in this section.
• Spring Expression Language
• IoC enhancements/Java based bean metadata
• General-purpose type conversion system and field formatting system
• Object to XML mapping functionality (OXM) moved from Spring Web Services project
• Comprehensive REST support
• @MVC additions
• Declarative model validation
• Early support for Java EE 6
• Embedded database support


Core APIs updated for Java 5:
BeanFactory interface returns typed bean instances as far as possible:
• T getBean(Class requiredType)
• T getBean(String name, Class requiredType)
• Map getBeansOfType(Class type)


Spring's TaskExecutor interface now extends java.util.concurrent.Executor.
• extends AsyncTaskExecutor supports standard Callables with Futures.


New Java 5 based converter API and SPI:
• stateless ConversionService and Converters
• superseding standard JDK PropertyEditors
Typed ApplicationListener


Spring Expression Language:
Spring introduces an expression language which is similar to Unified EL in its syntax but offers significantly more features. The expression language can be used when defining XML and Annotation based bean definitions and also serves as the foundation for expression language support across the Spring portfolio.


The Spring Expression Language was created to provide the Spring community a single, well supported expression language that can be used across all the products in the Spring portfolio.


The following is an example of how the Expression Language can be used to configure some properties of a database setup
This functionality is also available if you prefer to configure your components using annotations:
 - - - - - - - - - - - - - - - - - - - - - - - - - -- - - - - - - - - - - - - - - - - - - - - -
@Repository
public class RewardsTestDatabase {
   @Value("#{systemProperties.databaseName}")
   public void setDatabaseName(String dbName) { … }
   @Value("#{strategyBean.databaseKeyGenerator}")
    public void setKeyGenerator(KeyGenerator kg) { … }
}
- - - - - - - - - - - - - - - - - - - - - - - - - -- - - - - - - - - - - - - - - - - - - - - - - -
The Inversion of Control (IoC) container:
• Java based Bean metadata
Some core features from the JavaConfig project have been added to the Spring Framework now. This means that the following annotations are now directly supported:
@Configuration
@Bean
@DependsOn
@Primary
@Lazy
@Import
@ImportResource
@Value
Here is an example of a Java class providing basic configuration using the new JavaConfig features:
- - - - - - - - - - - - - - - - - - - - - - - - - -- - - - - - - - - - - - - - - - - - - - - -
package org.example.config;
@Configuration
public class AppConfig {
   private @Value("#{jdbcProperties.url}") String jdbcUrl;
   private @Value("#{jdbcProperties.username}") String username;
   private @Value("#{jdbcProperties.password}") String password;


   @Bean
   public FooService fooService() {
      return new FooServiceImpl(fooRepository());
   }
   @Bean
   public FooRepository fooRepository() {
      return new HibernateFooRepository(sessionFactory());
   }
   @Bean
   public SessionFactory sessionFactory() {
      // wire up a session factory
      AnnotationSessionFactoryBean asFactoryBean = new AnnotationSessionFactoryBean();
      asFactoryBean.setDataSource(dataSource());
    // additional config
   return asFactoryBean.getObject();
   }
   @Bean
   public DataSource dataSource() {
      return new DriverManagerDataSource(jdbcUrl, username, password);
   }
}
- - - - - - - - - - - - - - - - - - - - - - - - - -- - - - - - - - - - - - - - - - - - - -
To get this to work you need to add the following component scanning entry in your minimal application context XML file.


Or you can bootstrap a @Configuration class directly using AnnotationConfigApplicationContext:
- - - - - - - - - - - - - - - - - - - - - - - - - - - - - - - - - - - - - - - - - - - - - -
public static void main(String[] args) {
   ApplicationContext ctx = new AnnotationConfigApplicationContext(AppConfig.class);
   FooService fooService = ctx.getBean(FooService.class);
   fooService.doStuff();
}
- - - - - - - - - - - - - - - - - - - - - - - - - -- - - - - - - - - - - - - - - - - - -
• Defining bean metadata within components:
@Bean annotated methods are also supported inside Spring components. They contribute a factory bean definition to the container.


• The Data Tier: Object to XML mapping functionality (OXM) from the Spring Web Services project has been moved to the core Spring Framework now


• The Web Tier: The most exciting new feature for the Web Tier is the support for building RESTful web services and web applications. There are also some new annotations that can be used in any web application.
      o Comprehensive REST support:
Server-side support for building RESTful applications has been provided as an extension of the existing annotation driven MVC web framework. Client-side support is provided by the RestTemplate class in the spirit of other template classes such as JdbcTemplate andJmsTemplate. Both server and client side REST functionality make use of HttpConverters to facilitate the conversion between objects and their representation in HTTP requests and responses.
The MarshallingHttpMessageConverter uses the Object to XML mapping functionality mentioned earlier.
    o @MVC additions:
A mvc namespace has been introduced that greatly simplifies Spring MVC configuration.
Additional annotations such as @CookieValue and @RequestHeaders have been added.


• Declarative Model Validation: Several validation enhancements, including JSR 303 support that uses Hibernate Validator as the default provider.


• Early Support for Java EE 6:
We provide support for asynchronous method invocations through the use of the new @Async annotation (or EJB 3.1's @Asynchronous annotation). JSR 303, JSF 2.0, JPA 2.0, etc


• Support for embedded database: Convenient support for embedded Java database engines, including HSQL, H2, and Derby, is now provided.

Tuesday, July 27, 2010

Oracle Weblogic 11/12


Install Java
Download Java bin file from Oracle Java Web Site run following command to install it over Linux system.
$ sudo ./jdk-6u32-linux-x64.bin

After installation, say java got installed at following directory with JAVA_HOME as follows:
JAVA_HOME=/var/cemp/hsd/mediation/jdk1.6.0_32
Set Environment variable:
$ JAVA_HOME=/var/cemp/hsd/mediation/jdk1.6.0_32
$ PATH=/usr/local/bin:/usr/kerberos/bin:/usr/local/bin:/bin:/usr/bin:/opt/dell/srvadmin/bin:/home/cemp/bin:/opt/oracle/product/10.2.0/db_1/bin:.:
$ PATH=$JAVA_HOME/bin:$PATH
$ export PATH
$ echo $PATH

Install Weblogic
Download Weblogic installable from Oracle Weblogic Web Site.
$ sudo java -d64 -Djava.io.tmpdir=/logs -jar wls1036_generic.jar 
[Bold: changed the temp location to overcome root space restriction].

For example we want to install weblogic (Middleware_home) at following location:
(Middleware Home) MW_Home=/var/cemp/hsd/mediation/bea11
   1|WebLogic Server: [/var/cemp/hsd/mediation/bea11/wlserver_10.3]
   2|Oracle Coherence: [/var/cemp/hsd/mediation/bea11/coherence_3.7]

$ cd ${MW_Home}/utils/config/10.3
./setHomeDirs.sh

- - - - - - - - - - - - - - 
MW_HOME="/var/cemp/hsd/mediation/bea11"
WL_HOME="/var/cemp/hsd/mediation/bea11/wlserver_10.3"

- - - - - - - - - - - - - -

Domain Creation
Go to following directory:
$ cd ${WL_HOME}/wlserver_10.3/common/bin
 $ ./config.sh

<------------------- Fusion Middleware Configuration Wizard ------------------>
Welcome:
--------
Choose between creating and extending a domain. Based on your selection,
the Configuration Wizard guides you through the steps to generate a new or
extend an existing domain.
*   1 |Create a new WebLogic domain
       |    Create a WebLogic domain in your projects directory.
   2  |Extend an existing WebLogic domain
       |    Use this option to add new components to an existing domain and modify     

     |    configuration settings.
1. Select Domain Source: Choose Weblogic Platform components
2. Application Template Selection: Available Template
    Available Templates
    |_____Basic WebLogic Server Domain - 10.3.6.0 [wlserver_10.3]x
    |_____Basic WebLogic SIP Server Domain - 10.3.6.0 [wlserver_10.3] [2] x
    |_____WebLogic Advanced Web Services for JAX-RPC Extension - 10.3.6.0 [wlserver_10.3] [3] x
    |_____WebLogic Advanced Web Services for JAX-WS Extension - 10.3.6.0 [wlserver_10.3] [4] x

3. Edit Domain Information:
---------------------------
    |  Name     | Value  |
__|________|______ |_
  1| *Name:  | aspen   |

4.Select the target domain directory for this domain:
Target Location: "/var/cemp/hsd/mediation/bea11/user_projects/domains"

5. Configure Administrator User Name and Password:
______________________________________
      |          Name                      |    Value              |
___|_____________________|_____________ |_
   1|         *Name:                     |  weblogic          |
   2|     *User password:           | ***********    |
   3| *Confirm user password: | ***********    |

   4|      Description:                 |   asusual            |
------------------------------------------------- 
6. Domain Mode Configuration:
*  1|Development Mode
    2|Production Mode

7. Java SDK Selection:
 * 1|Sun SDK 1.6.0_32 @ /var/cemp/hsd/mediation/jdk1.6.0_32
    2|Other Java SDK

8. Select Optional Configuration: [Optional-can be configured later, but also can be configured from here]
   1|Administration Server [ ]
   2| [ ]
   3|Managed Servers, Clusters and Machines [ ]
   4|Deployments and Services [ ]
   5|JMS File Store [ ]
   6|RDBMS Security Store [ ]

Creating Domain...
0%          25%          50%          75%          100%
[------------|------------|------------|------------]
[***************************************************]
**** Domain Created Successfully! ****


This will create domain aspen
Start Weblogic & Node Manager
Domain Home: ${MW_Home}/user_projects/domainsDomain Name: aspen
Start Node Manager:
$ cd {MW_Home}/wlserver_10.3/server/bin
bin]$ nohup ./startNodeManager.sh > nohup.out &
Start WebLogic Admin Server:
$ cd ${Domain_Home}/aspen/bin
./setDomainEnv.sh
bin]$ nohup ./startWebLogic.sh > nohup.out &


JAVA_HOME=/home/aupm/neps/jdk1.6.0_33
PATH=$JAVA_HOME/bin:$PATH
export PATH

export CLASSPATH=/home/aupm/neps/weblogic_10.3.6/wlserver_10.3/server/lib/weblogic.jar:

java weblogic.WLST
connect('weblogic','weblogic123','t3://vivpfmwc03.westchester.pa.bo.comcast.net:9001')
nmEnroll('/home/aupm/neps/weblogic_10.3.6/user_projects/domains/base_domain','/home/aupm/neps/weblogic_10.3.6/wlserver_10.3/common/nodemanager') 
.
disconnect()


dumpStack()   // very useful command in times :)


Weblogic Console
http://AdminAddress:AdminPort/console 
Domain: aspen
Console User / Password: weblogic /weblogic123

0.1. Create A New Machine:A. Name: Machine1 / OS : UNIX
B. Type: SSL, Listen Address: 147.191.113.124, Listen Port: 5556, Debug Enabled: Checked


1.1. Create a New Cluster:
A. Name: Cluster-1, Messaging Mode: Unicast, Multicast Address: 239.192.0.0, Multicast Port: 7001
1.2. Create a New Server:

A. Server Name: Server-1, Server Listen Address: 147.191.113.124, Server Listen Port: 7011, Yes Make this server belong to Existing Cluster: 1.1.Name,
#1. Cluster-1 - Server-1 : Coherence
#2. Cluster-2 - Server-2 : DataSource
#3. Cluster-3 - Server-3 : Application Deployment

2.1. Create Coherence Cluster Configuration:
A. Name: Coherence-Cluster
B. Unicast Listen Address: 147.191.113.124, Unicast Listen Port: 8888, Multicast Listen Address: 231.1.1.1, Multicast Listen Port: 7777
C. Target: 1.1.Name (Cluster-1)
2.2. Create Coherence Server Configuration:

A. Name: Coherence-Server-1, Machine: 0.1.Name, Cluster: 2.1.Name, Unicast Listen Address: 147.191.113.124, Unicast Listen Port: 8888, Unicast Port Auto Adjust: Checked

Admin Port: 7001
Cluster-1-Server-1: Coherence: 7011, 7012 (https)
Cluster-2-Server-2: Coherence: 7021, 7022 (https)
Cluster-3-Server-3: Coherence: 7031, 7032(https)


${Domain_Home}/aspen/servers/Server-1
${Domain_Home}/aspen/servers/Server-2
${Domain_Home}/aspen/servers/Server-3
${Domain_Home}/aspen/servers/AdminServer
${Domain_Home}/aspen/servers/domain_bak


Common Errors
Problem 0.[Management:141266]Parsing Failure in config.xml: java.lang.AssertionError: java.lang.ClassNotFoundException: com.bea.wcp.sip.management.descriptor.beans.SipServerBean - While starting the Managed Server.
Solution: Update nodemanager.properties: ${MW_Home}/wlserver_10.3/common/nodemanager/nodemanager.properties

- - - - - - - - - - - - - - - - - - - - - - - - - - - - - - - - - - - - - - - - - - - - -
DomainsFile=/var/cemp/hsd/mediation/bea11/wlserver_10.3/common/nodemanager/nodemanager.domains
StartScriptEnabled=true
- - - - - - - - - - - - - - - - - - - - - - - - - - - - - - - - - - - - - - - - - - - -

Explanation:
You have to make sure this class is in the classpath: com.bea.wcp.sip.management.descriptor.beans.SipServerBean.
You have to edit the nodemanager.properties file and set the variable StartScriptEnabled=true instead of the default false.
The nodemanager.properties file is usually located in the directory: /wlserver_10.3/common/nodemanager. Now the nodemanager uses the start script usually startWebLogic, which calls the setDomainEnv in which the classpath for the SIP server is set. When you use the startManagedServer command the setDomainEnv is called so the classpath is set.


Problem 1: Exception in thread "main" java.lang.NoClassDefFoundError: weblogic/nodemanager/server/provider/WeblogicCacheServer
Solution 1: The process should be able to find correct classpath by default, we might hit this issue in some cases over *nix system, where we set some thing in classpath (or it's not empty), solution to this issue is set coherence.jar and coherence.server_.jar as follows:
 ${COHERENCE_HOME}/lib/coherence.jar:${COHERENCE_HOME}/modules/features/weblogic.server.modules.coherence.server_.jar: [along with other files we want to set in classpath]
Once the server started the Log file for the coherence server exists on the file system as follows: $DOMAIN_HOME/servers_coherence/{COHERENCE_SERVER_NAME}/logs/{COHERENCE_SERVER_NAME}.out
PID of the server is found here, i normally add that to the log file, but it's not possible when we start it from console.
$DOMAIN_HOME/servers_coherence/{COHERENCE_SERVER_NAME}/data/nodemanager/{COHERENCE_SERVER_NAME}.pid

Problem 2: Coherence*Web, exception on RedHat Linux, but not on windows and Debian: [weblogic.application.ModuleException: Missing Coherence jar or WebLogic Coherence Integration jar]:
Solution 2: Taking a look at the Module Exception, the coherence.jar is part of counter.war application, and the Weblogic.coherence.integration.jar is declared with the active-cache-[version].jar lib which is refrenced by MANIFEST.MF of the counter application.
The entire issue was that the MANIFEST.MF in the counter.war was named as "manifest.mf". Therefore the RedHat Linux could not recognize it simpl due to the naming issues. So make sure that manifest file name is "MANIFEST.MF" and declares to active-cache.jar which should be deployed as a lib on servers (can be bundled in Application/APP-INF/lib or 'as seperate application library deployed on same cluster')
This was solved by executing the following steps:
a) Explode the counter.war application.
b) Go to Counter.war application
c) Rename the manifest.mf to MANIFEST.MF
d) Deploy as open directory or compact back to war file and deploy.

Problem 3: Sample Configuration file for weblogic 12C
4 Managed Server on 4 Machine:
Managed Server 1:Server 1 => Arguments:
-Dtangosol.coherence.override=/home/aupm/neps/usageCache/client/tangosol-coherence-p1-override.xml -Dtangosol.coherence.cacheconfig=/home/aupm/neps/usageCache/usage-cache-config.xml
-Desp.propDir=/home/aupm/neps/usageCache/props
-Desp.logDir=/home/aupm/neps/usageCache/logs
-Dtangosol.coherence.management=all
-Dcom.sun.management.jmxremote


Coherence 1: => Classpath:
/home/aupm/neps/usageCache/UsageCacheModel-12.08-SNAPSHOT.jar:/home/aupm/neps/weblogic_10.3.6/coherence_3.7/lib/coherence.jar:/home/aupm/neps/weblogic_10.3.6/modules/features/weblogic.server.modules.coherence.server_10.3.5.0.jar:
Coherence 1: =&gt; Arguments:
-Dtangosol.coherence.override=/home/aupm/neps/usageCache/server/tangosol-coherence-p1-override.xml
-Dtangosol.coherence.cacheconfig=/home/aupm/neps/usageCache/usage-cache-config.xml
-Dtangosol.coherence.cluster=aupm_usage_service
-Dtangosol.coherence.distributed.localstorage=true


Managed Server 2:Server 2 => Arguments:
-Dtangosol.coherence.override=/home/aupm/neps/usageCache/client/tangosol-coherence-p2-override.xml -Dtangosol.coherence.cacheconfig=/home/aupm/neps/usageCache/usage-cache-config.xml
-Desp.propDir=/home/aupm/neps/usageCache/props
-Desp.logDir=/home/aupm/neps/usageCache/logs
-Dtangosol.coherence.management=local-only
-Dtangosol.coherence.management.remote=true


Coherence 2: => Classpath:
/home/aupm/neps/usageCache/UsageCacheModel-12.08-SNAPSHOT.jar:/home/aupm/neps/weblogic_10.3.6/coherence_3.7/lib/coherence.jar:/home/aupm/neps/weblogic_10.3.6/modules/features/weblogic.server.modules.coherence.server_10.3.5.0.jar:

Coherence 2 =&gt; Arguments:
-Dtangosol.coherence.override=/home/aupm/neps/usageCache/server/tangosol-coherence-p2-override.xml
-Dtangosol.coherence.cacheconfig=/home/aupm/neps/usageCache/usage-cache-config.xml
-Dtangosol.coherence.cluster=aupm_usage_service
-Dtangosol.coherence.distributed.localstorage=true


Managed Server 3:Server 3 => Arguments:
-Dtangosol.coherence.override=/home/aupm/neps/usageCache/client/tangosol-coherence-p3-override.xml -Dtangosol.coherence.cacheconfig=/home/aupm/neps/usageCache/usage-cache-config.xml -Desp.propDir=/home/aupm/neps/usageCache/props -Desp.logDir=/home/aupm/neps/usageCache/logs
-Dtangosol.coherence.management=local-only
-Dtangosol.coherence.management.remote=true


Coherence 3: => Classpath:
/home/aupm/neps/usageCache/UsageCacheModel-12.08-SNAPSHOT.jar:/home/aupm/neps/weblogic_10.3.6/coherence_3.7/lib/coherence.jar:/home/aupm/neps/weblogic_10.3.6/modules/features/weblogic.server.modules.coherence.server_10.3.5.0.jar:

Coherence 3: =&gt; Arguments:
-Dtangosol.coherence.override=/home/aupm/neps/usageCache/server/tangosol-coherence-p3-override.xml
-Dtangosol.coherence.cacheconfig=/home/aupm/neps/usageCache/usage-cache-config.xml
-Dtangosol.coherence.cluster=aupm_usage_service
-Dtangosol.coherence.distributed.localstorage=true


Managed Server 4:Server 4 => Arguments:
-Dtangosol.coherence.override=/home/aupm/neps/usageCache/client/tangosol-coherence-p4-override.xml -Dtangosol.coherence.cacheconfig=/home/aupm/neps/usageCache/usage-cache-config.xml -Desp.propDir=/home/aupm/neps/usageCache/props -Desp.logDir=/home/aupm/neps/usageCache/logs
-Dtangosol.coherence.management=local-only
-Dtangosol.coherence.management.remote=true


Coherence 4:=> Classpath:
/home/aupm/neps/usageCache/UsageCacheModel-12.08-SNAPSHOT.jar:/home/aupm/neps/weblogic_10.3.6/coherence_3.7/lib/coherence.jar:/home/aupm/neps/weblogic_10.3.6/modules/features/weblogic.server.modules.coherence.server_10.3.5.0.jar:

Coherence 4: =&gt; Arguments:
-Dtangosol.coherence.override=/home/aupm/neps/usageCache/server/tangosol-coherence-p4-override.xml
-Dtangosol.coherence.cacheconfig=/home/aupm/neps/usageCache/usage-cache-config.xml
-Dtangosol.coherence.cluster=aupm_usage_service
-Dtangosol.coherence.distributed.localstorage=true


Problem 4:


Sunday, June 20, 2010

RSA - Public Private Key Algorithm - Cryptography

Rivest, Shamir and Adleman, the inventors of the algorithm. Rivest Shamir Adleman (RSA) Authentication Mechanism is used to simplify the security environment for the Flexible Management Topology. It supports the ability to securely and easily register new servers to the Flexible Management topology. With the Flexible Management topology, you can submit and manage administrative jobs, locally or remotely, by using a job manager that manages applications, performs product maintenance, modifies configurations, and controls the application server runtime. The RSA authentication mechanism is only used for server-to-server administrative authentication, such as admin connector and file transfer requests.

RSA Key Length:
When you create an RSA key pair, you specify a key length in bits, as generally you would for other algorithms. Specifically, the key length of an RSA key specifies the number of bits in the modulus. In this article we specified a key length of 2048 bits. But in practice, what RSA key length should we choose?

First the short answer:

  • A RSA key length of 1024 bits is sufficient for many medium-security purposes such as web site logins.
  • For high-security applications1 or for data that needs to remain confidential for more than a few years, you should use at least a 2048-bit key, and consider having a contingency plan for migrating to larger key sizes. 
  • To keep data confidential for more than the next two decades, RSA recommends a key size larger than 2048 bits (see below).
So, why not just make the key much longer, say 4096 bits or even 8192 bits? Well, as usual, there's no such thing as a free lunch. A larger key increases the maximum number of bytes that we can encrypt at once, and also the security of the encryption. But it has a serious problem in practice:
  • With every doubling of the RSA key length, decryption is 6-7 times times slower.
Figure 1 shows how decryption time increases with modulus length. The timings were made on a 2GHz Pentium.


Figure 1: RSA decryption time by key length.
The key length also affects the speed of encryption, but it's usually the speed of decryption that we're more concerned about because (a) that's the part that takes place on the server, and (b) decryption is much much slower than encryption, because the decryption exponent is huge (whereas the encryption exponent is typically small).
If we use a 4096-bit modulus, it takes around a second of CPU time to decrypt a block of data. Even if you were able to sacrifice this amount of CPU to every log on, it leaves us with the problem that an attacker can effectively burn a second of CPU time on our server by firing some random data at it. With a 1024-bit key length, decryption takes just 25 milliseconds; with suitable restrictions on the rate of login attemps (and thus decryptions) we allow per remote client, protecting against a "CPU burn" attack is more feasible.

How secure is an n-bit RSA key?
As ever, judging the security of a key of a given size is a complex issue. With current knowledge, "breaking" an RSA key by brute force effectively means factoring the modulus. The largest number that has been factored publically to date is RSA-640, a 640-bit number put up as a challenge by RSA and factored in 2005. This number took "only" around 350 CPU hours (using a cluster of 80 2.2 GHz Opterons). Put another way, you can rent that CPU time from Amazon for about 50 dollars. This is a simplistic view: it doesn't take into account memory and data transfer requirements. And the experimental software used by the team isn't exactly a "plug and play RSA cracker": it surely requires considerable configuration by somebody well versed in number theory.
Factoring RSA 512-bit keys is now squarely within the reach of anyone who is determined enough. As testimony to this, several 512-bit RSA keys used to sign the operating systems of Texas Instruments calculators were recently factored, reportedly within "several months".
So what about 1024-bit keys? Generally, this size will keep your data safe now from an adversary with modest resources. But it's not sufficient for keeping data confidential much into the future, or for keeping it secret from an adversary prepared to devote a few million dollars to the problem. To see why, we'll look below at some estimates on the difficulty of breaking 1024-bit RSA encryption.

One estimate is made by Shamir & Tromer (2003) in their hypothetical TWIRL device. They suggested that for "a few dozen million US dollars", a hardware device could be built to break a 1024-bit RSA key within around a year. Franke et al (2005) similarly estimate a cost of 200 million dollars2 for a machine to factorise a 1024-bit number in one year. If these cost estimates are accurate, it's safe to assume that the NSA has built such a machine (unless they have another way of breaking RSA more efficiently). And by Moore's Law alone, we'd assume that their machine takes considerably less than a year.

Based on Shamir & Tromer's estimate, Kaliski (2003)— see reference in footnote 1— recommends the following RSA key lengths depending on how long data is intended to remain confidential:


Recommended RSA key sizes depending on lifetime of confidential data.

Lifetime of dataRSA key size
Up to 20101024 bits
Up to 20302048 bits
Up to 2031 onwards3072 bits

Shamir & Tromer considered hardware because they estimated that a solution in software would not scale beyond around 500 bits. Thorsten Kleinjung (one of the tem that broke RSA-640) estimates that around 8.4 million CPU years are needed to factorise a 1024-bit number in software3 (his estimate is specifically 8.4 million uniprocessor PCs, taking into account memory and data transfer requirements). Using my favourite crude approximation, that's a million or so dollars of rented CPU time in 2009. It's not clear if and how this would scale to, say, several thousand 256-core machines (bearing in mind that that could be a fairly modest botnet by, say, 2020).
Ferguson & Schneier (2003) in Practical Cryptography are actually more conservative than the RSA recommendations:
    "The absolute minimum size for n is 2048 bits or so if you want to protect your data for 20 years. [...] If you can afford it in your application, let n be 4096 bits long, or as close to this size as you can get it." (p. 233)

They also recommend checking that your software supports keys up to 8192 bits, "just in case". To my knowledge, Sun's RSA implementation does in principle support this size, but at present it is impractical performance-wise.

RSA Encryption in Java
We introduced the notion of asymmetric encryption, in which a key needed to encrypt data is made public, but the corresponding key needed to decrypt it is kept private, for example in a file on the server to which clients connect. In principle, such a system solves the problem of how to send a temporary encryption key securely to the server when opening a secure connection*. A very common asymmetric encryption system is RSA, named after inventors Rivest, Shamir & Adleman.

*If we just used a symmetric encryption system such as AES on its own, we'd have the problem of how the two parties agree on the key in advance. This is sometimes possible, but usually, we want to transmit a temporary key at the moment of connecting. Generally, we use an asymmetric encryption system such as RSA to transmit the secret key, then for the rest of the conversation, use a regular symmetric encryption system using that secret key.

Basic algorithm and terminology:
RSA encryption and decryption are essentially mathematical operations. They are what are termed exponentiation, modulo a particular number. Because of this, RSA keys actually consist of numbers involved in this calculation, as follows:
  • The public key consists of the modulus and a public exponent.
  • The private key consists of that same modulus plus a private exponent.
Those interested in more details of the RSA algorithm should see this separate page.

Creating an RSA key pair in Java
As a one-off process, we need to generate an RSA key pair that from then on, we'll use for all conversations between our clients and server.
Creating an RSA key pair essentially consists of picking a modulus, which is based on two random primes intended to be unique to that key pair, picking a public exponent (in practice, the common exponent 65537 is often used), then calculating the corresponding private exponent given the modulus and public exponent. Java provides the KeyPairGenerator class for performing this task. The essential idea is as follows:
  • we create an instance of KeyPairGenerator suitable for generating RSA keys.
  • We initialise the generator, telling it the bit length of the modulus that we require (see below).
  • We call genKeyPair(), which eventually returns a KeyPair object.
  • We call getPublic() and getPrivate() on the latter to pull out the public and private keys.
The code looks as follows:
KeyPairGenerator kpg = KeyPairGenerator.getInstance("RSA");
kpg.initialize(2048);
KeyPair kp = kpg.genKeyPair();
Key publicKey = kp.getPublic();
Key privateKey = kp.getPrivate();


Notice that we specify a key length of 2048 bits. Common values are 1024 or 2048. Choosing an RSA key length is a tradeoff between security and performance.

We now have two Key objects. Whilst we could immediately use these to start encrypting and decrypting, in most practical uses, we want to store these two keys for later use. For that, we use a KeyFactory to pull out the components (modulus and exponents) of the keys.

Saving the public and private key
In practice, we need to store the public and private keys somewhere. Typically, the private key will be placed on our server, and the public key distributed to clients. To store the key, we simply need to pull out the modulus and the public and private exponents, then write these numbers to some file (or put in whatever convenient place).

The Key interface allows us to pretend for a second that we don't need to worry about the algorithm-specific details of keys. But unfortunately, in practice we do. So there also exist "key specification" classes— RSAPublicKeySpec and RSAPrivateKeySpec in this case— with transparent methods for pulling out the parameters that make up the key. Then, a KeyFactory allows us to translate between Keys and their corresponding specification. It's a bit clumsy, but the code ends up as follows:
KeyFactory fact = KeyFactory.getInstance("RSA");
RSAPublicKeySpec pub = fact.getKeySpec(kp.getPublic(), RSAPublicKeySpec.class);
RSAPrivateKeySpec priv = fact.getKeySpec(kp.getPrivate(), RSAPrivateKeySpec.class);
saveToFile("public.key", pub.getModulus(), pub.getPublicExponent());
saveToFile("private.key", priv.getModulus(), priv.getPrivateExponent());

To save the moduli and exponents to file, we can just use boring old serialization, since the modulus and exponents are just BigInteger objects:
public void saveToFile(String fileName, BigInteger mod, BigInteger exp) throws IOException {
  ObjectOutputStream oout = new ObjectOutputStream(new BufferedOutputStream(new FileOutputStream(fileName)));
  try {
    oout.writeObject(mod);
    oout.writeObject(exp);
  } catch (Exception e) {
    throw new IOException("Unexpected error", e);
  } finally {
    oout.close();
  }
}

In our example, we end up with two files: public.key, which is distributed with out clients (it can be packed into the jar, or whatever); meanwhile, private.key, is kept secret on our server. Of course, we needn't even bother saving the keys to a file: they're just numbers, and we could embed them as constant strings in our code, then pass those strings to the constructor of BigInteger. Saving the keys to file simply makes it a bit easier to manage keys in some cases (for example, we might change keys periodically and distribute new key files to the clients; distributing a few bytes is often more practical than distributing the entire code base).

Now we've got a mechanism to generate a key pair and save those keys for the future, we're ready to consider how to actually perform RSA encryption/decryption, reading in the key files we generated.

The RSA Algorithm:
For performing RSA encryption with Java, you luckily don't need to know all the gory details of how RSA works. But it's worth having an overview, at least so that you can understand the terminology. (Note that outside of Java, you do need to know some of these details to use RSA securely; luckily, at least Sun's implementation solves some potential security issues that you could otherwise run into if you just used RSA "without thinking about it".) OK, hold on to your hat...

Basic RSA equation:
The essential idea is as follows:
  • we pretend that our message to encrypt is a number (although conceptually, we want to encrypt/decrypt some arbitrary series of bytes, we can always put them together and treat them as a big number).
  • We pick two large prime numbers, call them p and q.
  • We multiply p and q together to form the modulus (n).
  • It is then mathematically possible to find two exponents, generally called e and d, so that.
    • med (mod n) = m (mod n) [where m is the number representing the message we want to encrypt.]
In other words, if we raise m to the power e, taking the answer modulo n, there exists some other number d, so that raising the result to d (and taking the answer modulo n again) gets us back to the original number. Thus, we have a way to perform encryption then decryption, each using a different number: e in one case and d in the other.

Using the RSA equation in practice
Once we've picked values for p and q (remember, these are random large primes), we need to pick suitable corresponding values for e and d. In practice, it's easiest to just use some small value of e that we know is suitable (65537 is commonly used), and then calculate the corresponding d. Then:
  • To encrypt a message, we calculate me (mod n).
  • To get back to the original message, the person on the other end will take this number and raise it again to the power d (overall, that means between them they'll have calculated med and gotten back to the original message).
  • The person encrypting needs to know only the values of e and n— these two numbers therefore become the public key. 
  • Only the person decrypting needs to know the value of d (and the value of n)— these two numbers therefore form the private key.
How to calculate d
The method of calculating d actually turns out to be the basis of the security of RSA:
It is mathematically easy to find d if and only if you know p and q, but otherwise, it is extremely difficult.
Remember that p and q are initially chosen by the person creating the key pair, but then these numbers are discarded (or at least, kept secret) once d has been calculated; only the result of multiplying the two numbers together (n = pq) is made public (along with e), and in practice, this multiplication cannot be undone if p and q are large enough.

Terminology
The following terminology is generally used, and is useful to know when working with the Java RSA classes:
  • n is called the modulus.
  • e is the public exponent.
  • d is the private exponent.
  • the public key consists of the pair (e, n).
  • the private key consists of the pair (d, n)— though in fact n is publically known.
Security of RSA
Purely in theory, RSA could be attacked as follows:
  • Somebody could factorise n to get the corresponding p and q, but there is no publically known way to factorise numbers efficiently, so that this becomes impossible in practice if n is sufficiently large (say, a few thousand bits). 
  • Somebody could come up with "some other way" of calculating d given e and n— again, no such method is known (or at least, not publically known) at present.
  • If the original message is predictable, somebody could make repeated guesses at the original message, calculating me (mod n) each time— where m is the guess in question— until the result matched the encrypted version.
To get round the latter problem, it is important to make sure that the message is unpredictable by appending random padding. Sun's implementation handles this (but another implementation might not by default). Adding padding also solves a problem with very short messages: if the message is so short that me is less than n, then an attacker can simply calculate the eth root of m to retrieve the message. (Once it exceeds n, and so the number is actually reduced modulo n, such a calculation isn't feasible.)

Symmetric Key Encryption in Java:
Having introduced the the notion of an encryption key, we turn our attention to symmetric-key encryption. This is the case where the same key is used to both encrypt and decrypt. It sometimes called secret-key encryption, single-key encryption or simply symmetric encryption.

In traditional fashion, we'll assume that Alice wants to send some data securely to Bob. This means Alice is going to encrypt the data, and then when he receives it, Bob will decrypt it again. Firstly, somehow or other, Alice and Bob have to agree between them on what the secret key will be. We'll assume that the key is some sequence of bytes of an appropriate length. (We mentioned in our introduction to encryption keys that in fact, with certain algorithms, you have to make sure the key has a certain structure and/or avoid "weak" keys; in fact, it turns out that for our particular example this won't be a problem.) In a moment, we'll come back to the problem of how the key is chosen, what length it should be, and how Alice and Bob can agree in advance on what that key is. For now, let's pretend they "just know" what the secret key is, and worry about the Java code that they each run to actually encrypt and decrypt their data.

In this example, we're going to use a widely-adopted encryption algorithm called AES. (We'll consider one or two other algorithms later. But in general, if you need to use a symmetric encryption system and you're not sure which algorithm to pick, AES is probably the one you'll end up using unless you have a strong reason to use something else.) Then, as a first attempt (which we will need to revise), this is essentially the pattern for encryption/decryption:
Very basic AES encryption/decryption functions in Java.
N.B. In reality, this code contains some insecurities that we would need to revise for various common uses (see below).

Alice's encryption codeBob's decryption code
byte[] key = //... secret sequence of bytes
byte[] dataToSend = ...

Cipher c = Cipher.getInstance("AES");
SecretKeySpec k =
new SecretKeySpec(key, "AES");
c.init(Cipher.ENCRYPT_MODE, k);
byte[] encryptedData = c.doFinal(dataToSend);

// now send encryptedData to Bob...
byte[] key = //... we know the secret!
byte[] encryptedData = //... received from Alice

Cipher c = Cipher.getInstance("AES");
SecretKeySpec k =
new SecretKeySpec(key, "AES");
c.init(Cipher.DECRYPT_MODE, k);
byte[] data = c.doFinal(encryptedData);

// do something with data

If you want to test this code, just pick any 16-byte sequence as the key. If you put the same key into each side, you should find that data encrypted by Alice's code can be decrypted by Bob's. And if you try printing out the encrypted bytes, you should find that it looks like a series of undecipherable random bytes. Indeed, in principle at least, these bytes will be computationally undecipherable without the key.

But unfortunately, that's not the whole story... To see why, we need to first consider how AES and similar algorithms work, and in particular the notion of block ciphers.

Symmetric Key Encryption in Java: AES and block ciphers:
The basic Java encryption code we've just looked at gives us the very basic building block for securely storing or transmitting data. Unfortunately, like all good building blocks, it's generally not enough on its own. To get proper security, we need to use the building blocks properly.
The first thing we need to consider is that AES, like other common encryption algorithms, is a block cipher. That means that it always operates on units or "blocks" that are some fixed number of bytes in size. In the case of AES, a block is 16 bytes, or 128 bits. (Coincidentally, we're also using a 16-byte key in our examples, but the block size and key size aren't necessarily the same. AES can be used with other key sizes. And another algorithm, DES, has a 7-byte key but an 8-byte block size.) AES and various other block ciphers essentially take each n-byte block of bytes and "mix" that block together with the key, thus outputting an encrypted block.
Mixing typically involves simple bitwise operations such as the XOR operation and bitshifts, possibly arithmetic operations (addition and multiplication), plus a technique called "substitution" (whereby at points during the process, parts of the encryption buffer are used as indicies into an array of alternative "random" bytes/bits for which they are swapped). Mixing occurs in "rounds": the mixing procedure is repeated some number of times on each block, often with some variation on each round (e.g. different bytes might be used from the key on different rounds).
The upshot is that:
By default with a block cipher, a given block-length sequence will always result in the same sequence of encrypted bytes when encrypted with a given key.
To illustrate this, consider Alice's encryption code from the previous page. Supposing we define the data to be encrypted as follows (in other words, bytes 16-31 of the block will be a repetition of bytes 0-15):
byte[] plaintext = new byte[32];
for (int i = 0; i < 32; i++) {
  plaintext[i] = (byte) (i % 16);
}

Now, we pick a random key (if you're not familiar with it, see this site's explanation of the SecureRandom class; for reasons discussed there, never use poor-quality generators such as java.util.Random for generating random keys):
byte[] key = new byte[16];
SecureRandom r = new SecureRandom();
r.nextBytes(key);


But let's see what happens when we encrypt plaintext using key, which, remember, contains 16 random bytes. We run Alice's encryption code, save the encrypted bytes, and look at them in a hex editor (or write a little Java method to print them out). What we actually get is something such as this:
6BA71D86E3115D2D49F54A12B5800291 k?.??.]-I?J.??.?
6F91863A50238AD46AACC5064E902B8D o??:P#??j??.N?+?


Although each individual line contains undecipherable garbage as we'd hope, the first and second lines of encrypted data are identical. Because our plaintext consisted of a repeated pattern, where the pattern itself is exactly the length of a block, the encrypted result contains two identical blocks. (The third block is something called padding: we'll come back to that.) In other words, the cipher is leaking information about the structure of our plaintext. Depending on our application, this could be really bad news.
Unfortunately, you'll see that this happens with the "default" options. When we constructed our AES Cipher object, we didn't set any special option to say "please operate in insecure mode". And yet that's what it decided to do. So I'm just guessing there could be one or two commercial systems out there handling sensitive data with this insecurity. What's the solution?
Well, the solution is essentially quite low-tech at first glance. We simply arrange things so that by the time our data is fed into the encryption algorithm, we "never encrypt the same block twice". And to do that, we choose an appropriate option from what are called block modes.

Encryption Key Size
As well as choosing an encryption algorithm, you must generally choose a key size to use with that algorithm. In a loose way, the key size determines the "strength" of encryption, assuming that the actual algorithm is otherwise secure. Specifically, the key size generally determines: the number of guesses that an attacker would need to make in order to find the key by "brute force", assuming that all possible keys are equally likely. Relatedly, it also determines the chance and feasibility of a collision attack.
Note that on this page, we are concerned with the key size of symmetric encryption algorithms— that is, where a shared secret key is used by all parties. In geneal, asymmetric algorithms require a larger key size measured bit-for-bit. We discuss RSA key sizes on a separate page.

How to set the key size in Java
If you use the KeyGenerator class, then you can set the key size in bits via the init() method. The following example shows how to generate a 256-bit AES key:
KeyGenerator gen = KeyGenerator.getInstance("AES/CTR/PKCS5PADDING");
gen.init(256);
SecretKey k = gen.generateKey();
Cipher ciph = Cipher.getInstance("AES");
ciph.init(Cipher.ENCRYPT_MODE, k);

...
Note that attempting to use this key with Sun's JDK "out-of-the-box" will throw an InvalidKeyException due to an (overridable) policy restriction that limits symmetric keys to 128 bits. Below, we describe how to remove this 128-bit description, and how to determine if a given client has this restriction.

Which key size?In general, the minimum required key size is some combination of the maximum key size that can be attacked now for a given algorithm, extrapolated to the number of years that you need to keep the encrypted data confidential. Needless to say, such extrapolation is extremely difficult beyond a few years. A couple of pointers are:
  • Lenstra & Verheul (2001)1 take data points from attacks on keys of various lengths and extrapolate via Moore's Law. They conclude that in 2030, it will seem as difficult to brute-force a 93-bit symmetric key as it did to brute-force DES in 1982, and that in 2050 this will be true for a 109-bit key. From this, we might conclude that, ignoring collision attacks, a 128-bit key is sufficient to keep data confidential for the next few decades.
  • Taking into account collision attacks, Ferguson & Schneier (2003)2 recommend using a 256-bits key size (p 65).
  • NIST (2006)3, presumably based on similar types of calculation, recommend a minimum of "128 bits of strength" (p. 66) to keep data confidential "beyond 2030".
  • The Visa credit card company's Data Field Encryption best practices guide suggets that for the purpose of transmitting credit card numbers, "keys should have the strength of at least 112 equivalent bit strength". For this purpose, they actually judge 128 bits (as in the minimum AES key size) to be "stronger than needed" (presumably because of the relatively short lifespan of credit cards).
  • In principle, a quantum computer could square root the effort of a brute-force key search, so that the bit strength of the key is halved (i.e. a 256-bit key in quantum computing has the strength of a 128-bit key in classical computing).
The conclusions I draw from this are:
  • If possible, use a 256-bit key; if no great revolution occurs, this will probably keep your data safe for at least 20 or 30 years.
  • A 128-bit key may be suitable if you've thought carefully about collision attacks and how they affect the future of your data and application, and if you don't see quantum computing as a threat within the lifetime of your data (in the transmission of credit card details, for example, it seems a fairly safe bet that all existing cards will have expired by the time practical quantum computers become a reality!).
Practical problems with using 256-bit keys in JavaThere are a couple of practical problems with using 256-bit keys in Java:
  • Current versions of the JDK ship with a 128-bit policy restriction on key sizes.
  • The SecureRandom generator has a 2160 period— in other words, it can only generate 2160 out of the 2256 possible 256-bit keys.
If your deployment model allows it, the 128-bit restriction can be removed by downloading and manually installing Unlimited Strength Jurisdiction Policy Files provided by Sun.