Monday, May 20, 2013

Oracle 12c Container and Pluggable Databases (Multi tenant Architecture)

The Oracle 12c Database has the most new features ever released with any version of any database. As you might have guessed from it’s name, the new version is more focused on Cloud Computing. Larry Ellison had pointed out in his Keynote session, at Openworld 2012, that in-fact it is the biggest release of database that they have done in quite some time. This time there have been some drastic architectural changes in this version, with about 500 new features!

Oracle 12c Container and Pluggable Databases [It is a major design change on how Oracle deals with databases and the underlying architecture.]
This is the most talked about feature in Oracle 12c. Oracle introduces the concept of Container databases and Pluggable databases. The container database has all the metadata which will be inherited by the core Oracle components when it is installed. Pluggable databases will store user’s data and other pertinent metadata.

This concept is similar to the virtual machines in a virtualized environment, hosted on a physical server machine. The virtualized software runs different virtual machines on the host operating system, with each of the virtual machines dependent on the host but having their own identity and their own specific purpose. Additionally the individual machines are also independent of the other. Here, in 12c database, it is defined as a multitenant database with the Container database as a host operating system and each individual virtual machine as a Pluggable database. The main advantage is obvious. Just like in a virtualized server, here too we will be able to better make use of the hardware resources. How?

When you install Oracle Database 12C, a Container database will be created. This database will have all the metadata information related to the Oracle software and will also host the SYSTEM and SYSAUX tablespaces. Then with every new Pluggable database, the SYSTEM and SYSAUX tablespaces will not be created, rather only tablespaces to store user’s data and metadata inside the Pluggable database. The SGA memory area and background is shared between all the new pluggable databases. Each of this Container database can support roughly up to 250 pluggable databases. Each pluggable database in turn will be used as a service by any other application or database.

Apart from this obvious advantage of better resource utilization there are also numerous other advantages. Pluggable databases will be easy to back-up and move to another system. Patching or upgrading the Container database will automatically update all the pluggable databases. Another major advantage is having a single point of administration. From the development perspective developers will not have to worry about implementing Multitenancy into their application code. Rather the simple process of creating a separate database for every different potential tenant will do the trick more easily and more efficiently. Separation of these Plugin databases will also help satisfy Security concerns for some applications.

Container and Pluggable databases is one of the main new features introduced in 12c nd is referred to as the Multitenant Option.

A Container database (CDB) is made up of the following containers:
  1. There is one root container which stores the Oracle supplied metadata like the PL/SQL data dictionary packages and the common users. This root container is referred to as CDB$ROOT.
  2. One seed Pluggable Database (PDB) which is a system supplied template which can be used to create new PDB’s. This seed PDB is called PDB$SEED.
  3. None or more user created PDBs.
A container database can also be created via the SQL statement.
$ SQL> CREATE DATABASE ... ENABLE PLUGGABLE DATABASE

Lets take a look at some of the characteristics of a CDB

  • There is a separate SYSTEM and SYSAUX tablespace for the root container of the CDB and each PDB
  • There is only one UNDO tablespace for the entire CDB.
  • There is only one set of control files and online redo logs files for the entire CDB. Individual PDB’s have their own data files (which contain the user data), but do not have distinct redo log or control files.
  • We can create on default temporary tablespace for the entire CDB or each PDB can have its own additional temporary tablespaces.
  • There is single network administration files like listener.ora, tnsnames.ora, and sqlnet.ora file for an entire CDB. All of the PDBs in the CDB use the same files.
  • There is only one set of background processes shared by the root and all PDBs.
  • There is a single SGA shared by all  PDB’s.
  • When the CDB is shut down then all PDB’s are also automatically shut down
When the CDB is open then we can change the open mode of individual PDBs via the ALTER PLUGGABLE DATABASE SQL statement.
Let us look at some examples of using CDBs and PDBs. In this case we have a CDB called cdb12c and the PDB name is testdb1.

Connect to the CDB – by default we are connected to the root container – the container id is 1
C:\Users\adixit3034c>sqlplus sys/password@localhost:1525/cdb12c as sysdba
SQL*Plus: Release 12.1.0.1.0 Production on Mon Jul 1 11:07:52 2013
Copyright (c) 1982, 2013, Oracle.  All rights reserved.
Connected to:
Oracle Database 12c Enterprise Edition Release 12.1.0.1.0 - 64bit Production
With the Partitioning, OLAP, Advanced Analytics and Real Application Testing options

SQL> show con_name
CON_NAME
------------------------------
CDB$ROOT
SQL> show con_id
CON_ID
------------------------------
1

Now connect to the PDB testdb1 – note the container id is 3 ( 2 is the container id for PDB$SEED)
C:\Users\adixit3034c> sqlplus sys/password@localhost:1525/testdb1 as sysdba
SQL*Plus: Release 12.1.0.1.0 Production on Mon Jul 1 11:09:47 2013
Copyright (c) 1982, 2013, Oracle.  All rights reserved.
Connected to:
Oracle Database 12c Enterprise Edition Release 12.1.0.1.0 - 64bit Production
With the Partitioning, OLAP, Advanced Analytics and Real Application Testing options

SQL> show con_name
CON_NAME
------------------------------
TESTDB1
SQL> show con_id
CON_ID
------------------------------
3

When the container database is started up, by default the pluggable databases are not automatically opened but remain in a mount state
SQL> select name, open_mode from v$pdbs;
NAME                           OPEN_MODE
------------------------------ ----------
TESTDB1                        MOUNTED
SQL> alter pluggable database testdb1 open;
Pluggable database altered.
SQL> select name, open_mode from v$pdbs;
NAME                           OPEN_MODE
------------------------------ ----------
TESTDB1                        READ WRITE
Note the datafiles shown by V$DATAFILE view when we are connected to the root container.
We see the datafiles for the root container CDB$ROOT, the PDB$SEED PDB and the testdb1 PDB
SQL> select name from v$datafile;
NAME
--------------------------------------------------------------------------------
/u01/app/oracle/oradata/cdb12c/system01.dbf
/u01/app/oracle/oradata/cdb12c/sysaux01.dbf
/u01/app/oracle/oradata/cdb12c/undotbs01.dbf
/u01/app/oracle/oradata/cdb12c/pdbseed/system01.dbf
/u01/app/oracle/oradata/cdb12c/users01.dbf
/u01/app/oracle/oradata/cdb12c/pdbseed/sysaux01.dbf
/u01/app/oracle/oradata/cdb12c/testdb1/system01.dbf
/u01/app/oracle/oradata/cdb12c/testdb1/sysaux01.dbf
/u01/app/oracle/oradata/cdb12c/testdb1/SAMPLE_SCHEMA_users01.dbf
/u01/app/oracle/oradata/cdb12c/testdb1/example01.dbf

Connected to the root container, we can see the datafiles of the seed PDB
SQL> select name from v$datafile where con_id=2;
NAME
--------------------------------------------------------------------------------
/u01/app/oracle/oradata/cdb12c/pdbseed/system01.dbf
/u01/app/oracle/oradata/cdb12c/pdbseed/sysaux01.dbf

Now when connected to the PDB testdb1, the V$DATAFILE only displays the datafiles belonging to that individual PDB
SQL> select name from v$datafile;
NAME
--------------------------------------------------------------------------------
/u01/app/oracle/oradata/cdb12c/undotbs01.dbf
/u01/app/oracle/oradata/cdb12c/testdb1/system01.dbf
/u01/app/oracle/oradata/cdb12c/testdb1/sysaux01.dbf
/u01/app/oracle/oradata/cdb12c/testdb1/SAMPLE_SCHEMA_users01.dbf
/u01/app/oracle/oradata/cdb12c/testdb1/example01.dbf

Each of the CDB and PDBs have their own temp files
SQL> select con_id,name from v$tempfile;
CON_ID NAME
---------- --------------------------------------------------------------------------------
         1 /u01/app/oracle/oradata/cdb12c/temp01.dbf
         2 /u01/app/oracle/oradata/cdb12c/pdbseed/pdbseed_temp01.dbf
         3 /u01/app/oracle/oradata/cdb12c/testdb1/testdb1_temp01.dbf

Note – there is only one SGA!

C:\Users\adixit3034c> sqlplus sys as sysdba
SQL*Plus: Release 12.1.0.1.0 Production on Tue Jul 9 10:25:23 2013
Copyright (c) 1982, 2013, Oracle.  All rights reserved.
Enter password:
Connected to:
Oracle Database 12c Enterprise Edition Release 12.1.0.1.0 - 64bit Production
With the Partitioning, OLAP, Advanced Analytics and Real Application Testing options

SQL> show sga
Total System Global Area 4275781632 bytes
Fixed Size                  2296576 bytes
Variable Size            2936014080 bytes
Database Buffers         1325400064 bytes
Redo Buffers               12070912 bytes
Connect to the PDB – SGA is the same

SQL> ALTER SESSION SET CONTAINER =testdb1;
Session altered.

SQL> show sga
Total System Global Area 4275781632 bytes
Fixed Size                  2296576 bytes
Variable Size            2936014080 bytes
Database Buffers         1325400064 bytes
Redo Buffers               12070912 bytes
Controlfiles and Online Redo Log files are only one for CDB as well as PDB

C:\Users\adixit3034c> sqlplus sys as sysdba
SQL*Plus: Release 12.1.0.1.0 Production on Tue Jul 9 11:04:10 2013
Copyright (c) 1982, 2013, Oracle.  All rights reserved.
Enter password:
Connected to:
Oracle Database 12c Enterprise Edition Release 12.1.0.1.0 - 64bit Production
With the Partitioning, OLAP, Advanced Analytics and Real Application Testing options

SQL> select name from v$controlfile;
NAME
--------------------------------------------------------------------------------
/u01/app/oracle/oradata/cdb12c/control01.ctl
/u01/app/oracle/fast_recovery_area/cdb12c/control02.ctl

SQL> select member from v$logfile;
MEMBER
--------------------------------------------------------------------------------
/u01/app/oracle/oradata/cdb12c/redo03.log
/u01/app/oracle/oradata/cdb12c/redo02.log
/u01/app/oracle/oradata/cdb12c/redo01.log

SQL>  ALTER SESSION SET CONTAINER =testdb1;
Session altered.

SQL> select name from v$controlfile;
NAME
--------------------------------------------------------------------------------
/u01/app/oracle/oradata/cdb12c/control01.ctl
/u01/app/oracle/fast_recovery_area/cdb12c/control02.ctl

SQL> select member from v$logfile;
MEMBER
--------------------------------------------------------------------------------
/u01/app/oracle/oradata/cdb12c/redo03.log
/u01/app/oracle/oradata/cdb12c/redo02.log
/u01/app/oracle/oradata/cdb12c/redo01.log

Provision Oracle 12c PDB

Somebody wants help provisioning a pluggable database (PDB). It’s important to understand that PDB is a private data context. Most of it’s data catalog is private and separate from the overall database. Only a small portion of the database catalog is stored in the container database catalog, and new CDB_ administrative views are added to the database. A PDB is a great solution when you’re leveraging the Editioning feature of Oracle 11g database.

You should note the guarantee from page #9 of Oracle’s Oracle Multitenant:

From the point of view of the client connecting via Oracle Net, the PDB is the database. A PDB is fully compatible with a non-CDB. We shall refer to this from now on as the PDB/non-CDB compatibility guarantee. In other words, the installation scheme for an application backend that ran without error against a non-CDB will run, with no change, and without error, in a PDB and will produce the same result.

Here are the steps that work on both Windows, Linux, or Windows:
1. The following SQL command lets you create a pluggable database (PDB) with a video user assigned to it:
CREATE PLUGGABLE DATABASE videodb
  ADMIN USER videoadm IDENTIFIED BY Video1
  ROLES = (dba)
  DEFAULT TABLESPACE videots
    DATAFILE '/u01/app/oracle/ORADATA/ORCL/VIDEO01.DBF' SIZE 500M ONLINE
  FILE_NAME_CONVERT = ('/u01/app/oracle/ORADATA/ORCL/PDBSEED\',
                       '/u01/app/oracle/ORADATA/ORCL/VIDEOPDB');

Don’t try to create the DEFAULT TABLESPACE before you provision the database. If you do, you’ll get the following exception:
CREATE PLUGGABLE DATABASE videodb
*
ERROR at line 1:
ORA-00604: error occurred at recursive SQL level 1
ORA-01537: cannot add file 'C:\APP\ORACLE\ORADATA\ORCL\VIDEO01.DBF' - file already part of database

2. You need to stop the Oracle listener and modify the listener.ora file. Lines 9 through 12 configure a VIDEODB Oracle SID. After you make the changes, start the Oracle listener.
SID_LIST_LISTENER =
  (SID_LIST =
    (SID_DESC =
      (SID_NAME = CLRExtProc)
      (ORACLE_HOME = C:\app\oracle\product\12.1.0\dbhome_1)
      (PROGRAM = extproc)
      (ENVS = "EXTPROC_DLLS=ONLY:C:\app\oracle\product\12.1.0\dbhome_1\bin\oraclr12.dll")
    )
    (SID_DESC =
      (SID_NAME = VIDEODB)
      (ORACLE_HOME = C:\app\oracle\product\12.1.0\dbhome_1)
    )
  )
LISTENER =
  (DESCRIPTION_LIST =
    (DESCRIPTION =
      (ADDRESS = (PROTOCOL = IPC)(KEY = EXTPROC1521))
      (ADDRESS = (PROTOCOL = TCP)(HOST = localhost)(PORT = 1521))
    )
  )

3. You also need to add a VIDEO TNS alias to the tnsnames.ora file for the VIDEODB pluggable database (PDB).
ORACLR_CONNECTION_DATA =
  (DESCRIPTION =
    (ADDRESS_LIST =
      (ADDRESS = (PROTOCOL = IPC)(KEY = EXTPROC1521))
    )
    (CONNECT_DATA =
      (SID = CLRExtProc)
      (PRESENTATION = RO)
    )
  )
ORCL =
  (DESCRIPTION =
    (ADDRESS = (PROTOCOL = TCP)(HOST = localhost)(PORT = 1521))
    (CONNECT_DATA =
      (SERVER = DEDICATED)
      (SERVICE_NAME = orcl)
    )
  )
VIDEO =
  (DESCRIPTION =
    (ADDRESS = (PROTOCOL = TCP)(HOST = localhost)(PORT = 1521))
    (CONNECT_DATA =
      (SERVER = DEDICATED)
      (SERVICE_NAME = videodb)
    )
  )

4. You connect as the SYSDBA for the VIDEO pluggable database with the following syntax (not presently an example in the SQL*Plus Guide). After connecting as the SYSDBA for the VIDEODB, you’ll be prompted for a password. The required password is the Video1 password that you used when you set up the VIDEODB database.
$ sqlplus sys@VIDEO AS sysdba 
or
adixit3034c> sqlplus sys@VIDEO AS sysdba

5. After authenticating as the SYSDBA, you need to start the VIDEODB pluggable database, like:
SQL> startup
Pluggable DATABASE opened.
You can also start the pluggable database from the generic SYSDBA account. You only need to change the CONTAINER context to pluggable database. You can find the status of pluggable databases with the following query:
SQL> COLUMN RESTRICTED FORMAT A10
SQL> SELECT   v.name
  2  ,        v.open_mode
  3  ,        NVL(v.restricted, 'n/a') AS restricted
  4  ,        d.STATUS
  5  FROM     v$PDBs v INNER JOIN dba_pdbs d USING(guid)
  6  ORDER BY v.create_scn;

The generic sample database returns this after restarting the database:
NAME                               OPEN_MODE  RESTRICTED STATUS
------------------------------          ----------         ----------    --------
PDB$SEED                       READ ONLY     NO         NORMAL
PDBORCL                        MOUNTED       n/a        NORMAL

The following changes the CONTAINER context, opens the pdborcl PDB, and creates a traditional Oracle 11g and backward standard user/schema account in the pluggable database.
SQL> ALTER SESSION SET container=pdborcl;
SQL> ALTER PLUGGABLE DATABASE pdborcl OPEN;
SQL> CREATE USER johnny IDENTIFIED BY johnny;

Re-query the status of the pluggable databases, and you’ll see:
NAME                           OPEN_MODE  RESTRICTED STATUS
------------------------------ ---------- ---------- --------
PDB$SEED                       READ ONLY  NO         NORMAL
PDBORCL                        READ WRITE NO         NORMAL

If you have more than one pluggable database, you can use the following to open them all as the CDB’s SYSDBA:
SQL> ALTER PLUGGABLE DATABASE ALL OPEN;

6. As Oracle said during the Oracle 11gR2 release, the DBA role no longer grants UNLIMITED TABLESPACE. That means you need to grant it as the SYSDBA for the PDB, like:
GRANT UNLIMITED TABLESPACE TO videoadm;

7. After you’ve done all the prior steps, you can connect with the following as the Administrative VIDEO user:
sqlplus videoadm@VIDEO/Video1
Although making such a connection is a poor choice, it would be better to make a secure connection like the one below. The problem with the former is that it exposes information at the OS command line that would be visible to other users. Connecting to the Oracle SQL*Plus with the /NOLOG option prevents disclosure of that information.
C:\Users\adixit3034c>sqlplus /nolog
SQL*Plus: Release 12.1.0.1.0 Production ON Tue Aug 13 01:28:30 2013
Copyright (c) 1982, 2013, Oracle.  ALL rights reserved.
SQL> CONNECT videoadm@VIDEO/Video1
Connected.
SQL> SHOW USER
USER IS "VIDEOADM"

8. Once you’re connected as the SYSDBA role, you can create standard (pre-Oracle 12c) user/schemas with the old syntax. Below, we create a student account:
SQL> CREATE USER student IDENTIFIED BY student;
SQL> GRANT CREATE cluster, CREATE indextype, CREATE operator
  2  ,     CREATE PROCEDURE, CREATE SEQUENCE, CREATE SESSION
  3  ,     CREATE TABLE, CREATE TRIGGER, CREATE TYPE
  4  ,     CREATE VIEW, UNLIMITED TABLESPACE TO student;
Naturally, you can also add a USER from the CDB’s SYSDBA role when in the proper CONTAINER context.

This has shown you how to provision a pluggable database (PDB). As a side note, you should know that you can only create user-defined common users (at the CDB-level) with a c## prefix.

An addendum: DBMS_COMPARE isn’t provisioned automatically, and you need to manually apply it in your ADMIN user for the PDB.

DBMS_COMPARISON Missing?

The dbms_comparison package isn’t deployed when you provision a pluggable databases (PDBs) in Oracle 12c. It appears to be a simple omission. At least, it let me manually compiled the dbms_comparison package with this syntax:
@?/rdbms/admin/dbmscmp.SQL
@?/rdbms/admin/prvtcmp.plb
However, when I ran the code against the PDB it failed. The same code worked against a container database (CDB). It struck me as odd. The error stack wasn’t too useful, as you can see below:
BEGIN
*
ERROR at line 1:
ORA-06564: object "SYS"."COMPARE_NAME" does NOT exist
ORA-06512: at "SYS.DBMS_LOGREP_UTIL", line 569
ORA-06512: at "SYS.DBMS_LOGREP_UTIL", line 602
ORA-06512: at "SYS.DBMS_CMP_INT", line 394
ORA-01403: no DATA found
ORA-06512: at "SYS.DBMS_COMPARISON", line 764
ORA-06512: at line 2

My test was using two copies of a table with differences between column values. Both were deployed in the same CDB or PDB. That meant it was either a missing table or a problem with my database link. Here’s the statement that caused the failure:
dbms_comparison.create_comparison(comparison_name      => 'COMPARE_NAME'
                                   , schema_name         => 'video'
                                   , object_name         => 'MEMBER#1'
                                   , dblink_name         => 'loopbackpdb'
                                   , remote_schema_name  => 'video'
                                   , remote_object_name  => 'MEMBER#2');

Unfortunately, there wasn’t any notable difference between the two database links. Playing around with it, I discovered the problem. While you don’t have to enclose your case sensitive password in double quotes for a CDB database link, you do need to enclose the password with double quotes in a PDB database link.
This database link fixed the problem:
CREATE DATABASE LINK loopbackpdb
  CONNECT TO video IDENTIFIED BY "Video1"
  USING 'video';

The delimiting double quotes on line 2 fixed the problem. Hopefully, this helps somebody who runs into it too. Any way, according to this June 2013 Oracle White Paper it would appear as a bug because it’s an inconsistent behavior between a CDB and PDB.

Sunday, May 19, 2013

Oracle 12c Database Installation Guide

Oracle has finally made the much hyped and anticipated version of database i.e. 12cR1 publically available. The software is now available on OTN download or on Oracle edelivery Portal. Here we will look at Oracle Database 12c installation on Oracle Linux 6. The article assumes that you have Linux box, up and ready. Here we will using Oracle VirtualBox to host the machine.

Here are some other install guides on Oracle 12c Database Installation on Solaris 11 and Oracle 12c RAC Install on Linux 6.

Pre-Installation Tasks
Once you have your system ready and installation files downloaded from links above, you can proceed with pre-installation steps. It is worth mentioning that currently the database is only available for 64-bit OSs and that too only Linux and Solaris.

Hosts Configuration: After unpacking the zip files the first step is to properly name your host by editing the /etc/hosts file as below.
127.0.0.1         localhost.localdomain
10.0.2.15         VST-12c

Oracle Prerequisites: To perform the Oracle specific prerequisite tasks you can use the yum package which is available via ULN and also public yum. Please note that if you don’t have ULN subscription then you will have to use the 11g package to perform preinstallation steps. The Package for 12c is not available on public yum yet.

If you have ULN account then you can run the following command.
# yum install Oracle-rdbms-server-12cR1-preinstall -y
If you don’t have ULN subscription then you can use the following.
# yum install Oracle-rdbms-server-11gR2-preinstall -y

The package will install all the required packages, setup the kernel parameters and create the two mandatory groups i.e. dba and oinstall. However it will not make “Oracle” user member of those groups. You will have to make that change yourself.
Also paste the following profile options in .bash_profile file of the “Oracle” user. This will properly set the installation environment.
# Oracle Settings
export TMP=/tmp
export TMPDIR=$TMP
export Oracle_HOSTNAME=VST-12c
export Oracle_UNQNAME=cdb12c
export Oracle_BASE=/u01/app/Oracle
export Oracle_HOME=$Oracle_BASE/product/12.1.0/db_1
export Oracle_SID=cdb12c
export PATH=/usr/sbin:$PATH
export PATH=$Oracle_HOME/bin:$PATH
export LD_LIBRARY_PATH=$Oracle_HOME/lib:/lib:/usr/lib
export CLASSPATH=$Oracle_HOME/jlib:$Oracle_HOME/rdbms/jlib

The Oracle_HOST should be the same as you set above.

A Few More Steps:
There are a few more steps before you can start the actual install process. The first step is to create the directories for installation and make the “Oracle” user owner of it.
mkdir -p /u01/app/Oracle/product/12.1.0/db_1
chown -R Oracle:oinstall /u01

chmod -R 775 /u01

Make sure you have sufficient space available. The space should be at least 10GB.
As a last step you need to disable Firewall and SELinux security. To disable Firewall go to System–>Administration–>Firewall and press the disable button. Click Apply to save.

To disable the SELinux security you need to edit the config file located in /etc/SELinux directory. Change the SELINUX parameter from “Enforcing” to “Disabled” as below.
#SELINUX=disabled

Installation Steps
Over the years the installation process has been made simpler by Oracle. Although 12c is a huge architectural shift in comparison to 11g but the installation is more or less the same. And that is actually a very good thing.
To start the install process navigate to database folder where you unzipped the install files and execute the runInstaller script.

$ ./runInstaller
Starting Oracle Universal Installer...
Checking Temp space: must be greater than 500 MB. Actual 2166 MB Passed
Checking swap space: must be greater than 150 MB. Actual 4031 MB Passed
Checking monitor: must be configured to display at least 256 colors. Actual 16777216 Passed
Preparing to launch Oracle Universal Installer from /tmp/OraInstall2013-06-26_11-35-01AM. Please wait ...

  1. The installer window will pop up and will be something like below:
  2. You can skip the Oracle support registration part although you will receive a warning message. Click Next.
  3. On next screen choose skip updates and click Next.
  4. Choose the first option as installation type. Click Next.
  5. Choose Server class as the database option and click Next
  6. Select Single Instance database and click Next.
  7. Select the first radio button for install method. Click Next.
  8. Select the locations of Oracle_BASE and Oracle_HOME. Provide dba group as the owner of database. Also name the container database and also the one pluggable database. This is the new architectural change and you read more on Container and Pluggable databases. Click Next.
  9. Choose the Inventory location and also the Inventory owner group which should be oinstall. Click Next.
  10. This is the installation summary screen and you can use the Edit link to change any option. Click Install when ready.
  11. The installation may take a bit time. So wait and grab some snacks or Coffee.
  12. When Setup gets completed the installer will prompt you to run these two scripts. Log in as root and run them.
  13. After successful execution of scripts go back to Installer and click OK button.
  14. The installation will resume to perform configurations.
  15. The database creation is in progress.
  16. Once the database has been created you can use this screen to change or set the passwords of seeded database accounts. Click OK when done. Also note the URL of EM Express for your database.
The installation is now complete!

Post Installation Tasks
To verify that everything is up and running you can always use the good old SQL*PLUS.

$ sqlplus / as sysdba
SQL*Plus: Release 12.1.0.1.0 Production on Wed Jun 26 12:46:12 2013
Copyright (c) 1982, 2013, Oracle. All rights reserved.
Connected to:
Oracle Database 12c Enterprise Edition Release 12.1.0.1.0 - 64bit Production
With the Partitioning, OLAP, Advanced Analytics and Real Application Testing options

SQL> select banner from v$version;
BANNER
--------------------------------------------------------------------------------
Oracle Database 12c Enterprise Edition Release 12.1.0.1.0 - 64bit Production
PL/SQL Release 12.1.0.1.0 - Production
CORE 12.1.0.1.0 Production
TNS for Linux: Version 12.1.0.1.0 - Production
NLSRTL Version 12.1.0.1.0 - Production

SQL> select instance_name from v$instance;

INSTANCE_NAME
----------------
cdb12c

You can also use the EM express to see the current status. The DB console has been deprecated starting from 12c and an express version of Enterprise Manager will replace the DB Console. This is to give a more unified look and feel.
You can also edit the entry of database in oratab to make it auto start at OS startup. The file is located at /etc and entry should look like this.
cdb12c:/u01/app/Oracle/product/12.1.0/db_1:Y

Tuesday, May 7, 2013

How To Delete Pagefile.Sys In Windows 7 / 8 ?

What is the pagefile.sys and why shouldn’t I delete it?

The pagefile.sys is the virtual memory file that is saved on your hard drive. Therefore this file can become quite big. Whenever you don’t have enough physical RAM the system can use the virtual RAM to speed up the current process. So, the virtual memory is quite essential for a fast system and it is not recommended to disable it. Even on systems with a lot of RAM you will need this file badly. Actually, the more physical RAM you have, the more virtual memory you should have. As a rule of thumb, you should always have 1.5 times more virtual memory than physical RAM, recommended is 2 times more.

As you can see, deleting the pagefile.sys is not a good solution and you should only do it if you need disk space urgently.

Delete pagefile.sys

  1. Open up the Control Panel
  2. Click on System and Security
  3. Click on the System link:

(The text “System” is a link)

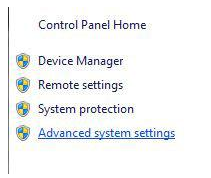
4. In the sidebar click on “Advanced system settings”


5. Go to the tab Advanced:


6. Click on Settings at the top (Performance field)

7. Go to the Advanced tab
8. At the bottom you will see how much disk space is currently used as virtual memory. Click on the Change button
   
9. Uncheck Automatically manage paging file size for all drives
10. Check No paging file and click on Set
11. Click on Ok and reboot. The pagefile.sys will be gone for good you don’t even have to delete it.
  If the pagefile.sys is still there, don’t delete it manually and double-check that you followed the instructions carefully. Only then if the virtual memory is set to 0 you can try to delete the pagefile.sys

Fix “File is too large for destination file system” Error

Today, while copying some large files to an external hard drive, I was promptly issued this message by Windows:

The file “myfile” is too large for the destination file system.

So I wondered to myself what could possibly cause this issue. My external hard drive had tons of free space, so why would I not be able to copy this file over?

Well, the reason for this problem is because my file was 4.3 GB in size and my external hard drive was formatted in FAT32 format. The max file size for FAT32 is 4GB. The max file size for FAT16 is only 2GB!

So how do you fix this problem? Well there are two ways you can go about it. You can either split the file into smaller pieces and then copy it to your external hard drive or you can convert the file system to NTFS, where there is no limit on file sizes.

However you can use File Splitter or GSplit to split large files into smaller ones.

If you want to go with the second method, read my post on how to convert a hard drive from FAT to NTFS without losing any data.

Now you should be able to copy your large files by either splitting them or converting the hard drive to NTFS! Enjoy!

Delete Hibernation File - (hiberfil.sys) - Free some space on Windows 7 / 8

To avoid some of the drawbacks of Vista’s Sleep power-saving mode, you can hibernate your PC. Hibernate saves a copy of everything in your PC’s memory (RAM) onto your hard disk before it shuts down.

Windows uses the file hiberfil.sys, stored in the root folder of your hard disk, to hold your hibernation data. Because it must hold everything in memory, its size is the same as the amount of installed system memory.

Hibernation is made unavailable when you set the value of the Hibernate after setting to Never by using the Power Options item in Control Panel. To turn hibernation off in Windows Vista, follow these steps:
  1. Click Start, and then type cmd in the Start Search box.
  2. In the search results list, right-click Command Prompt, and then click Run as Administrator.
  3. When you are prompted by User Account Control, click Continue.
  4. At the command prompt, type powercfg.exe /hibernate off, and then press ENTER.
  5. Type exit, and then press ENTER.
To turn hibernation in Windows Vista, follow these steps:
  1. Click Start, and then type cmd in the Start Search box.
  2. In the search results list, right-click Command Prompt, and then click Run as Administrator.
  3. When you are prompted by User Account Control, click Continue.
  4. At the command prompt, type powercfg.exe /hibernate on, and then press ENTER.
  5. Type exit, and then press ENTER to close the Command Prompt window.
Have 4 GB of RAM? You’ll see a 4 GB hiberfil.sys file on your hard disk that Windows won’t let you delete. Windows creates the hiberfil.sys file automatically when you turn on the Hibernate feature; the only way to delete the file is to turn off Hibernate.
  Here is a shortcut to turn-off hibernate: open a Command Prompt window in administrator mode and type this command at the prompt:
powercfg /hibernate off

Then press Enter. If the command returns you to the prompt with no message, the change was successful, and hiberfil.sys should be gone. If hiberfil.sys is still there, hibernation may’ve already been turned off, and the file may be left over from an older version of Windows.

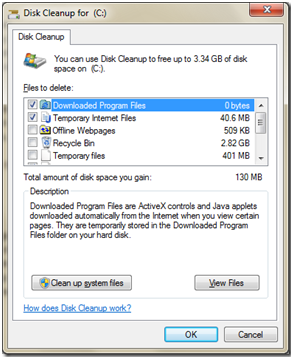
Another way to delete the file is to use the Disk Cleanup tool.  You can use this by typing in cleanmgr.exe in the search or run prompt; just select the drive containing the file, place a checkmark next to it then click OK.


Delete Hiberfil.sys File
To delete this file, you have to use the command prompt to manually turn off hibernation. If you turn off hibernation via Power Options (which I will show you next), it will not delete the actual file itself.

Open a command prompt in Windows 7 by typing command in the search box. Right click Command Prompt and choose Run as Administrator.

To turn off or disable hibernation, type the following command at the prompt:
powercfg –h off

This will disable hibernation and will remove the hiberfil.sys file from your system.

Turn Off Hibernation in Windows 7
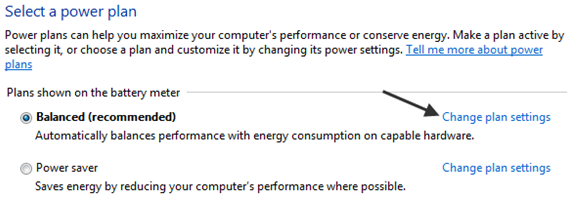
To disable hibernation in Windows 7, you have to go into Power Options and click on Change plan settings.


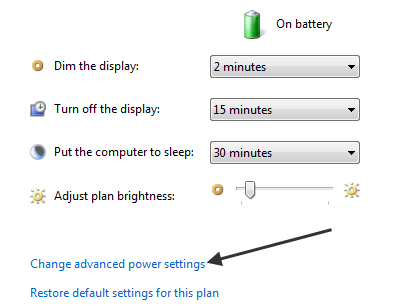
Then click on the Change advanced power settings link at the bottom.


Now expand Sleep and then expand Hibernate after. Change the value of On battery and Plugged in to 0 minutes. Note that the option will not even be available if you turned off hibernation using the command line.


That’s pretty much it! Hopefully, you can reclaim some lost disk space by getting rid of the hiberfil.sys file in Windows 7.

Sunday, March 10, 2013

Installing CentOS 6.4 Step by Step

In this post, I will show step by step process of installing CentOS 6.4. At first, download the installation image to do the fresh install. Download Disk1 and Disk2 installation images. While the disks are being downloaded, take a look at release notes of CentOS 6.4.


  1. At first, insert the bootable media in the drive and start the machine. Then select Install or upgrade an existing system.
  2. Choose Skip to cancel the installation media check. But if you choose ok, this will check your installation media for any sort of missing installation files of the operating system.
  3. Now you can see the installation welcome screen. Here click next button.
  4. Now choose the language you prefer to install and click next button.
  5. Choose the appropriate keyboard layout from the option and click next button.
  6. Here choose Basic Storage Device and click next button.
  7. Click Yes, discard any data to continue option in storage device warning.
  8. Type unique host  name for this system and click Next button.
  9. Select time/zone and click next button.
  10. Enter strong root password and click next button.
  11. Choose the type of installation. Here I will choose replace existing Linux system(s). You can check review and modify partition layout to edit partitions. You can create new partitions from here. But I will not check this and click next button.
  12. Click write changes to disk.
  13. Choose Basic server and click next button.
  14. The installation now starts.
  15. Installation has successfully completed. Click restart to finish installation.
You can now configure IP address, GUI or other features as required.

Tuesday, January 1, 2013

Credit - History - Report - Score (FICO) & Fixes.

A credit rating is an evaluation of the credit worthiness of a debtor, especially a business (company) or a government, but not individual consumers. The evaluation is made by a credit rating agency of the debtor's ability to pay back the debt and the likelihood of default.Evaluations of individuals credit worthiness is known as credit reporting and done by credit bureaus, or consumer credit reporting agencies, which issue credit scores.

Credit History or credit report is, in many countries, a negative record of an individual's or company's past borrowing and repaying, including information about late payments and bankruptcy.

What is Credit Score? : Before deciding on what terms they will offer you a loan (which they base on their "risk"), lenders want to know two things about you: your ability to pay back the loan, and your willingness to pay back the loan. For the first, they look at your income-to-debt obligation ratio. For your willingness to pay back the loan, they consult your credit score. The most widely used credit scores are FICO scores, which were developed by Fair Isaac & Company, Inc. (and they're named after their inventor!). Your FICO score is between 350 (high risk) and 850 (low risk).

Credit scores only consider the information contained in your credit profile. Different portions of your credit history are given different weights. Thirty-five percent of your FICO score is based on your specific payment history. Thirty percent is your current level of indebtedness. Fifteen percent each is the time your open credit has been in use (ten year old accounts are good, six month old ones aren't as good) and types of credit available to you (installment loans such as student loans, car loans, etc. versus revolving and debit accounts like credit cards). Finally, five percent is pursuit of new credit -- credit scores requested. One can follow certain FICO guidelines to improve Credit Score.

How to Obtain Your Free Credit Report: You can obtain a free copy of your credit report, once every 12 months, from each of the three national credit reporting agencies – Equifax, Experian, and Trans Union. The free report is available only through a centralized website, phone number, and address established by Equifax, Experian, and Trans Union. You can request your free credit report by visiting the website www.annualcreditreport.com, calling 1-877-322-8228, or completing the annual credit report request form available at www.ftc.gov/credit and mailing it to Annual Credit Report Request Service, P.O. Box 105281, Atlanta, GA 30348-5281. You have the option of ordering a credit report from each of the three credit reporting agencies at the same time or you may stagger your requests during the 12-month period.

In order to get your free report, you must furnish proper identification information before the credit reporting agency will send you the report. Be prepared to provide your full name, date of birth, social security number, and current address. Furthermore, for your security, Equifax, Experian, and Trans Union may ask you for information that only you would have knowledge of, e.g. a previous address or monthly mortgage payment.

If necessary, you may obtain a copy of your credit report directly from a credit reporting agency. The credit reporting agency, however, may charge you up to $11.00 for a copy of the report. To purchase a copy of your credit report, contact one of the following credit reporting agencies:

Equifax : 800-685-1111
Experian: 888-397-3742
Trans Union:800-888-4213

Fixing credit report errors:
With respect to credit reporting agencies, the Federal Trade Commission (FTC) enforces the Fair Credit Reporting Act. If you have concerns regarding your credit report or credit reporting agencies, please contact the FTC at www.ftc.gov or call toll free 1-877-382-4357.
Equifax Disputes (1-866-238-8067), P.O. Box 740256, Atlanta, GA 30374-0256Experian Disputes (All disputes with Experian are handled online)TransUnion Disputes (1-800-916-8800) , 2 Baldwin Place, P.O. BOX 1000, Chester, PA 19022


The Fair Credit Reporting Act (FCRA) is designed to help ensure that credit bureaus furnish correct and complete information to businesses to use when evaluating your application. Your rights under the Fair Credit Reporting Act:
  • You have the right to receive a copy of your credit report. The copy of your report must contain all of the information in your file at the time of your request.
  • You have the right to know the name of anyone who received your credit report in the last year for most purposes or in the last two years for employment purposes.
  • Any company that denies your application must supply the name and address of the credit bureau they contacted, provided the denial was based on information given by the credit bureau.
  • You have the right to a free copy of your credit report when your application is denied because of information supplied by the credit bureau. Your request must be made within 60 days of receiving your denial notice, or if your credit report is inaccurate due to fraud, including identity theft.
  • If you contest the completeness or accuracy of information in your report, you should file a dispute with the credit bureau and with the company that furnished the information to the bureau. Both the credit bureau and the furnisher of information are legally obligated to investigate your dispute.
  • You have a right to add a summary explanation to your credit report if your dispute is not resolved to your satisfaction.
Each Credit Union provided one free report annually through One can request one free report annually from www.annualcreditreport.com to keep a close look on credit history or any fraud we can break them into 3 reports like follow:
  • An Annual report from Equifax in December.
  • An Annual report from Experian in May
  • An Annual report from TransUnion in September
Validate your account, credit cards and 3 credit report every year to keep check on credit history or any kind of identity theft, only you will not able to find Credit Score.. but if you follow FICO guidelines you will have good Credit Score when you buy new car, new investment, new job, new Home or loan etc agencies will check for your Credit History and as per law you can request a copy to see your credit scores :)