Monday, April 30, 2012

Installing MySQL on Linux (centOS)


Following are steps to install MySQL on CenOS 5/6.

  1. Check the OS Versions and download respective installables from Oracle / Mysql Sites.
    1. cat /proc/version
    2. cat /etc/issue
    3. cat /etc/redhat-release
    4. lsb_release -a
  2. For my CentOS system download following to your Linux System:
    Output of $ lsb_release -a
    1. MySQL Cluster 7.3.4 RPM for Oracle Linux / RHEL 6 x86 (64bit) V43767-01 330M
    2. MySQL Cluster Manager 1.3.0+Cluster RPM for Oracle Linux/RHEL 5+6 x86 (64bit) V42979-01 140M
    3. or download: MySQL-Cluster-gpl-7.3.5-1.rhel5.x86_64.rpm-bundle.tar
  3. Important RPM Command for Installing RPM Package.
    1. Install: $ rpm -ivh mcm-1.3.0-cluster-7.3.3-linux-rhel5-x86-64bit.rpm
      1. -i : install a package
      2. -v : verbose for a nicer display
      3. -h : print hash mark as the package archive is unpacked.
    2. Check Signature: $ rpm --checksig mcm-1.3.0-cluster-7.3.3-linux-rhel5-x86-64bit.rpm
    3. Check dependency of rpm package before installing:[rpm -qPR *.rpm]
      1. -q: query a package
      2. -p: list capabilities this package provides
      3. -R: list capabilities on which this package depends
    4. Install a RPM package without dependencies: [rpm -ivh --nodeps *.rpm]
    5. Check an install rpm package: rpm -q mysql
    6. List (query list) all files of an installed rpm package: [ $ rpm -ql mysql]
    7. List recently installed rpm packages: [$ rpm -qa --last]
    8. List all installed rpm packages: [$ rpm -qa]
    9. Upgrade a rpm package: [rpm -Uvh *.rpm]
    10. Remove a package: [$ rpm -evv mysql]
    11. Remove a rpm package without dependencies: [$ rpm -ev --nodeps mysql]
    12. Query a file that belongs which rpm package: [$ rpm -qf /usr/bin/htpasswd]
    13. Query an info for installed rpm package: [ $ rpm -qi mysql]
    14. Get info of rpm package before installing: [ $ rpm -qip *mysql*.rpm] # query info package
    15. Query documentation of installed RPM Package: [ $ rpm -qdf /usr/bin/vmstat] (query document file)
    16. Verify a RPM package: (verify package) $ rpm -vP *mysql*.rpm
    17. Verify all RPM package: rpm -Va
    18. Import RPM GPG Key: $ rpm --import /etc/pki/rpm-gpg/RPM-GPG-KEY-CENTOS-6
    19. List all imported RPM GPG Key: ( $ rpm -qa gpg-pubkey*)
    20. Rebuild corrupted RPM database: Sometimes rpm database gets corrupted and stops all the functionality of RPM and other applications on the system, so at that time we need to rebuild the RPM Database and restore it with the help of following commands:
      1. cd /var/lib
      2. rm __db*
      3. rpm --rebuilddb
      4. rpmdb_verify Packages
  4. Installation Steps:
    1. Create required users / group on CentOS & unarchive file on all hosts:
      1. $ groupadd mysql
      2. $ useradd –g mysql mysql
      3. Artifacts.
        1. tar –zxvf  /usr/local/ mysql-cluster-gpl-7.3.2-linux-glibc2.5-x86_64.tar.gz or
        2. tar -zvf /usr/local/ MySQL-Cluster-gpl-7.3.5-1.rhel5.x86_64.rpm-bundle.tar [ wget http://cdn.mysql.com/Downloads/MySQL-Cluster-7.3/MySQL-Cluster-gpl-7.3.5-1.rhel5.x86_64.rpm-bundle.tar to download file]
      4. mv /usr/local/ mysql-cluster-gpl-7.3.2-linux-glibc2.5-x86_64 /opt/mysql_cluster
      5. chown mysql.mysql –R /opt/mysql_cluster
    2. We have list of following Servers:
      1. 10.253.92.154 - ndb(192.168.1.196) & mgm (192.168.1.144)
      2. 10.253.92.155 - ndb(192.168.1.197)
      3. 10.252.168.174 - mysql (192.168.1.152)
      4. 10.252.168.173 - mysql (192.168.1.193)
    3. On Server '10.253.92.154' & '10.253.92.155' create a new folder - Data Node.
      1. mkdir  /opt/mysql_cluster/ndbdata
      2. chown mysql.mysql –R /opt/mysql_cluster
    4.  MGM Node: (10.253.92.154) configuration:
      1.  cd /opt/mysql_cluster/ 
      2. vi config.ini
    5. Install and configure mysql on two mysqld node (10.252.168.173, 10.252.168.174)
      1. cd /opt/mysql_cluster/
      2. scripts/mysql_cluster_install --user=mysql --datadir=/opt/mysql_cluster/data --basedir=/opt/mysql_cluster/
      3. mv /opt/mysql_cluster/my.cnf /etc/my.cnf
      4. vi /etc/my.cnf 
      5. Modify the /opt/mysql_cluster/support-files/mysql.server, replace datadir and basedir
        1. datadir=/opt/mysql_cluster/data
        2. basedir=/opt/mysql_cluster/
    6. Start all cluster and mgm node:
      1. Startup data node(10.253.92.154, 10.253.92.155)
      2. [root@Node1]# /opt/mysql_cluster/bin/ndbd --defaults-file=/opt/mysql_cluster/my.cnf --initial
      3. 2013-10-02 13:17:36 [ndbd] INFO     -- Angel connected to '10.253.92.154:1186'
      4. 2013-10-02 13:17:36 [ndbd] INFO     -- Angel allocated nodeid: 11
      5. Startup mysqld node(10.252.168.173, 10.252.168.174)
      6. Startup the mgm node:
        1. /opt/mysql_cluster/bin/ndb_mgmd -f /opt/mysql_cluster/config.ini --configdir=/opt/mysql_cluster
    7. Check status:

Sunday, April 29, 2012

Installing MySQL (noinstall Zip file) on Windows 7 (64)

Users who are installing from the noinstall package can use the instructions in this section to manually install MySQL. The process for installing MySQL from a Zip archive is as follows:
  1. Extract the archive to the desired install directory: Traditionally MySQL server is installed in C:\mysql and MySQL installation Wizard installs MySQL under C:\Program Files\MySQL, if we do not install MySQL at C:\mysql, we must specify the part to the install directory during startup or in an option file.
  2. Create an option file: If we need to specify startup options when we run the server, we can indicate them on command line or place them in an option file.
    1. The installation or data directory locations are different from the default locations (C:\Program Files\MySQL\MySQL Server 5.5 and C:\Program Files\MySQL\MySQL Server 5.5\data)
    2. We need to tune the server settings, such as memory , cache or InnoDB configuration information.
    3. When MySQL Server starts on Windows, it looks for option files in several locations, such as:
      1. Locations:
        1. Windows Directory [C:\> echo %WINDIR%]
        2. C:\
        3. MySQL Installation Directory.
      2. MySQL looks for options first in (my.ini) file then in (my.cnf) file each location, we can use both files but to avoid confusion better to use one file, as follows:
        1. %PROGRAMDATA%\MySQL\MySQL Server 5.5\my.ini,%PROGRAMDATA%\MySQL\MySQL Server 5.5\my.cnf
        2. %WINDIR%\my.ini, %WINDIR%\my.cnf
        3. C:\my.ini, C:\my.cnf
        4. INSTALLDIR\my.ini, INSTALLDIR\my.cnf
        5. defaults-extra-file The file specified with --defaults-extra-file=path, if any
      3. Use a --datadir option to specify the new data directory location each time you start the server.
  3. Choose a MySQL server type:
    1. SHOW [STORAGE] ENGINES: displays status information about the server's storage engines, same information can also be obtained from INFORMATION_SCHEMA_ENGINES tables.
  4. Starting the Server for the First Time:
    1. Clients have two options. They can use TCP/IP, or they can use a named pipe if the server supports named-pipe connections.
    2. MySQL for Windows also supports shared-memory connections if the server is started with the --shared-memory option. Clients can connect through shared memory by using the --protocol=MEMORY option.
    3. START: C:\> "C:\CCC\mysql\mysql-advanced-5.6.16-winx64\bin\mysqld" --console
      1. C:\CCC\mysql\mysql-advanced-5.6.16-winx64\bin>mysqld.exe --console --explicit_defaults_for_timestamp
      2. If you omit the --console option, the server writes diagnostic output to the error log in the data directory by default. The error log is the file with the .err extension, or may be specified by passing in the --log-error option.
    4. STOP: C:\> "C:\CCC\mysql\mysql-advanced-5.6.16-winx64\bin\mysqladmin" -u root shutdown
      1. If the MySQL root user account has a password, you need to invoke mysqladmin with the -p option and supply the password when prompted.
      2. The last option is to start mysqld with the --standalone and --debug options. In this case, mysqld writes a log file C:\mysqld.trace that should contain the reason why mysqld doesn't start.
    5. Use mysqld --verbose --help to display all the options that mysqld supports.
  5. Secure the default user accounts.
  6. Customize the Path for MySQL Tools: To make it easier to invoke MySQL programs, you can add the path name of the MySQL bin directory to your Windows system PATH environment variable:
    1. On the Windows desktop, right-click the My Computer icon, and select Properties.
    2. Next select the Advanced tab from the System Properties menu that appears, and click the Environment Variables button.
    3. Under System Variables, select Path, and then click the Edit button. The Edit System Variable dialogue should appear.
    4. Add Mysql/bin to PATH environment variables.
  7. Starting MySQL as Windows Service: A MySQL server installed as a service can also be controlled from the command line using NET commands, or with the graphical Services utility. Generally, to install MySQL as a Windows service you should be logged in using an account that has administrator rights.
    1. The Services utility (the Windows Service Control Manager) can be found in the Windows Control Panel (under Administrative Tools on Windows 2000, XP, Vista, and Server 2003). To avoid conflicts, it is advisable to close the Services utility while performing server installation or removal operations from the command line.
    2. Before installing MySQL as a Windows service, you should first stop the current server if it is running by using the following command:
      1. C:\> "C:\CCC\mysql\mysql-advanced-5.6.16-winx64\bin\mysqladmin" -u root shutdown.
      2. Note: If the MySQL root user account has a password, you need to invoke mysqladmin with the -p option and supply the password when prompted.
    3. Install the server as a service using this command:
      1. C:\> "C:\Program Files\MySQL\MySQL Server 5.5\bin\mysqld" --install
      2. set mysql/bin to windows PATH
        1. On the Windows desktop, right-click the My Computer icon, and select Properties.
        2. Next select the Advanced tab from the System Properties menu that appears, and click the Environment Variables button.
        3. Under System Variables, select Path, and then click the Edit button. The Edit System Variable dialogue should appear.
        4. IMP NOTE: You should not add the MySQL bin directory to your Windows PATH if you are running multiple MySQL servers on the same machine.
      3. The following additional arguments can be used when installing the service:
        1. You can specify a service name immediately following the --install option. The default service name is MySQL.
        2. If a service name is given, it can be followed by a single option. By convention, this should be --defaults-file=file_name to specify the name of an option file from which the server should read options when it starts.
        3. The use of a single option other than --defaults-file is possible but discouraged. --defaults-file is more flexible because it enables you to specify multiple startup options for the server by placing them in the named option file.
        4. You can also specify a --local-service option following the service name. This causes the server to run using the LocalService Windows account that has limited system privileges. This account is available only for Windows XP or newer. If both --defaults-file and --local-service are given following the service name, they can be in any order.
        5. For a MySQL server that is installed as a Windows service, the following rules determine the service name and option files that the server uses:
          1. If the service-installation command specifies no service name or the default service name (MySQL) following the --install option, the server uses the a service name of MySQL and reads options from the [mysqld] group in the standard option files.
          2. If the service-installation command specifies a service name other than MySQL following the --install option, the server uses that service name. It reads options from the [mysqld] group and the group that has the same name as the service in the standard option files. This enables you to use the [mysqld] group for options that should be used by all MySQL services, and an option group with the service name for use by the server installed with that service name.
          3. If the service-installation command specifies a --defaults-file option after the service name, the server reads options the same way as described in the previous item, except that it reads options only from the the named file and ignores the standard option files.
        6. C:\> "C:\CCC\mysql\mysql-advanced-5.6.16-winx64\bin\mysqld" --install MySQL --defaults-file=C:\my-opts.cnf
      4. Once a MySQL server has been installed as a service, Windows starts the service automatically whenever Windows starts, The service also can be started immediately from the Services utility, or by using:
        1. NET START MySQL command
        2. NET STOP MySQL
        3. You also have the choice of installing the server as a manual service if you do not wish for the service to be started automatically during the boot process. To do this, use the --install-manual option rather than the --install option:
          1. C:\> "C:\CCC\mysql\mysql-advanced-5.6.16-winx64\bin\mysqld" --install-manual
        4. Removing the service: To remove a server that is installed as a service, first stop it if it is running by executing NET STOP MySQL. Then use the --remove option to remove it:
          1. C:\> "C:\CCC\mysql\mysql-advanced-5.6.16-winx64\bin\mysqld" --remove
  8. Testing MySQL Installation: You can test whether the MySQL server is working by executing any of the following commands:
    1. C:\> "C:\CCC\mysql\mysql-advanced-5.6.16-winx64\bin\mysqlshow"
    2. C:\> "C:\CCC\mysql\mysql-advanced-5.6.16-winx64\bin\mysqlshow" -u root mysql
    3. C:\> "C:\CCC\mysql\mysql-advanced-5.6.16-winx64\bin\mysqladmin" version status proc
    4. C:\> "C:\CCC\mysql\mysql-advanced-5.6.16-winx64\bin\mysql" test
  9. Windows Useful Commands:
    1. Service Control: SC COMMAND ( SC [\\server] [command] [service_name] [Options] )
      1. server       : The machine where the service is running.
      2. service_name : The KeyName of the service, this is often but not always the same as the DisplayName shown in Control Panel, Services. You can get the KeyName by running: SC GetKeyName <DisplayName>
      3. commands:
        1. query  [qryOpt]   Show status
        2. queryEx [qryOpt]  Show extended info - pid, flags
        3. GetDisplayName    Show the DisplayName
        4. GetKeyName        Show the ServiceKeyName
        5. EnumDepend        Show Dependencies
        6. qc                Show config - dependencies, full path etc
        7. start          START a service.
        8. stop           STOP a service
        9. pause          PAUSE a service.
        10. continue       CONTINUE a service.
        11. create         Create a service. (add it to the registry)
        12. config         permanently change the service configuration
        13. delete         Delete a service (from the registry)
        14. control        Send a control to a service
        15. interrogate    Send an INTERROGATE control request to a service
        16. Qdescription   Query the description of a service
        17. description    Change the description of a service
        18. Qfailure       Query the actions taken by a service upon failure
        19. failure        Change the actions taken by a service upon failure
        20. sdShow         Display a service's security descriptor using SDDL
        21. SdSet          Sets a service's security descriptor using SDDL
      4. qryOpt:
        1. type= driver|service|all - Query specific types of service
        2. state= active|inactive|all - Query services in a particular state only
        3. bufsize= bytes 
        4. ri= resume_index_number (default=0)
        5. group= groupname - Query services in a particular group
      5. Misc commands that don’t require a service name:
        1. SC  QueryLock  Query the LockStatus for the ServiceManager Database. this will show if a service request is running
        2. SC  Lock       Lock the Service Database
        3. SC  BOOT       Values are {ok | bad} Indicates whether to save the last restart configuration as the `last-known-good` restart configuration
      6. Options:
        1. The CREATE and CONFIG commands allow additional options to be set see the build-in help: 'SC create' and 'SC config'
    2. Windows check who is using a particular port:
      1. C:\> netstat -aon | find /i "listening" | find "3306"
      2. C:\> netstat -abno


Wednesday, April 4, 2012

Adding Classes to the JAR File's Classpath

You may need to reference classes in other JAR files from within a JAR file.
For example, in a typical situation an applet is bundled in a JAR file whose manifest references a different JAR file (or several different JAR files) that serves as utilities for the purposes of that applet.
You specify classes to include in the Class-Path header field in the manifest file of an applet or application. The Class-Path header takes the following form:
Class-Path: jar1-name jar2-name directory-name/jar3-name
By using the Class-Path header in the manifest, you can avoid having to specify a long -classpath flag when invoking Java to run the your application.

Note: The Class-Path header points to classes or JAR files on the local network, not JAR files within the JAR file or classes accessible over internet protocols. To load classes in JAR files within a JAR file into the class path, you must write custom code to load those classes. For example, if MyJar.jar contains another JAR file called MyUtils.jar, you cannot use the Class-Path header in MyJar.jar's manifest to load classes in MyUtils.jar into the class path.

An Example

We want to load classes in MyUtils.jar into the class path for use in MyJar.jar. These two JAR files are in the same directory.
We first create a text file named Manifest.txt with the following contents:
Class-Path: MyUtils.jar

Warning: The text file must end with a new line or carriage return. The last line will not be parsed properly if it does not end with a new line or carriage return.

We then create a JAR file named MyJar.jar by entering the following command:
jar cfm MyJar.jar Manifest.txt MyPackage/*.class
This creates the JAR file with a manifest with the following contents:
Manifest-Version: 1.0
Class-Path: MyUtils.jar
Created-By: 1.7.0_06 (Oracle Corporation)
The classes in MyUtils.jar are now loaded into the class path when you run MyJar.jar.

Tuesday, March 27, 2012

The JarClassLoader Class

The JarClassLoader Class

The JarClassLoader class extends java.net.URLClassLoader. As its name implies, URLClassLoader is designed to be used for loading classes and resources that are accessed by searching a set of URLs. The URLs can refer either to directories or to JAR files.
In addition to subclassing URLClassLoaderJarClassLoader also makes use of features in two other new JAR-related APIs, the java.util.jar package and thejava.net.JarURLConnection class. In this section, we'll look in detail at the constructor and two methods of JarClassLoader.

The JarClassLoader Constructor

The constructor takes an instance of java.net.URL as an argument. The URL passed to this constructor will be used elsewhere in JarClassLoader to find the JAR file from which classes are to be loaded.
public JarClassLoader(URL url) {
super(new URL[] { url });
this.url = url;
}
The URL object is passed to the constructor of the superclass, URLClassLoader, which takes a URL[] array, rather than a single URL instance, as an argument.

The getMainClassName Method

Once a JarClassLoader object is constructed with the URL of a JAR-bundled application, it's going to need a way to determine which class in the JAR file is the application's entry point. That's the job of the getMainClassName method:
public String getMainClassName() throws IOException {
URL u = new URL("jar", "", url + "!/");
JarURLConnection uc = (JarURLConnection)u.openConnection();
Attributes attr = uc.getMainAttributes();
return attr != null
? attr.getValue(Attributes.Name.MAIN_CLASS)
: null;
}
You may recall from a previous lesson that a JAR-bundled application's entry point is specified by the Main-Class header of the JAR file's manifest. To understand howgetMainClassName accesses the Main-Class header value, let's look at the method in detail, paying special attention to the new JAR-handling features that it uses:

The JarURLConnection class and JAR URLs

The getMainClassName method uses the JAR URL format specified by the java.net.JarURLConnection class. The syntax for the URL of a JAR file is as in this example:
jar:http://www.example.com/jarfile.jar!/
The terminating !/ separator indicates that the URL refers to an entire JAR file. Anything following the separator refers to specific JAR-file contents, as in this example:
jar:http://www.example.com/jarfile.jar!/mypackage/myclass.class
The first line in the getMainClassName method is:
URL u = new URL("jar", "", url + "!/");
This statement constructs a new URL object representing a JAR URL, appending the !/ separator to the URL that was used in creating the JarClassLoader instance.

The java.net.JarURLConnection class

This class represents a communications link between an application and a JAR file. It has methods for accessing the JAR file's manifest. The second line of getMainClassNameis:
JarURLConnection uc = (JarURLConnection)u.openConnection();
In this statement, URL instance created in the first line opens a URLConnection. The URLConnection instance is then cast to JarURLConnection so it can take advantage ofJarURLConnection's JAR-handling features.

Fetching Manifest Attributes: java.util.jar.Attributes

With a JarURLConnection open to a JAR file, you can access the header information in the JAR file's manifest by using the getMainAttributes method ofJarURLConnection. This method returns an instance of java.util.jar.Attributes, a class that maps header names in JAR-file manifests with their associated string values. The third line in getMainClassName creates an Attributes object:
Attributes attr = uc.getMainAttributes();
To get the value of the manifest's Main-Class header, the fourth line of getMainClassName invokes the Attributes.getValue method:
return attr != null
? attr.getValue(Attributes.Name.MAIN_CLASS)
: null;
The method's argument, Attributes.Name.MAIN_CLASS, specifies that it's the value of the Main-Class header that you want. (The Attributes.Name class also provides static fields such as MANIFEST_VERSIONCLASS_PATH, and SEALED for specifying other standard manifest headers.)

The invokeClass Method

We've seen how JarURLClassLoader can identify the main class in a JAR-bundled application. The last method to consider, JarURLClassLoader.invokeClass, enables that main class to be invoked to launch the JAR-bundled application:
public void invokeClass(String name, String[] args)
throws ClassNotFoundException,
NoSuchMethodException,
InvocationTargetException
{
Class c = loadClass(name);
Method m = c.getMethod("main", new Class[] { args.getClass() });
m.setAccessible(true);
int mods = m.getModifiers();
if (m.getReturnType() != void.class || !Modifier.isStatic(mods) ||
!Modifier.isPublic(mods)) {
throw new NoSuchMethodException("main");
}
try {
m.invoke(null, new Object[] { args });
} catch (IllegalAccessException e) {
// This should not happen, as we have disabled access checks
}
}
The invokeClass method takes two arguments: the name of the application's entry-point class and an array of string arguments to pass to the entry-point class's main method. First, the main class is loaded:
Class c = loadClass(name);
The loadClass method is inherited from java.lang.ClassLoader.
Once the main class is loaded, the reflection API of the java.lang.reflect package is used to pass the arguments to the class and launch it. You can refer to the tutorial onThe Reflection API for a review of reflection.

Thursday, February 23, 2012

Maven log4j-1.2.15 dependency problem

If you’re using Maven to manage your project’s build and dependencies, you may have encountered some problems when trying to include the latest version of log4j as a dependency. Specifically, log4j 1.2.15 depends on some artifacts that are not available in the central Maven repository due to licensing issues, and thus when you try to build a project that depends on this version of log4j, you may not be able to download the artifacts and your build will fail.
We could download and install these artifacts to the local repository, if we really needed them. But in most cases, they’re not needed and thus you won’t want your project relying on these artifacts just because some parts of log4j do. Thus, we need to exclude them.

The problem: Not really neededThe issue is going from log4j 1.2.14 to 1.2.15, the developers added some features which required some dependencies on various sun and javax packages. However in most cases, you won’t be using this extra functionality, but if you just include log4j 1.2.15, this will cause your project to require those extra artifacts as per the transitive dependency rule.
Because some of these artifacts are not available from the central Maven repository, due to licensing issues, they will not be automatically installed to your local repository. So, if you attempt to run mvn install, you’re likely to encounter this sort of error:
~~~~~~~~~~~~~~~~~~~~~~~~~~~~~~~~~~~~~~~~~~~~~~~~~~~~~~~~~~~~~~~~~~~~~~~~~~~~~~~~~~~~~~~~~~~~
[INFO] Unable to find resource 'com.sun.jdmk:jmxtools:jar:1.2.1' in repository central (http://repo1.maven.org/maven2)
[INFO] Unable to find resource 'javax.jms:jms:jar:1.1' in repository central (http://repo1.maven.org/maven2)
[INFO] Unable to find resource 'com.sun.jmx:jmxri:jar:1.2.1' in repository central (http://repo1.maven.org/maven2)
[INFO] ------------------------------------------------------------------------
[ERROR] BUILD ERROR
[INFO] ------------------------------------------------------------------------
[INFO] Failed to resolve artifact.
Missing:
----------
1) com.sun.jdmk:jmxtools:jar:1.2.1
2) javax.jms:jms:jar:1.1
3) com.sun.jmx:jmxri:jar:1.2.1
----------
3 required artifacts are missing.
 
~~~~~~~~~~~~~~~~~~~~~~~~~~~~~~~~~~~~~~~~~~~~~~~~~~~~~~~~~~~~~~~~~~~~~~~~~~~~~~~~~~~~~~~~~~~~

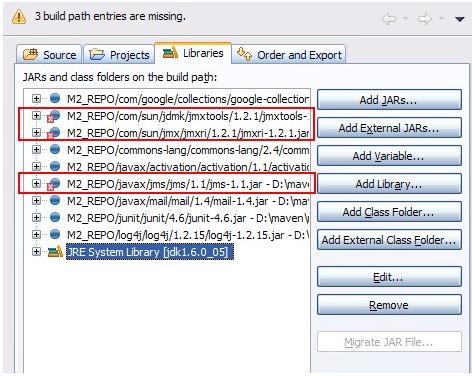
And if you’re using Eclipse, and have used the Maven Eclipse plugin command (mvn eclipse:eclipse) to generate the project settings, you’ll have the problem of Eclipse not being able to find the artifacts references on the build path, resulting in an error like so:

DIAGRAM 1:

This causes a big problem as it essentially prevents you from building your project. You could download and install these artifacts to your local repository, but since they’re not really needed, we should exclude them from the dependency list for log4j.

Excluding dependenciesThankfully, Maven make it easy to exclude dependencies from a certain project. Looking at the log4j 1.2.15 POM file (you may have to select “View Source”), we can see several dependencies that weren’t there in the previous release. These are likely to support new features, and aren’t needed for the most common uses of log4j. Here are the actual dependencies for log4j 1.2.15:

Dependencies----------------------------------------------------------
GroupId                |    ArtifactId         |    Version
----------------------------------------------------------
javax.mail              |    mail                  |    1.4
javax.jms               |    jms                  |    1.1
com.sun.jdmk        |    jmxtools          |    1.2.1
com.sun.jmx          |    jmxri                |    1.2.1
oro                        |    oro                  |    2.0.8
junit                       |    junit                 |    3.8.1
-----------------------------------------------------------
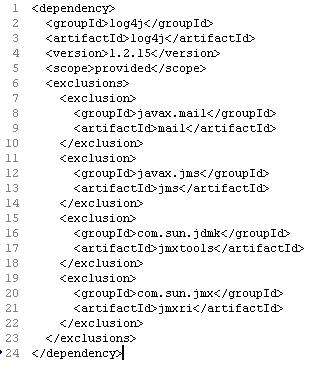
 We only need to exclude the first four, and not the last two, since they have a scope of test, and won’t be included anyways. To exclude these dependencies, add the log4j 1.2.15 dependency as show below.


This tells Maven not to add those artifacts to the classpath and so they won’t be needed to build your project anymore. Note that you have to explicitly exclude each one, there is no way to exclude all of the dependencies for a project.

If you’re using Eclipse, after running mvn eclipse:clean/mvn eclipse:eclipse, you should have the build path properly setup without any missing artifacts:

Everything should now work!
Transitive Dependencies and ExclusionsThe issue here is that the log4j 1.2.15 POM file probably should have marked these dependencies as optional, which would have had the same effect as having to exclude them on every project that referenced that version of log4j. What does an optional dependency mean? The Maven website has a pretty good explanation.

Basically, if you have a large project that requires a lot of dependencies, but the “core” features only require a subset of those dependencies, you may want to mark the others as “optional” so as not to burden any projects that reference yours. Your project will still need all of the dependencies to build, but other projects that reference yours will only need the optional dependencies if they are using the additional features. In this case, they’ll have to explicitly add those dependencies, as the transitive dependency rule won’t kick in for “optional” ones.

Also worthy to note: exclusions are done on a per-dependency basis. This means that the dependencies that we excluded from log4j are only excluded from the log4j scope. This has the effect of not globally excluding those dependencies. So, for example, if we added another dependency that did really require the javax.jms/jms artifact, it would not be prevented from being added. Furthermore, if we wanted, we could manually add a dependency to our own list for that JMS artifact, and it would show up as normal.

Friday, February 3, 2012

Java and Regular Expressions

Overview:
A regular expression defines a search pattern for strings. This pattern may match one or several times or not at all for a given string. The abbreviation for regular expression is regex.
A simple example for a regular expression is a (literal) string. For example the Hello World regex will match the "Hello World" string.
"." (dot) is another example for an regular expression. "." matches any single character; it would match for example "a" or "z" or "1".

Usage:
Regular expressions can be used to search, edit and manipulate text.
Regular expressions are supported by most programming languages, e.g. Java, Perl, Groovy, etc.
Unfortunately each language supports regular expressions slightly different.
If a regular expression is used to analyse or modify a text, this process is called "The regular expression is applied to the text".
The pattern defined by the regular expression is applied on the string from left to right. Once a source character has been used in a match, it cannot be reused. For example the regex "aba" will match "ababababa" only two times (aba_aba__).

Common Matching Symbol:

Regular Expression Description
. Matches any sign
^regex regex must match at the beginning of the line
regex$ Finds regex must match at the end of the line
[abc] Set definition, can match the letter a or b or c
[abc][vz] Set definition, can match a or b or c followed by either v or z
[^abc] When a "^" appears as the first character inside [] when it negates the pattern. This can match any character except a or b or c
[a-d1-7] Ranges, letter between a and d and figures from 1 to 7, will not match d1
X|Z Finds X or Z
XZ Finds X directly followed by Z
$ Checks if a line end follows

Meta Characters:
The following metacharacters have a pre-defined meaning and make certain common pattern easier to use, e.g. \d instead of [0..9].
Regular Expression Description
\d Any digit, short for [0-9]
\D A non-digit, short for [^0-9]
\s A whitespace character, short for [ \t\n\x0b\r\f]
\S A non-whitespace character, for short for [^\s]
\w A word character, short for [a-zA-Z_0-9]
\W A non-word character [^\w]
\S+ Several non-whitespace characters

Quantifier:
A quantifier defines how often an element can occur. The symbols ?, *, + and {} define the quantity of the regular expressions.

Regular Expression Description Examples
* Occurs zero or more times, is short for {0,} X* - Finds no or several letter X, .* - any character sequence
+ Occurs one or more times, is short for {1,} X+ - Finds one or several letter X
? Occurs no or one times, ? is short for {0,1} X? -Finds no or exactly one letter X
{X} Occurs X number of times, {} describes the order of the preceding liberal \d{3} - Three digits, .{10} - any character sequence of length 10
{X,Y} Occurs between X and Y times, \d{1,4}- \d must occur at least once and at a maximum of four
*? ? after a qualifier makes it a "reluctant quantifier", it tries to find the smallest match.  

Grouping and Back reference:
You can group parts of your regular expression. In your pattern you group elements via round brackets, e.g. "()". This allows you to assign a repetition operator the a complete group.
In addition these groups also create a backreference to the part of the regular expression. This captures the group. A backreference stores the part of the String which matched the group. This allows you to use this part in the replacement.
Via the $ you can refer to a group. $1 is the first group, $2 the second, etc.
Lets for example assume you want to replace all whitespace between a letter followed by a point or a comma. This would involve that the point or the comma is part of the pattern. Still it should be included in the result

// Removes whitespace between a word character and . or ,
String pattern = "(\\w)(\\s+)([\\.,])";
System.out.println(EXAMPLE_TEST.replaceAll(pattern, "$3"));

This example extracts the text between a title tag.
// Extract the text between the two title elements
pattern = "(?i)()(.+?)()";
String updated = EXAMPLE_TEST.replaceAll(pattern, "$2");


Blackslashes in Java
The backslash is an escape character in Java Strings. e.g. backslash has a predefined meaning in Java. You have to use "\\" to define a single backslash. If you want to define "\w" then you must be using "\\w" in your regex. If you want to use backslash you as a literal you have to type \\\\ as \ is also a escape character in regular expressions.

Using regular expression with String.matches()
Strings in Java have build in support for regular expressions. Strings have three build in methods for regular expressions, e.g. matches(), split()), replace(). .
These methods are not optimized for performance. We will later use classes which are optimized for performance.

Method Description
s.matches("regex") Evaluates if "regex" matches s. Returns only true if the WHOLE string can be matched
s.split("regex") Creates array with substrings of s divided at occurance of "regex". "regex" is not included in the result.
s.replace("regex"), "replacement" Replaces "regex" with "replacement

Create for the following example the Java project com.dixit.regex.test.
package com.dixit.regex.test;

public class RegexTestStrings {
    public static final String EXAMPLE_TEST = "This is my small example "
            + "string which I'm going to " + "use for pattern matching.";

    public static void main(String[] args) {
        System.out.println(EXAMPLE_TEST.matches("\\w.*"));
        String[] splitString = (EXAMPLE_TEST.split("\\s+"));
        System.out.println(splitString.length);// Should be 14
        for (String string : splitString) {
            System.out.println(string);
        }
        // Replace all whitespace with tabs
        System.out.println(EXAMPLE_TEST.replaceAll("\\s+", "\t"));
    }
}


Examples:
The following class gives several examples for the usage of regular expressions with strings. See the comment for the purpose.
If you want to test these examples, create for the Java project com.dixit.regex.string.

package com.dixit.regex.string;

public class StringMatcher {
    // Returns true if the string matches exactly "true"
    public boolean isTrue(String s){
        return s.matches("true");
    }
    // Returns true if the string matches exactly "true" or "True"
    public boolean isTrueVersion2(String s){
        return s.matches("[tT]rue");
    }
   
    // Returns true if the string matches exactly "true" or "True"
    // or "yes" or "Yes"
    public boolean isTrueOrYes(String s){
        return s.matches("[tT]rue|[yY]es");
    }
   
    // Returns true if the string contains exactly "true"
    public boolean containsTrue(String s){
        return s.matches(".*true.*");
    }
   

    // Returns true if the string contains of three letters
    public boolean isThreeLetters(String s){
        return s.matches("[a-zA-Z]{3}");
        // Simpler from for
//        return s.matches("[a-Z][a-Z][a-Z]");
    }
   
    // Returns true if the string does not have a number at the beginning
    public boolean isNoNumberAtBeginning(String s){
        return s.matches("^[^\\d].*");
    }
    // Returns true if the string contains a arbitrary number of characters except b
    public boolean isIntersection(String s){
        return s.matches("([\\w&&[^b]])*");
    }
    // Returns true if the string contains a number less then 300
    public boolean isLessThenThreeHundret(String s){
        return s.matches("[^0-9]*[12]?[0-9]{1,2}[^0-9]*");
    }
   
}


And a small JUnit Test to validates the examples.
------------------------------------------------------------------------------------------------------------------------------------------------------package com.dixit.regex.string;

import org.junit.Before;
import org.junit.Test;

import static org.junit.Assert.assertFalse;
import static org.junit.Assert.assertTrue;

public class StringMatcherTest {
    private StringMatcher m;

    @Before
    public void setup(){
        m = new StringMatcher();
    }

    @Test
    public void testIsTrue() {
        assertTrue(m.isTrue("true"));
        assertFalse(m.isTrue("true2"));
        assertFalse(m.isTrue("True"));
    }

    @Test
    public void testIsTrueVersion2() {
        assertTrue(m.isTrueVersion2("true"));
        assertFalse(m.isTrueVersion2("true2"));
        assertTrue(m.isTrueVersion2("True"));;
    }

    @Test
    public void testIsTrueOrYes() {
        assertTrue(m.isTrueOrYes("true"));
        assertTrue(m.isTrueOrYes("yes"));
        assertTrue(m.isTrueOrYes("Yes"));
        assertFalse(m.isTrueOrYes("no"));
    }

    @Test
    public void testContainsTrue() {
        assertTrue(m.containsTrue("thetruewithin"));
    }

    @Test
    public void testIsThreeLetters() {
        assertTrue(m.isThreeLetters("abc"));
        assertFalse(m.isThreeLetters("abcd"));
    }
   
    @Test
    public void testisNoNumberAtBeginning() {
        assertTrue(m.isNoNumberAtBeginning("abc"));
        assertFalse(m.isNoNumberAtBeginning("1abcd"));
        assertTrue(m.isNoNumberAtBeginning("a1bcd"));
        assertTrue(m.isNoNumberAtBeginning("asdfdsf"));
    }
   
    @Test
    public void testisIntersection() {
        assertTrue(m.isIntersection("1"));
        assertFalse(m.isIntersection("abcksdfkdskfsdfdsf"));
        assertTrue(m.isIntersection("skdskfjsmcnxmvjwque484242"));
    }
   

    @Test
    public void testLessThenThreeHundret() {
        assertTrue(m.isLessThenThreeHundret("288"));
        assertFalse(m.isLessThenThreeHundret("3288"));
        assertFalse(m.isLessThenThreeHundret("328 8"));
        assertTrue(m.isLessThenThreeHundret("1"));
        assertTrue(m.isLessThenThreeHundret("99"));
        assertFalse(m.isLessThenThreeHundret("300"));
    }
}


Pattern and Matcher
For advanced regular expressions the java.util.regex.Pattern and java.util.regex.Matcher classes are used.
You first create a Pattern object which defines the regular expression. This Pattern object allows you to create a Matcher object for a given string. This Matcher object then allows you to do regex operations on a String.
           
package com.dixit.regex.test;

import java.util.regex.Matcher;
import java.util.regex.Pattern;

public class RegexTestPatternMatcher {
    public static final String EXAMPLE_TEST = "This is my small example string which I'm going to use for pattern matching.";

    public static void main(String[] args) {
        Pattern pattern = Pattern.compile("\\w+");
        // In case you would like to ignore case sensitivity you could use this
        // statement
        // Pattern pattern = Pattern.compile("\\s+", Pattern.CASE_INSENSITIVE);
        Matcher matcher = pattern.matcher(EXAMPLE_TEST);
        // Check all occurance
        while (matcher.find()) {
            System.out.print("Start index: " + matcher.start());
            System.out.print(" End index: " + matcher.end() + " ");
            System.out.println(matcher.group());
        }
        // Now create a new pattern and matcher to replace whitespace with tabs
        Pattern replace = Pattern.compile("\\s+");
        Matcher matcher2 = replace.matcher(EXAMPLE_TEST);
        System.out.println(matcher2.replaceAll("\t"));
    }
}


Java Regrex Examples:
The following lists typical examples for the usage of regular expressions. I hope you find similarities to your examples.

OR
Task: Write a regular expression which matches a text line if this text line contains either the word "Joe" or the word "Jim" or both.
Create a project com.dixit.regex.eitheror and the following class.
-------------------------------------------------------------------------------------------------------------------------------------
package com.dixit.regex.eitheror;

import org.junit.Test;

import static org.junit.Assert.assertFalse;
import static org.junit.Assert.assertTrue;

public class EitherOrCheck {
    @Test
    public void testSimpleTrue() {
        String s = "humbapumpa jim";
        assertTrue(s.matches(".*(jim|joe).*"));
        s = "humbapumpa jom";
        assertFalse(s.matches(".*(jim|joe).*"));
        s = "humbaPumpa joe";
        assertTrue(s.matches(".*(jim|joe).*"));
        s = "humbapumpa joe jim";
        assertTrue(s.matches(".*(jim|joe).*"));
    }
}
-------------------------------------------------------------------------------------------
---------------------------------

Phone number
Task: Write a regular expression which matches any phone number.
A phone number in this example consists either out of 7 numbers in a row or out of 3 number a (white)space or a dash and then 4 numbers.

-----------------------------------------------------------------------------------------------------------------------------------------               
package com.dixit.regex.phonenumber;

import org.junit.Test;
import static org.junit.Assert.assertFalse;
import static org.junit.Assert.assertTrue;


public class CheckPhone {
   
    @Test
    public void testSimpleTrue() {
        String pattern = "\\d\\d\\d([,\\s])?\\d\\d\\d\\d";
        String s= "1233323322";
        assertFalse(s.matches(pattern));
        s = "1233323";
        assertTrue(s.matches(pattern));
        s = "123 3323";
        assertTrue(s.matches(pattern));
    }
}
-----------------------------------------------------------------------------------------------------------------------------------------
           

Check for a certain number range
The following example will check if a text contains a number with 3 digits.
Create the Java project "com.dixit.regex.numbermatch" and the following class.
-----------------------------------------------------------------------------------------------------------------------------------------
package de.vogella.regex.numbermatch;
import java.util.regex.Matcher;
import java.util.regex.Pattern;

import org.junit.Test;

import static org.junit.Assert.assertFalse;
import static org.junit.Assert.assertTrue;

public class CheckNumber {
    @Test
    public void testSimpleTrue() {
        String s= "1233";
        assertTrue(test(s));
        s= "0";
        assertFalse(test(s));
        s = "29 Kasdkf 2300 Kdsdf";
        assertTrue(test(s));
        s = "99900234";
        assertTrue(test(s));
    }
    public static boolean test (String s){
        Pattern pattern = Pattern.compile("\\d{3}");
        Matcher matcher = pattern.matcher(s);
        if (matcher.find()){
            return true;
        }
        return false;
    }

}
-----------------------------------------------------------------------------------------------------------------------------------------

Building a link checker
The following example allows you to extract all valid links from a webpage. It does not consider links with start with "javascript:" or "mailto:".
Create the Java project com.dixit.regex.weblinks and the following class:
-----------------------------------------------------------------------------------------------------------------------------------------
package com.dixit.regex.weblinks;

import java.io.BufferedReader;
import java.io.IOException;
import java.io.InputStreamReader;
import java.net.MalformedURLException;
import java.net.URL;
import java.util.ArrayList;
import java.util.List;
import java.util.regex.Matcher;
import java.util.regex.Pattern;

public class LinkGetter {
    private Pattern htmltag;
    private Pattern link;
    private final String root;

    public LinkGetter(String root) {
        this.root = root;
        htmltag = Pattern.compile("]*href=\"[^>]*>(.*?)");
        link = Pattern.compile("href=\"[^>]*\">");
    }

    public List getLinks(String url) {
        List links = new ArrayList();
        try {
            BufferedReader bufferedReader = new BufferedReader(
                    new InputStreamReader(new URL(url).openStream()));
            String s;
            StringBuilder builder = new StringBuilder();
            while ((s = bufferedReader.readLine()) != null) {
                builder.append(s);
            }

            Matcher tagmatch = htmltag.matcher(builder.toString());
            while (tagmatch.find()) {
                Matcher matcher = link.matcher(tagmatch.group());
                matcher.find();
                String link = matcher.group().replaceFirst("href=\"", "")
                        .replaceFirst("\">", "");
                if (valid(link)) {
                    links.add(makeAbsolute(url, link));
                }
            }
        } catch (MalformedURLException e) {
            e.printStackTrace();
        } catch (IOException e) {
            e.printStackTrace();
        }
        return links;
    }

    private boolean valid(String s) {
        if (s.matches("javascript:.*|mailto:.*")) {
            return false;
        }
        return true;
    }

    private String makeAbsolute(String url, String link) {
        if (link.matches("http://.*")) {
            return link;
        }
        if (link.matches("/.*") && url.matches(".*$[^/]")) {
            return url + "/" + link;
        }
        if (link.matches("[^/].*") && url.matches(".*[^/]")) {
            return url + "/" + link;
        }
        if (link.matches("/.*") && url.matches(".*[/]")) {
            return url + link;
        }
        if (link.matches("/.*") && url.matches(".*[^/]")) {
            return url + link;
        }
        throw new RuntimeException("Cannot make the link absolute. Url: " + url
                + " Link " + link);
    }
}
-----------------------------------------------------------------------------------------------------------------------------------------

Monday, January 30, 2012

Apache: No space left on device: Couldn't create accept lock

This error completely stumped me a couple of weeks ago. Apparently someone was adjusting the Apache configuration, then they checked their syntax and attempted to restart Apache. It went down without a problem, but it refused to start properly, and didn't bind to any ports.

Within the Apache error logs, this message appeared over and over:
[emerg] (28)No space left on device: Couldn't create accept lock

Apache is basically saying "I want to start, but I need to write some things down before I can start, and I have nowhere to write them!" If this happens to you, check these items in order:

1. Check your disk space
This comes first because it's the easiest to check, and sometimes the quickest to fix. If you're out of disk space, then you need to fix that problem.


2. Review filesystem quotasIf your filesystem uses quotas, you might be reaching a quota limit rather than a disk space limit. Use repquota / to review your quotas on the root partition. If you're at the limit, raise your quota or clear up some disk space. Apache logs are usually the culprit in these situations.

3. Clear out your active semaphoresSemaphores? What the heck is a semaphore? Well, it's actually an apparatus for conveying information by means of visual signals. But, when it comes to programming, semaphores are used for communicating between the active processes of a certain application. In the case of Apache, they're used to communicate between the parent and child processes. If Apache can't write these things down, then it can't communicate properly with all of the processes it starts.

I'd assume if you're reading this article, Apache has stopped running. Run this command as root:
# ipcs -s
----------------------------- 
# ipcs
# ipcrm -s sem_id

# ipcrm -m mem_id
-----------------------------
If you see a list of semaphores, Apache has not cleaned up after itself, and some semaphores are stuck. Clear them out with this command:
# for i in `ipcs -s | awk '/httpd/ {print $2}'`; do (ipcrm -s $i); done

Now, in almost all cases, Apache should start properly. If it doesn't, you may just be completely out of available semaphores. You may want to increase your available semaphores, and you'll need to tickle your kernel to do so. Add this to /etc/sysctl.conf:
kernel.msgmni = 1024
kernel.sem = 250 256000 32 1024

And then run sysctl -p to pick up the new changes.