Friday, October 18, 2013

CENTOS v 6.4, GIT v 1.7.1 and JENKINS v 1.535 CONTINOUS INTEGRATION

Having tuned our Agile process to release iteratively and often I decided it was time to spend some time looking at how we could introduce continuous integration into our PHP and Javascript BDD workflows. Given that Travis isn’t suitable for most of our work (your code must be open source), I chose Jenkins as our CI server and was able to get up and running fairly quickly. I  found a few resources that covered integrating Git with Jenkins but I ended up doing a bit of digging myself so thought I’d quickly share the steps I followed.

Install Jenkins and Git

I provisioned a fresh CENTOS v 6.4 box, which meant I was able to follow the official Jenkins docs without any problems. If you’re using anything other than Ubuntu/Debian or Redhat you may need to look elsewhere. The installation instructions outline simple Apache or Nginx vhost configurations that can be used to serve the Jenkins administration console. You’ll need to install git on the same box so that Jenkins can eventually pull down, or commit to, your git repositories. To install Git I simply ran $ sudo apt-get install git (debian) and $ yum install git (Centos).

Install the Git Plugin

Once you can access your Jenkins console,  goto `Manage Jenkins -> Manage Plugins` from the home screen.
Open the ‘Available’ tab and find the plugin entitled Git Plugin.There is a filter box but it didn’t work particularly well for me, I ended up using Find in Chrome.

Create ssh key pair

Part of the installation process will create the user `jenkins` which will envoke all Jenkins processes, including all git commands. Therefore you’ll need to provision a keypair for this user then add the public key to your git repo. There’s a bit of trick to doing the former which I’ll cover now:

  1. Login to your box and switch to the Jenkins user. The installation process doesn’t create a password so you’ll need to have root/sudo permissions to do this. Run the command sudo su - jenkins. The ‘-’ specifies a login shell, and will switch you to jenkins’ home directory (for me this was /var/lib/jenkins’).
  2. Create a .ssh directory in the jenkins home directory.
  3. Create the public private key pair. There are many tutorials which cover using the ssh-keygen command to do this. The most important thing is not to set a password, otherwise the jenkins user will not be able to connect to the git repo in an automated way.
  4. Add the public key to your Git repo. We use bitbucket so this was fairly straightforward for me and I imagine anyone reading this will have performed similar actions for all their devs keys in the past.
  5. Set a git user and email address. This is also mentioned in the git plugin documentation. Run:cd /srv/jenkins/jobs/project/workspacegit config user.email "some@email.com"git config user.name "jenkins".
Connect to the Git repo. This is a one time step which will dismiss that ‘Are you sure you want to connect’ ssh message, again jenkins won’t be able to deal with this. Just run ssh git@your_git_server_url info.

Create a new Job in Jenkins

The official docs provide a good level of detail on how to configure a basic Jenkins job, so I’d recommend following them here. The git-plugin docs also provide some useful info, so there’s not too much more for me to say other than list the steps I followed:

  1. Select Git in Source Code Management.
  2. Enter your git repository URL. This performs a asynchronous check and will give you an error if it can’t connect. Double check you followed the steps in #3 if you get an error.
  3. Select the branch to build. This is branch jenkins will pull from when a build is started so enter whatever is suitable. We are building from develop so I entered this here.

Run a test Build

Once you’ve saved the job it’s worth kicking off a build to check everything’s working OK. You can do this in the main dashboard. Have a look at the latest build, you should see the commit id that was pulled down. If you dig around in the docs you’ll find that the plugin will have fetched your branch (in my case develop) and pulled from the remote repo. The repo is checked out into the job’s `workspace` directory and during the build the Jenkins user is cd’d into this directory. By adding your makefiles and build scripts into your repository it’s then a straightforward case of configuring the Jenkins job to execute these upon build. Again, this is covered in good detail in the docs.

Post Receive Hook

Finally you’ll need to setup your Git repository to initialise a build each time you push to your repository. Github and bitbucket both have hooks ready to be used, but if you’re self hosted a good place to start is at the plugin documentation which specifies the HTTP endpoint which can be used to trigger the job.

Wednesday, October 2, 2013

Sealing Packages within a JAR File

Packages within JAR files can be optionally sealed, which means that all classes defined in that package must be archived in the same JAR file. You might want to seal a package, for example, to ensure version consistency among the classes in your software.
You seal a package in a JAR file by adding the Sealed header in the manifest, which has the general form:
Name: myCompany/myPackage/
Sealed: true
The value myCompany/myPackage/ is the name of the package to seal.
Note that the package name must end with a "/".

An Example

We want to seal two packages firstPackage and secondPackage in the JAR file MyJar.jar.
We first create a text file named Manifest.txt with the following contents:
Name: myCompany/firstPackage/
Sealed: true

Name: myCompany/secondPackage/
Sealed: true

Warning: The text file must end with a new line or carriage return. The last line will not be parsed properly if it does not end with a new line or carriage return.

We then create a JAR file named MyJar.jar by entering the following command:
jar cmf MyJar.jar Manifest.txt MyPackage/*.class
This creates the JAR file with a manifest with the following contents:
Manifest-Version: 1.0
Created-By: 1.7.0_06 (Oracle Corporation)
Name: myCompany/firstPackage/
Sealed: true
Name: myCompany/secondPackage/
Sealed: true

Sealing JAR Files

If you want to guarantee that all classes in a package come from the same code source, use JAR sealing. A sealed JAR specifies that all packages defined by that JAR are sealed unless overridden on a per-package basis.
To seal a JAR file, use the Sealed manifest header with the value true. For example,
Sealed: true
specifies that all packages in this archive are sealed unless explicitly overridden for particular packages with the Sealed attribute in a manifest entry.

Friday, September 27, 2013

Viewing the Contents of a JAR File

The basic format of the command for viewing the contents of a JAR file is:
jar tf jar-file
Let's look at the options and argument used in this command:
  • The t option indicates that you want to view the table of contents of the JAR file.
  • The f option indicates that the JAR file whose contents are to be viewed is specified on the command line.
  • The jar-file argument is the path and name of the JAR file whose contents you want to view.
The t and f options can appear in either order, but there must not be any space between them.
This command will display the JAR file's table of contents to stdout.
You can optionally add the verbose option, v, to produce additional information about file sizes and last-modified dates in the output.

An Example

Let's use the Jar tool to list the contents of the TicTacToe.jar file we created in the previous section:
jar tf TicTacToe.jar
This command displays the contents of the JAR file to stdout:
META-INF/MANIFEST.MF
TicTacToe.class
audio/
audio/beep.au
audio/ding.au
audio/return.au
audio/yahoo1.au
audio/yahoo2.au
images/
images/cross.gif
images/not.gif
The JAR file contains the TicTacToe class file and the audio and images directory, as expected. The output also shows that JAR file contains a default manifest file, META-INF/MANIFEST.MF, which was automatically placed in the archive by the JAR tool.
All pathnames are displayed with forward slashes, regardless of the platform or operating system you're using. Paths in JAR files are always relative; you'll never see a path beginning with C:, for example.
The JAR tool will display additional information if you use the v option:
jar tvf TicTacToe.jar
For example, the verbose output for the TicTacToe JAR file would look similar to this:
    68 Thu Nov 01 20:00:40 PDT 2012 META-INF/MANIFEST.MF
553 Mon Sep 24 21:57:48 PDT 2012 TicTacToe.class
3708 Mon Sep 24 21:57:48 PDT 2012 TicTacToe.class
9584 Mon Sep 24 21:57:48 PDT 2012 TicTacToe.java
0 Mon Sep 24 21:57:48 PDT 2012 audio/
4032 Mon Sep 24 21:57:48 PDT 2012 audio/beep.au
2566 Mon Sep 24 21:57:48 PDT 2012 audio/ding.au
6558 Mon Sep 24 21:57:48 PDT 2012 audio/return.au
7834 Mon Sep 24 21:57:48 PDT 2012 audio/yahoo1.au
7463 Mon Sep 24 21:57:48 PDT 2012 audio/yahoo2.au
424 Mon Sep 24 21:57:48 PDT 2012 example1.html
0 Mon Sep 24 21:57:48 PDT 2012 images/
157 Mon Sep 24 21:57:48 PDT 2012 images/cross.gif
158 Mon Sep 24 21:57:48 PDT 2012 images/not.gif

Tuesday, July 30, 2013

Markdown

Markdown is a text-to-HTML conversion tool for web writers. Markdown allows you to write using an easy-to-read, easy-to-write plain text format, then convert it to structurally valid XHTML (or HTML).

Markdown can be written in a basic text editor (don't use Word) like TextEdit for Mac (save as plain-text) or Notepad on Windows. It's an easy way to write text that easily translates into HTML. The web is written in HTML, so think of it like quick-start web development tool for content editors. When you write in Markdown, you save the document with the file extension .md. More often than not, you'll never need to save a Markdown document, because you'll be using an online tool.

  • Basic:
    • Italics: _surround by_
    • bold: **I will complete these lessons!**
    • Italics & bold: **_"Of course," she whispered. Then, she shouted: "All I need is a little moxie!"_**
    • part of phrase both bold and Italics: If you're thinking to yourself, **_This is unbelievable_**, you'd probably be right.
  • Headers: #   - You can't really make a header bold, but you can italicize certain words
    • # Header one
    • ##Header two
    • ###Header three
    • ####Header four
    • #####Header five
    • ######Header six
  • Links:
    • Inline Link: The first link style is called an inline link. To create an inline link, you wrap the link text in brackets ( [ ] ), and then you wrap the link in parenthesis ( ( ) ).
      •  For example, to create a hyperlink to www.github.com, with a link text that says, Visit GitHub!, you'd write this in Markdown:
        • [Visit GitHub!](www.github.com)
      • In the box below, make a link to www.google.com, with link text that says "Search for it."
        • [Search for it.](www.google.com)
      • You can add emphasis to link texts, if you like. In the box below, make the phrase "really, really" bold, and have the entire sentence link to www.dailykitten.com. You'll want to make sure that the bold phrasing occurs within the link text brackets.
        • [You're **really, really** going to want to see this.](www.dailykitten.com)
      • Although it might make for an awkward experience, you can make links within headings, too. For this next tutorial, make the text a heading four, and turn the phrase "the BBC" into a link to www.bbc.com/news:
        • ####The Latest News from [the BBC](www.bbc.com/news)
    • Reference Link: The other link type is called a reference link. As the name implies, the link is actually a reference to another place in the document. Here's an example of what we mean:
      • Here's [a link to something else][another place].
      • Here's [yet another link][another-link].
      • And now back to [the first link][another place].
      • [another place]: www.github.com
      • [another-link]: www.google.com
  • Images: The difference is that an image is prefaced with an exclamation point ( ! ), followed by the same two brackets, and a pair of parentheses containing the image URL. Within the image brackets, you can place some "alt text," which is a phrase or sentence that describes the image for the visually impaired.
    • Images also have two styles, just like links. To create an inline image, you'll use the same syntax as an inline link.
    • Q: In the box below, turn the link to an image, and fill out the alt text brackets to say "A representation of Octdrey Catburn":
      • ![A representation of Octdrey Catburn](http://octodex.github.com/images/octdrey-catburn.jpg)
    • Q: In the box below, we've started placing some reference images; you'll need to complete them, just like the last lesson. Call the first reference tag "First Father", and make it link to http://octodex.github.com/images/founding-father.jpg; make the second image link out to http://octodex.github.com/images/foundingfather_v2.png.
      • ![The first father][First Father]
      • ![The second first father][Second Father]
      • [First Father]: http://octodex.github.com/images/founding-father.jpg
      • [Second Father]: http://octodex.github.com/images/foundingfather_v2.png
  • Paragraph:
    • To create a block quote, all you have to do is preface a line with the "greater than" caret (>). You can also place a caret character on each line of the quote. This is particularly useful if your quote spans multiple paragraphs.
    • Hard Break: To move to next time : give a line break. (If you forcefully insert a new line, you end up breaking the togetherness). 
    • Soft Break: Soft Break: add 2 space at end of line.
  • List:
    • Unordered List: *<single space> word
      • * Flour
      • * Cheese
      • * Tomatoes
    • Ordered List:
      • 1. One
      • 2. Two
      • 3. Three
    • Sublist: Notice extra space before asterisk.
      • * Calculus
      •  * A professor
      •  * Has no hair
      •  * Often wears green
      • * Castafiore
      •  * An opera singer
      •  * Has white hair
      •  * Is possibly mentally unwell

Sunday, June 23, 2013

Automatic Repository Deployment and Promotion Process OBIEE 11g

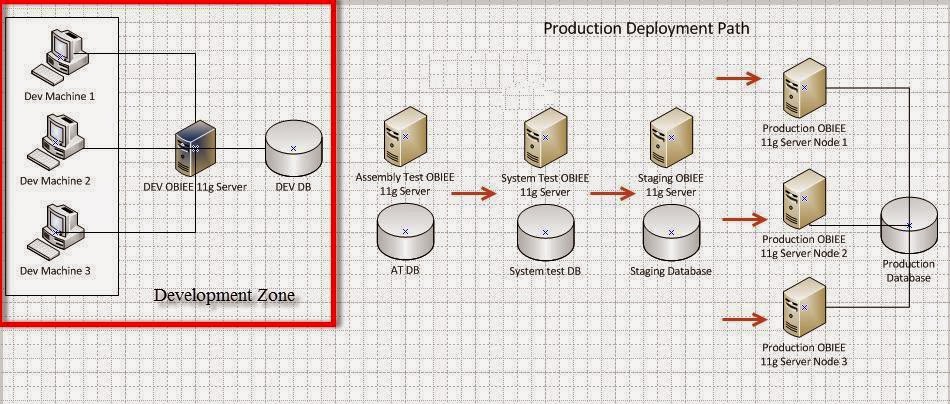
A typical deployment process an OBIEE 11g repository will follow in most production environments resembles the following:

The development zone represents a series of developer machines modifying a repository either by:
Multi User Directory Environment Configuration (MUDE)
Local development machines where each developer migrates their changes to a centralized OBIEE 11g dev/unit test box via a patch-merge process.

We're going to focus on the 'Production Deployment Path' that takes the repository from the Dev/Unit test machine and migrates it through the deployment path from Assembly Test through Production.

This production path is critical because it's at this point where the repository leaves the 'safe haven' of the developer environment and goes through various stages of testing, usually performed by another team. Each testing team will have their own BI Server and database that the repository must connect to for testing.

Usually, the repository remains the same through all environments except for:
  • Connection Pools
  • Environment specific server variables
We're going to perform the assembly test to production deployment process in a completely automated fashion by:
  1. Generating an XUDML file that connections connection pool information.
  2. Generating a new system test repository by applying the System test XUDML to the assembly test repository.
  3. Using WLST to upload the RPD to the specified environment.

Step 1: Generate the XUDML file for the assembly, system, staging and production environments:
We're going to create an eXtensible Universal Database Markup Language (XUDML for short) that contains connection pools specific for each environment. This file is generated by biserverxmlgen and is basically the repository exported to XML. The way to accomplish this in OBIEE 10g was using UDML which has seen been deprecated and is not supported by Oracle - see Oracle Note 1068266.1.

Step 1.1 - Set Variables via bi-init.sh
 . /export/obiee/11g/instances/instance1/bifoundation/OracleBIApplication/coreapplication/setup/bi-init.sh

Note the space between the '.' and the '/' . This is required for the i-init.sh script to propagate through all folders
 
Step 1.2 - Generate XUDML file
Navigate to export/obiee/11g/Oracle_BI1/bifoundation/server/bin/ and run:

biserverxmlgen -R C:\testconnpool\base.rpd -P Admin123 -O c:\testconnpool\test.xml -8

Replace base.rpd with your source RPD - i.e. if you want to generate connection pool information for assembly test, base.rpd should represent your assembly test repository.
  • -O generates the output XML file
  • -8 represents the UTF-8 formatting for the XML file
  • -P represents the password of the base repository

 
If fail to set your session variables will you encounter the following error:
"libnqsclusterapi64.so: open failed: No Such file or directory"
 

If you are successful, your output should be as follows:


Step 1.3 Remove inapplicable entries
For connection pool migrations, your script should only include:

<?xml version="1.0" encoding="UTF-8" ?>
<Repository xmlns:xsi="http://www.w3.org/2001/XMLSchema-instance">
<DECLARE>
<Connection Pool ......>
</ConnectionPool>
</DECLARE>
</Repository>

 
You will only need to re-generate this file if you change your connection pool information. This XUDML file will be used to update connection pools of your target environment.

Step 2: Apply XUDML file to base repository
Let's say you have an assembly test repository and a system test XUDML file. The biserverxmlexec.sh script will take your assembly test repository, system test XUDML file and generate a 'system test repository' using the following command located in export/obiee/11g/Oracle_BI1/bifoundation/server/bin/

biserverxmlexec -I input_file_pathname [-B base_repository_pathname] [-P password] -O output_repository_pathname

Where:
input_file_pathname is the name and location of the XML input file you want to execute base_repository_pathname is the existing repository file you want to modify using the XML input file (optional). Do not specify this argument if you want to generate a new repository file from the XML input file. password is the repository password.
If you specified a base repository, enter the repository password for the base repository. If you did not specify a base repository, enter the password you want to use for the new repository.
The password argument is optional. If you do not provide a password argument, you are prompted to enter a password when you run the command. To minimize the risk of security breaches, Oracle recommends that you do not provide a password argument either on the command line or in scripts. Note that the password argument is supported for backward compatibility only, and will be removed in a future release.
output_repository_pathname is the name and location of the RPD output file you want to generate.

Example:
biserverxmlexec -I testxudml.txt -B rp1.rpd -O rp2.rpd
Give password: my_rpd_password

You now have a system test repository that you can upload to your applicable environment.

Step 3: Upload Repository to BI Server via WLST
Many web sites show how to upload the repository via the FMW Enterprise Manager, but that is generally alot slower and not as efficient as scripting it.

The uploadRPD.py script below performs five tasks:
  1. Connects to WLST
  2. Locks the System
  3. Uploads the RPD
  4. Commits Changes
  5. Restarts BI Services
Copy the code below and save it as a python script (.py)


connect('user','pass','server')

 user = ''
 password = ''
 host = ''
 port = ''
 rpdpath = '/path/path2/repository.rpd'
 rpdPassword = ''


 # Be sure we are in the root
 cd("..\..")


 print(host + ": Connecting to Domain ...")
 try:
 domainCustom()
 except:
 print(host + ": Already in domainCustom")


 print(host + ": Go to biee admin domain")
 cd("oracle.biee.admin")


 # go to the server configuration
 print(host + ": Go to BIDomain.BIInstance.ServerConfiguration MBean")


 cd ('oracle.biee.admin:type=BIDomain,group=Service')
 biinstances = get('BIInstances')
 biinstance = biinstances[0]


 # Lock the System
 print(host + ": Calling lock ...")
 cd("..")
 cd("oracle.biee.admin:type=BIDomain,group=Service")
 objs = jarray.array([], java.lang.Object)
 strs = jarray.array([], java.lang.String)
 try:
 invoke("lock", objs, strs)
 except:
 print(host + ": System already locked")


 cd("..")

 # Upload the RPD
 cd (biinstance.toString())
 print(host + ": Uploading RPD")
 biserver = get('ServerConfiguration')
 cd('..')
 cd(biserver.toString())
 ls()
 argtypes = jarray.array(['java.lang.String','java.lang.String'],java.lang.String)
 argvalues = jarray.array([rpdpath,rpdPassword],java.lang.Object)


 invoke('uploadRepository',argvalues,argtypes)

 # Commit the system
 print(host + ": Commiting Changes")


 cd('..')
 cd('oracle.biee.admin:type=BIDomain,group=Service')
 objs = jarray.array([],java.lang.Object)
 strs = jarray.array([],java.lang.String)
 invoke('commit',objs,strs)


 # Restart the system
 print(host + ": Restarting OBIEE processes")


 cd("..\..")
 cd("oracle.biee.admin")
 cd("oracle.biee.admin:type=BIDomain.BIInstance,biInstance=coreapplication,group=Service")


 print(host + ": Stopping the BI instance")
 params = jarray.array([], java.lang.Object)
 signs = jarray.array([], java.lang.String)
 invoke("stop", params, signs)


 BIServiceStatus = get("ServiceStatus")
 print(host + ": BI ServiceStatus " + BIServiceStatus)


 print(host + ": Starting the BI instance")
 params = jarray.array([], java.lang.Object)
 signs = jarray.array([], java.lang.String)
 invoke("start", params, signs)


 BIServerStatus = get("ServiceStatus")
 print(host + ": BI ServerStatus " + BIServerStatus)


 The aforementioned code works on scaled out (clustered) environments since there is only one active admin server. The code will connect to the active admin server located in your first node, and WLST will propagate changes to each node. You can validate this by navigating to the local repository folder of each node.

To run the script, load wlst located at :
 /export/obiee/11g/oracle_common/common/bin/wlst.sh

and perform the execfile command as follows:
execfile(‘/path/path1/path2/uploadRPD.py’)

In conclusion, the entire repository deployment process can be executed by the following two scripts:
biserverxmlexec (provided by Oracle)
uploadRpd.py (see above)

Reference: Fusion Middleware Integrator's Guide for Oracle Business Intelligence Enterprise Edition

Saturday, June 1, 2013

GlassFish

Glassfish v 4 requires java 7
  1. glassfish/config/asenv.bat [set AS_JAVA=C:\YYY\java\jdk1.7.0_51]
  2. glassfish/config/asenv.conf [AS_JAVA=C:\YYY\java\jdk1.7.0_51]
  3. An alternative to setting the AS_JAVA variable is to set JAVA_HOME environment variable to the jdk
  4. set JAVA_HOME=C:\YYY\java\jdk1.7.0_51
Restart the GlassFish domain server and any other server instances you might have:
  1. C:\CCC\netbeans\glassfish4\bin\asadmin stop-local-instance
  2. C:\CCC\netbeans\glassfish4\bin\asadmin stop-domain domain1
  3. C:\CCC\netbeans\glassfish4\bin\asadmin start-domain domain1
  4. C:\CCC\netbeans\glassfish4\bin\asadmin start-local-instance 
  5. asadmin start-domain [--verbose]
C:\CCC\netbeans\glassfish4\bin>asadmin version
asadmin enable-secure-admin
asadmin restart-domain
asadmin undeploy hello
# In order to save typing "admin user name" and "password" every time you deploy or undeploy an application, create a password file pwdfile with content:
AS_ADMIN_PASSWORD=your_admin_password
--
Add --passwordfile in command: [asadmin --passwordfile pwdfile deploy /home/ee/glassfish/sample/hello.war]

as-install/bin/asadmin list-domains [List all domains]

Before you start database, atleast one domain to be running:
$ asadmin start-database
$ as-install/bin/asadmin start-database --dbhome directory-path
$ as-install/bin/asadmin start-database --dbhome as-install-parent/javadb [to start javadb]
$ as-install/bin/asadmin stop-database [stop database]


$ as-install/bin/asadmin deploy war-name [as-install/bin/asadmin deploy sample-dir/hello.war]
http://localhost:8080/hello
$ as-install/bin/asadmin list-applications
$ as-install/bin/asadmin undeploy war-name [as-install/bin/asadmin undeploy hello]

Automatically Deploy: copy application to as-install/domains/domain1/autodeploy
[Unix:] cp sample-dir/hello.war as-install/domains/domain-dir/autodeploy
[windows: ] copy sample-dir\hello.war as-install\domains\domain-dir\autodeploy
Undeploy:
 $ cd as-install\domains\domain-dir\autodeploy
$ rm hello.war [unix] or $ del hello.war (windows)

admin default password : adminadmin

At least one GlassFish Server domain must be started before you start the database server.
as-install/bin/asadmin start-database --dbhome directory-path
as-install/bin/asadmin start-database --dbhome as-install-parent/javadb
as-install/bin/asadmin stop-database

Changing Default GlassFish v3 Prelude Port Numbers 4848, 8080, and 8181
When you install GlassFish, it gives you default port numbers of:
  1. 4848 (for administration)
  2. 8080 (for the HTTP listener)
  3. 8181 (for the HTTPS listener)
Here are some examples that work in GlassFish v3 Prelude:
  1. To change the HTTP port to 10080: asadmin set server.http-service.http-listener.http-listener-1.port=10080
  2. To change the HTTPS port to 10443:asadmin set server.http-service.http-listener.http-listener-2.port=10443
  3. To change the administration server port to 14848: asadmin set server.http-service.http-listener.admin-listener.port=14848
  4. It's handy to know you can grep for server properties in GlassFish v3 Prelude as follows:
    1. asadmin get server | grep listener
  5. In GlassFish v3 Prelude, you can set port numbers for administration and the HTTP listener in the installer - but not for the HTTPS listener. You might find yourself needing to explicitly specify the administration port in your asadmin command. For example:
    1. $ asadmin set --port 14848 server.http-service.http-listener.http-listener-2.port=10443
    2. For GlassFish v2, use the asadmin get command as described here.

Managing Oracle 12c CDB’s and PDB’s – Cloning PDB’s – Part C


Cloning PDB’s

Cloning a database used to be a difficult, if not a hectic process. Before 12c the most efficient method to create the clone required using RMAN. However even this method has quite a number of steps inlvolved. In 12c too, the effort required to clone the CDB database is almost same as before but not for PDBs. Cloning PDB is as easy as executing three to four simple commands. As PDBs will have the actual user data in them so this will be a ground breaking feature in multiple deployments scenarios.

In this article we will look at how to clone a PDB within the same the CDB container. Within the same CDB, I mean that both the target and the source PDBs will be in the same CDB. But this process can be used if you want to clone it to a different CDB with a very minor modification.

Preparing for the Clone process

The first step is to prepare the environment for cloning. This includes opening the source PDB in the read-only mode and also creating the directories where the target Database files will be placed. We have CDB12c as the CDB container database and the PDB1 as the source PDB database for cloning. The new target database will be called PDB1_CLONE.
Log into the CDB and execute the following command.
SQL> select name,open_mode from v$pdbs;
NAME OPEN_MODE
------------------------------ ----------
PDB$SEED READ ONLY
PDB1 READ WRITE
SQL> alter pluggable database pdb1 close immediate;
Pluggable database altered.
SQL> alter pluggable database pdb1 open read only;
Pluggable database altered.
SQL> select name,open_mode from v$pdbs;
NAME OPEN_MODE
------------------------------ ----------
PDB$SEED READ ONLY
PDB1 READ ONLY

Next we will create the directory where data files will be stored.
$ mkdir -p /u02/app/oracle/oradata/cdb12c/pdb1_clone

After that we set the directory as the default file creation location for the entire instance. This is required so that files are created where we want them to be.
SQL> alter system set db_create_file_dest='/u02/app/oracle/oradata/cdb12c/pdb1_clone';
System altered.

Cloning the PDB

Once we have the environment ready, we can now start the clone process. The clone process in itself is just one command which goes something like below.
SQL> create pluggable database pdb1_clone from pdb1;
Pluggable database created.
That’s it. The PDB has been cloned. Depending on the size of database the above command may take sometime. If your source PDB is in different CDB then your target then you need a database link from target to source. The above command will work with just an addition of DB link reference at the end.

You can now open the source and target databases and confirm that cloning has been completed successfully.
SQL> alter pluggable database pdb1_clone open;
Pluggable database altered.
SQL> alter pluggable database pdb1 close immediate;
Pluggable database altered.
SQL> alter pluggable database pdb1 open;
Pluggable database altered.
SQL> select name,open_mode from v$pdbs;
NAME OPEN_MODE
------------------------------ ----------
PDB$SEED READ ONLY
PDB1 READ WRITE
PDB1_CLONE READ WRITE

As you can see both the source and target databases are up and running. You can now log into your newly created database. The easiest way if you are connected to CDB as SYS is to change the Container like below.
SQL> alter session set container=pdb1_clone;
Session altered.
SQL> select file_name from dba_data_files;
FILE_NAME
----------------------------------------------------------------------------------------------------
/u02/app/oracle/oradata/cdb12c/pdb1_clone/CDB12c/
E070CD4A69AC0893E0450000FF00020F/datafile/o1_mf_system_8x2tx8l9_.dbf
/u02/app/oracle/oradata/cdb12c/pdb1_clone/CDB12c/
E070CD4A69AC0893E0450000FF00020F/datafile/o1_mf_sysaux_8x2tx8m5_.dbf

As SYS is common user and has presence in almost every PDB created so you can easily switch between different Containers. In Oracle Database 12c every database whether it is CDB or PDB, both are considered a Container.

You can switch back to the CDB container just like that. The result of same SELECT statement will be different and will confirm that you are now connected to a different database.
SQL> alter session set container=CDB$ROOT;
Session altered.

SQL> select file_name from dba_data_files;
FILE_NAME
----------------------------------------------------------------------------------------------------
/u01/app/oracle/oradata/cdb12c/system01.dbf
/u01/app/oracle/oradata/cdb12c/sysaux01.dbf
/u01/app/oracle/oradata/cdb12c/undotbs01.dbf
/u01/app/oracle/oradata/cdb12c/users01.dbf
/u01/app/oracle/oradata/cdb12c/cdata.dbf

Migrating Non-CDB database as PDB via Cloning

You can migrate any non-cdb database created either in 11.2.0.3 or 12.1 as a PDB into your Container database. If your target database is running in 11g then you will first have to upgrade it to 12.1. Once upgraded you can then follow the process outlined here to migrate your non-cdb database as PDB into your main Container database.

Suppose we have a non-cdb database running in 12.1 named ORCL. The first step to migrate it as PDB would be to generate manifest file. Shutdown the database and then restart it in Read-Only mode.
SQL> shutdown immediate;
Database closed.
Database dismounted.
ORACLE instance shut down.
SQL> startup mount
ORACLE instance started.
Total System Global Area 626327552 bytes
Fixed Size 2291472 bytes
Variable Size 276826352 bytes
Database Buffers 343932928 bytes
Redo Buffers 3276800 bytes
Database mounted.
SQL> alter database open read only;
Database altered.

Once the database has been started in Read-Only mode, run the following procedure to generate manifest file. This file will be used to create clone of database as PDB into our CDB.
SQL> exec dbms_pdb.describe (pdb_descr_file=>'/u01/app/oracle/noncdb_orcl.xml');
PL/SQL procedure successfully completed.

Shutdown the database so that there is no data inconsistency while cloning.
SQL> shutdown immediate;
Database closed.
Database dismounted.
ORACLE instance shut down.


Now log into your CDB.
sqlplus sys/oracle as sysdba
SQL*Plus: Release 12.1.0.1.0 Production on Fri Jul 26 17:12:03 2013
Copyright (c) 1982, 2013, Oracle. All rights reserved.
Connected to:
Oracle Database 12c Enterprise Edition Release 12.1.0.1.0 - 64bit Production
With the Partitioning, OLAP, Advanced Analytics and Real Application Testing options
SQL> show con_name
CON_NAME
------------------------------
CDB$ROOT
SQL> select name,open_mode from v$pdbs;
NAME OPEN_MODE
------------------------------ ----------
PDB$SEED READ ONLY
PDB12C READ WRITE

As you can see that apart from Seed database currently we have only one PDB.

As our ORCL database was using Oracle managed files so we will have to set the db_create_file_dest parameter to make sure that files are copied where we want them to be.
SQL> alter system set db_create_file_dest='/u02/app/oracle/oradata/cdb12c/noncdb_orcl';
System altered.

The name of our database would be noncdb_orcl as you might have guessed. We are now ready to finally clone the non-cdb database as PDB into our CDB.
SQL> create pluggable database noncdb_orcl
2 using '/u01/app/oracle/noncdb_orcl.xml' copy;
Pluggable database created.

The database has been created and is almost ready to use. But we have one last step left. Although this last step is optional but is highly recommended. We will have to run an Oracle supplied SQL script to make sure that the migration was smooth. This script is also required if you are planning to upgrade your CDB in future.

To run the script we will have to open the newly created PDB.
SQL> alter pluggable database noncdb_orcl open;
Warning: PDB altered with errors.


Database opened with errors. You can ignore this message as of now. Next, run the script while logged into PDB as SYS.
SQL> @?/rdbms/admin/noncdb_to_pdb.sql

The script will take sometime and has lengthy output. But at the end it will leave your database in stage where it was when script was run. In our case database was open.

To make sure that everything is now OK with new PDB you can give database a bounce.
SQL> alter pluggable database noncdb_orcl close;
Pluggable database altered.
SQL> alter pluggable database noncdb_orcl open;
Pluggable database altered.
SQL> select name,open_mode from v$pdbs;
NAME OPEN_MODE
------------------------------ ----------
PDB$SEED READ ONLY
PDB12C READ WRITE
NONCDB_ORCL READ WRITE

Cloning vs Snapshot

When using the Cloning method above, the database will require exactly the same space as that consumed by the source database. Fortunately though, cloning further supports “SNAPSHOT COPY” which is synonymous with the traditional SNAP mechanism, reducing the requirementdisk space. However this option is only supported with ACFS and direct NFS Client storage. You can read more details in the CREATE PLUGGABLE DATABASE document.