While the installation of the Oracle 12c Database is more or less similar to that of 11g, the same cannot be said about the actual administration. Managing Oracle 12c PDBs and CDBs is different in many ways. That’s mainly because of architectural changes introduced 12c. If you have just downloaded the Oracle Database software you may want to read the following articles I have written previously.
Before getting into the actual administration lets briefly review the CDBs and PDBs concepts as it is very important to understand the multitenant environment which the installer creates.
 Oracle-12c-Multitenant Architecture.
Local users will be the users local to individual PDBs. They will not have identity in other databases. So a local user named Scott can exist in two databases with same name. However common user will have unique name across all databases.
A PDB administrator on the other hand will only be able to manage individual PDB where it is created. He can manage space, manager other users, move data files here and there but only to its specific PDB. He will not have access to other PDBs and CDB.
 Of course you can create pluggable databases later on as well. This is to show you that if you have followed our installation article then you will have one CDB Root CDB$ROOT (named cdb12c), one PDB Seed PDB$SEED and one pluggable database named pdb12c.
It is worth mentioning that every PDB created will have its own Service name which users will use to connect to – Just like in previous versions. However it will not have a separate instance. It will use the same instance and share memory structures (SGA) and background processes from CDB. This feature is known as Consolidation and its new in 12c. So the ORACLE_SID environment parameter will always have value equal to CDB instance name. The following query will always return the instance name of CDB regardless if you are connected to CDB or any PDB attached to that CDB.
SQL> select instance_name from v$instance;
With that said lets try to connect to Oracle instance using the very familiar command.
$ sqlplus / as sysdba
SQL*Plus: Release 12.1.0.1.0 Production on Fri Jun 28 03:12:40 2013
Copyright (c) 1982, 2013, Oracle. All rights reserved.
Connected to an idle instance.
SQL> startup
ORACLE instance started.
Total System Global Area 839282688 bytes
Fixed Size 2293928 bytes
Variable Size 562040664 bytes
Database Buffers 272629760 bytes
Redo Buffers 2318336 bytes
Database mounted.
Database opened.
SQL>
To check which database you are connected to you can use the new con_name and con_id SQL*PLUS functions.
SQL> show con_id
CON_ID
------------------------------
1
SQL> show con_name
CON_NAME
------------------------------
CDB$ROOT
SQL>
To connect to PDB databases you need to use the proper username/password combination. OS level authentication will not work for PDBs. This also means that you cannot connect to PDBs without first configuring tnsnames.ora and starting the listener. However for test purpose you can use the following syntax to avoid tnsnames configurations for now. Your listener should be listening however for this to work.
$ sqlplus sys/oracle@VST-12c:1521/pdb12c as sysdba
SQL*Plus: Release 12.1.0.1.0 Production on Fri Jun 28 03:32:21 2013
Copyright (c) 1982, 2013, Oracle. All rights reserved.
Connected to:
Oracle Database 12c Enterprise Edition Release 12.1.0.1.0 - 64bit Production
With the Partitioning, OLAP, Advanced Analytics and Real Application Testing options
SQL>
To confirm that we are connected to right database.
SQL> show con_name
CON_NAME
------------------------------
PDB12c
SQL> show con_id
CON_ID
------------------------------
3
SQL>
The following command however will show that instance is same. This is because of consolidation. All PDBs will use the CDB’s instance.
SQL> select instance_name from v$instance;
INSTANCE_NAME
----------------
cdb12c
If you are connected to CDB as SYS or any other Common user then you can switch between different Containers on the go – provided that you have relevant privileges. For example if you are connected to CDB as SYS and want to perform some operation in one of your PDB as SYS as well then instead of opening another session you can just switch Container as shown below.
SQL> show con_name
CON_NAME
------------------------------
CDB$ROOT
SQL> alter session set container=pdb12c;
Session altered.
SQL> show con_name
CON_NAME
------------------------------
PDB12C
SQL> select pdb_name,status from cdb_pdbs;
PDB_NAME STATUS
------------------------------ -------------
PDB12c NORMAL
PDB$SEED NORMAL
As you can see there are two PDBs. One is seeded and the other is what we created during installation. To create a new PDB we will first create a directory to hold the data files for new database and then use the following command.
SQL> create pluggable database pdbtest
2 admin user pdbtest_admin identified by oracle
3 roles = (DBA)
4 file_name_convert=('/u01/app/oracle/oradata/cdb12c/pdbseed','/u02/app/oracle/oradata/cdb12c/pdbtest');
Pluggable database created.
Elapsed: 00:00:17.08
I specifically turned on timing for this command. As you can see it took us just 17 seconds to create a new database. Application deployment is going to be extremely fast with this new concept. This was made possible due to the fact that for every new database Oracle does not have to extract and copy files from template, create and initialize instance and configure everything. Everything has already been done during CDB creation. Oracle merely copies the required data files and creates a service which can be used to connect to CDB instance.
The above command will only create SYSTEM and SYSAUX tablespaces for the new PDB. The files like for Undo tablespace and Redo Logs will be used to that of CDB.
Run the following command to confirm creation of database.
SQL> select pdb_name,status from cdb_pdbs;
PDB_NAME STATUS
------------------------------ -------------
PDB12c NORMAL
PDB$SEED NORMAL
PDBTEST NEW
Elapsed: 00:00:00.10
The status column shows New for our newly created database. This is because database has never been opened. We will see next how to start/stop CDB and PDBs.
To drop a PDB you must close it first.
SQL> alter pluggable database pdb12c close;
Pluggable database altered.
Elapsed: 00:00:02.25
SQL> drop pluggable database pdb12c including datafiles;
Pluggable database dropped.
Elapsed: 00:00:00.66
SQL> select name from v$pdbs;
NAME
------------------------------
PDB$SEED
PDBTEST
Elapsed: 00:00:00.06
SQL> select name,open_mode
2 from v$pdbs;
NAME OPEN_MODE
------------------------------ ----------
PDB$SEED READ ONLY
PDB12c MOUNTED
PDBTEST MOUNTED
Elapsed: 00:00:00.01
Already discussed above PDB$SEED cannot be opened for Read Write. Our two example PDBs are in Mount state. You can open a PDB using the following command.
SQL> alter pluggable database pdbtest open;
Pluggable database altered.
Elapsed: 00:00:11.69
SQL> select name,open_mode from v$pdbs;
NAME OPEN_MODE
------------------------------ ----------
PDB$SEED READ ONLY
PDB12c MOUNTED
PDBTEST READ WRITE
Elapsed: 00:00:00.04
Likewise you can close a PDB using the following command.
SQL> alter pluggable database pdbtest close;
Pluggable database altered.
Elapsed: 00:00:00.92
To open/close all PDBs at once you can use the following commands.
SQL> alter pluggable database all open;
Pluggable database altered.
Elapsed: 00:00:05.96
SQL> alter pluggable database all close;
Pluggable database altered.
Elapsed: 00:00:01.33
If you are connected to PDB and issue the Startup and Shutdown commands then those commands will Open and Close that PDB only . For example
SQL> show con_name
CON_NAME
------------------------------
PDB12C
SQL> shutdown immediate;
Pluggable Database closed.
SQL> startup
Pluggable Database opened.
SQL> create or replace trigger sys.after_startup after startup on database
2 begin
3 execute immediate 'alter pluggable database all open';
4 end after_startup;
5 /
Trigger created.
Elapsed: 00:00:00.19
Lets test this by shutting down and then starting up the CDB.
SQL> shutdown immediate;
Database closed.
Database dismounted.
ORACLE instance shut down.
SQL> startup
ORACLE instance started.
Total System Global Area 839282688 bytes
Fixed Size 2293928 bytes
Variable Size 562040664 bytes
Database Buffers 272629760 bytes
Redo Buffers 2318336 bytes
Database mounted.
Database opened.
SQL> select name,open_mode from v$pdbs;
NAME OPEN_MODE
------------------------------ ----------
PDB$SEED READ ONLY
PDB12c READ WRITE
PDBTEST READ WRITE
Elapsed: 00:00:00.18
First close the database and open it in restricted mode.
SQL> alter pluggable database pdb_test close;
Pluggable database altered.
SQL> alter pluggable database pdb_test open restricted;
Pluggable database altered.
We are currently connected to CDB. If we try to change the global of PDB_TEST, we will get the error message as shown below.
SQL> alter pluggable database pdb_test rename global_name to pdb3;
alter pluggable database pdb_test rename global_name to pdb3
*
ERROR at line 1:
ORA-65046: operation not allowed from outside a pluggable database
To do this we will first connect to PDB_TEST and then change the name from there.
$ sqlplus sys/oracle@localhost:1521/pdb_test as sysdba
SQL*Plus: Release 12.1.0.1.0 Production on Sat Jun 29 01:39:34 2013
Copyright (c) 1982, 2013, Oracle. All rights reserved.
Connected to:
Oracle Database 12c Enterprise Edition Release 12.1.0.1.0 - 64bit Production
With the Partitioning, OLAP, Advanced Analytics and Real Application Testing options
SQL> show con_name
CON_NAME
------------------------------
PDB_TEST
SQL> alter pluggable database pdb_test rename global_name to pdb3;
Pluggable database altered.
Global name has been changed. Close the database and reopen it in Normal Read Write mode.
SQL> alter pluggable database pdb_test rename global_name to pdb3;
Pluggable database altered.
SQL> alter pluggable database close immediate;
Pluggable database altered.
SQL> alter pluggable database open;
Pluggable database altered.
SQL> select name,open_mode from v$pdbs;
NAME OPEN_MODE
------------------------------ ----------
PDB3 READ WRITE
SQL> select file_name from cdb_data_files;
FILE_NAME
----------------------------------------------------------------------------------------------------
/u02/app/oracle/oradata/cdb12c/pdb12c/system01.dbf
/u02/app/oracle/oradata/cdb12c/pdb12c/sysaux01.dbf
/u01/app/oracle/oradata/cdb12c/system01.dbf
/u01/app/oracle/oradata/cdb12c/sysaux01.dbf
/u01/app/oracle/oradata/cdb12c/undotbs01.dbf
/u01/app/oracle/oradata/cdb12c/users01.dbf
/u01/app/oracle/oradata/cdb12c/cdata.dbf
/u01/app/oracle/oradata/cdb12c/pdbseed/system01.dbf
/u01/app/oracle/oradata/cdb12c/pdbseed/sysaux01.dbf
9 rows selected.
These data dictionary views have an extra column of CON_ID which can be used to select objects attached to specific database.
SQL> select file_name from cdb_data_files
2 where con_id=2;
FILE_NAME
----------------------------------------------------------------------------------------------------
/u01/app/oracle/oradata/cdb12c/pdbseed/system01.dbf
/u01/app/oracle/oradata/cdb12c/pdbseed/sysaux01.dbf
Almost every data dictionary view have a corresponding CDB_* view. The normal DBA_* views will only show information about objects of current container only.
SQL> select file_name from dba_data_files;
FILE_NAME
----------------------------------------------------------------------------------------------------
/u01/app/oracle/oradata/cdb12c/system01.dbf
/u01/app/oracle/oradata/cdb12c/sysaux01.dbf
/u01/app/oracle/oradata/cdb12c/undotbs01.dbf
/u01/app/oracle/oradata/cdb12c/users01.dbf
/u01/app/oracle/oradata/cdb12c/cdata.dbf
Before getting into the actual administration lets briefly review the CDBs and PDBs concepts as it is very important to understand the multitenant environment which the installer creates.
About Multitenant Architecture
There are three main concepts that we need to be familiar with.CDB Components:
CDB is the main container database. It is much like traditional database except for the fact that it now supports the multitenant architecture. The PDB’s database plug into this container database. The data in the PDB’s is accessed from the SGA and bacground processes of the CDB database. Mutiple PDB’s can be plugged into a container database. There are three main components of CDB.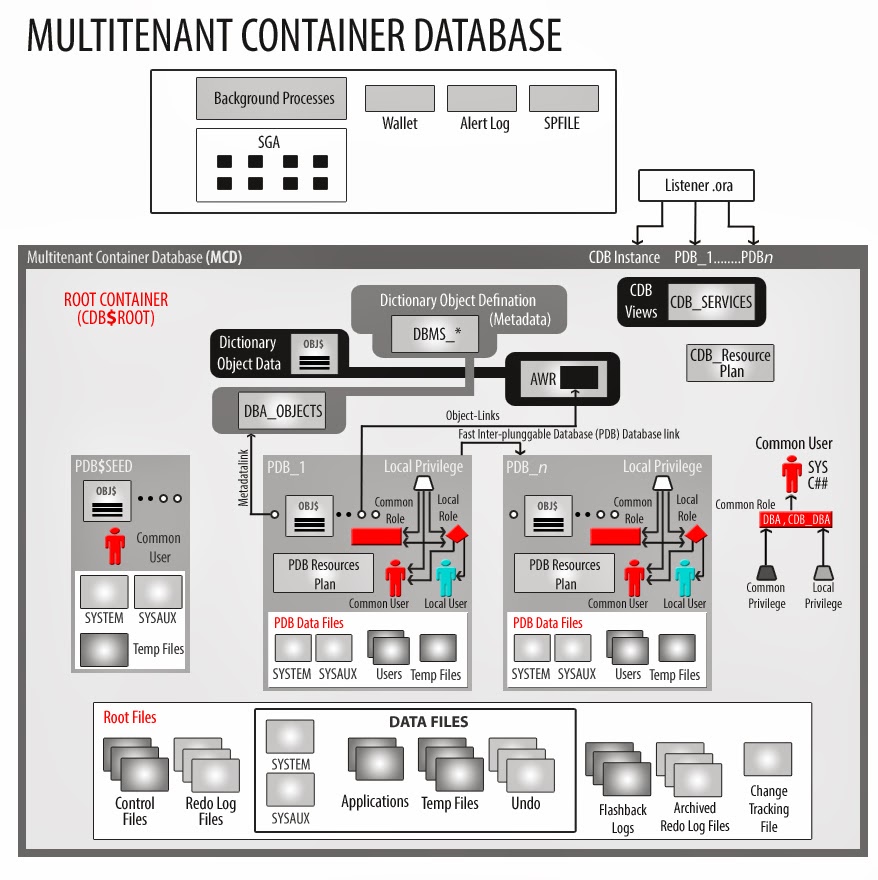
Root:
The root database, CDB$ROOT, is be the main container and holds the Oracle metadata and common users. A typical example of the metadata are the Oracle supplied PL/SQL packages. Common users are users defined at the root level which have access to all databases plugged into the CDB. They are available across the multitent architecture similar to SYS and SYSTEM, however their privileges vary across the PDB/CDB databases. A CDB can only have one root.
Seed:
A seed is a template which is used to create new PDBs. Its named as PDB$SEED. You cannot edit or modify objects within PDB$SEED and its Read-Only. There can be only PDB Seed against each CDB.PDBs:
From an end user’s perspective they only know and need to connect with PDBs. From their point of view PDB is no different from non-CDB database (Non-CDB is the term that will be used for databases created in versions before 12c). Ideally a PDB will correspond to one application and thus many applications can be hosted against one CDB. Currently Oracle supports 252 PDBs against one CDB. Every PDB will be fully compatible with previous versions of Oracle database. Also you can easily plug any Non-CDB database as PDB to CDB database and vice versa.Common and Local Users:
There will be two types of users. Common users will be the users which have same identity in Root and every other PDB database. What they are authorized to do within each database may vary from database to database but they will have identity in all of them.Local users will be the users local to individual PDBs. They will not have identity in other databases. So a local user named Scott can exist in two databases with same name. However common user will have unique name across all databases.
CDB and PDB Administration:
There is a clear SOD (Separation of Duties) defined between the administrator accounts of CDB and PDB. A CDB administrator can manage Root database and can also perform some operations on PDB level as well like Creating and dropping PDBs.A PDB administrator on the other hand will only be able to manage individual PDB where it is created. He can manage space, manager other users, move data files here and there but only to its specific PDB. He will not have access to other PDBs and CDB.
Connecting to CDB and PDB
During installation if you select to install and create database option then Oracle at least creates CDB$ROOT and PDB$SEED. If you choose to create a PDB then it will create a PDB as well the name of which will be specified by you. The screenshot below shows you this option when you are creating database.
It is worth mentioning that every PDB created will have its own Service name which users will use to connect to – Just like in previous versions. However it will not have a separate instance. It will use the same instance and share memory structures (SGA) and background processes from CDB. This feature is known as Consolidation and its new in 12c. So the ORACLE_SID environment parameter will always have value equal to CDB instance name. The following query will always return the instance name of CDB regardless if you are connected to CDB or any PDB attached to that CDB.
SQL> select instance_name from v$instance;
With that said lets try to connect to Oracle instance using the very familiar command.
$ sqlplus / as sysdba
SQL*Plus: Release 12.1.0.1.0 Production on Fri Jun 28 03:12:40 2013
Copyright (c) 1982, 2013, Oracle. All rights reserved.
Connected to an idle instance.
SQL> startup
ORACLE instance started.
Total System Global Area 839282688 bytes
Fixed Size 2293928 bytes
Variable Size 562040664 bytes
Database Buffers 272629760 bytes
Redo Buffers 2318336 bytes
Database mounted.
Database opened.
SQL>
To check which database you are connected to you can use the new con_name and con_id SQL*PLUS functions.
SQL> show con_id
CON_ID
------------------------------
1
SQL> show con_name
CON_NAME
------------------------------
CDB$ROOT
SQL>
To connect to PDB databases you need to use the proper username/password combination. OS level authentication will not work for PDBs. This also means that you cannot connect to PDBs without first configuring tnsnames.ora and starting the listener. However for test purpose you can use the following syntax to avoid tnsnames configurations for now. Your listener should be listening however for this to work.
$ sqlplus sys/oracle@VST-12c:1521/pdb12c as sysdba
SQL*Plus: Release 12.1.0.1.0 Production on Fri Jun 28 03:32:21 2013
Copyright (c) 1982, 2013, Oracle. All rights reserved.
Connected to:
Oracle Database 12c Enterprise Edition Release 12.1.0.1.0 - 64bit Production
With the Partitioning, OLAP, Advanced Analytics and Real Application Testing options
SQL>
To confirm that we are connected to right database.
SQL> show con_name
CON_NAME
------------------------------
PDB12c
SQL> show con_id
CON_ID
------------------------------
3
SQL>
The following command however will show that instance is same. This is because of consolidation. All PDBs will use the CDB’s instance.
SQL> select instance_name from v$instance;
INSTANCE_NAME
----------------
cdb12c
If you are connected to CDB as SYS or any other Common user then you can switch between different Containers on the go – provided that you have relevant privileges. For example if you are connected to CDB as SYS and want to perform some operation in one of your PDB as SYS as well then instead of opening another session you can just switch Container as shown below.
SQL> show con_name
CON_NAME
------------------------------
CDB$ROOT
SQL> alter session set container=pdb12c;
Session altered.
SQL> show con_name
CON_NAME
------------------------------
PDB12C
Creating and dropping PDBs
In order to create a new PDB or to drop an existing one you will have to connect to CDB as SYSDBA. First lets check what current PDBs are attached to CDB.SQL> select pdb_name,status from cdb_pdbs;
PDB_NAME STATUS
------------------------------ -------------
PDB12c NORMAL
PDB$SEED NORMAL
As you can see there are two PDBs. One is seeded and the other is what we created during installation. To create a new PDB we will first create a directory to hold the data files for new database and then use the following command.
SQL> create pluggable database pdbtest
2 admin user pdbtest_admin identified by oracle
3 roles = (DBA)
4 file_name_convert=('/u01/app/oracle/oradata/cdb12c/pdbseed','/u02/app/oracle/oradata/cdb12c/pdbtest');
Pluggable database created.
Elapsed: 00:00:17.08
I specifically turned on timing for this command. As you can see it took us just 17 seconds to create a new database. Application deployment is going to be extremely fast with this new concept. This was made possible due to the fact that for every new database Oracle does not have to extract and copy files from template, create and initialize instance and configure everything. Everything has already been done during CDB creation. Oracle merely copies the required data files and creates a service which can be used to connect to CDB instance.
The above command will only create SYSTEM and SYSAUX tablespaces for the new PDB. The files like for Undo tablespace and Redo Logs will be used to that of CDB.
Run the following command to confirm creation of database.
SQL> select pdb_name,status from cdb_pdbs;
PDB_NAME STATUS
------------------------------ -------------
PDB12c NORMAL
PDB$SEED NORMAL
PDBTEST NEW
Elapsed: 00:00:00.10
The status column shows New for our newly created database. This is because database has never been opened. We will see next how to start/stop CDB and PDBs.
To drop a PDB you must close it first.
SQL> alter pluggable database pdb12c close;
Pluggable database altered.
Elapsed: 00:00:02.25
SQL> drop pluggable database pdb12c including datafiles;
Pluggable database dropped.
Elapsed: 00:00:00.66
SQL> select name from v$pdbs;
NAME
------------------------------
PDB$SEED
PDBTEST
Elapsed: 00:00:00.06
Starting/Stopping CDB and PDBs
The traditional approach of starting and stopping databases is now only valid for CDB. So in order to start and stop CDB you will use the familiar startup and shutdown commands. PDBs don’t get automatically started with CDB. Even if your CDB is up and running it is possible that PDBs are still inaccessable. To view the current status of PDBs run the following command.SQL> select name,open_mode
2 from v$pdbs;
NAME OPEN_MODE
------------------------------ ----------
PDB$SEED READ ONLY
PDB12c MOUNTED
PDBTEST MOUNTED
Elapsed: 00:00:00.01
Already discussed above PDB$SEED cannot be opened for Read Write. Our two example PDBs are in Mount state. You can open a PDB using the following command.
SQL> alter pluggable database pdbtest open;
Pluggable database altered.
Elapsed: 00:00:11.69
SQL> select name,open_mode from v$pdbs;
NAME OPEN_MODE
------------------------------ ----------
PDB$SEED READ ONLY
PDB12c MOUNTED
PDBTEST READ WRITE
Elapsed: 00:00:00.04
Likewise you can close a PDB using the following command.
SQL> alter pluggable database pdbtest close;
Pluggable database altered.
Elapsed: 00:00:00.92
To open/close all PDBs at once you can use the following commands.
SQL> alter pluggable database all open;
Pluggable database altered.
Elapsed: 00:00:05.96
SQL> alter pluggable database all close;
Pluggable database altered.
Elapsed: 00:00:01.33
If you are connected to PDB and issue the Startup and Shutdown commands then those commands will Open and Close that PDB only . For example
SQL> show con_name
CON_NAME
------------------------------
PDB12C
SQL> shutdown immediate;
Pluggable Database closed.
SQL> startup
Pluggable Database opened.
Automating Startup of PDBs
You can automate the startup of PDBs so that they are opened as soon as CDB is up and running. The following code will create a trigger on Startup event to open all PDBs.SQL> create or replace trigger sys.after_startup after startup on database
2 begin
3 execute immediate 'alter pluggable database all open';
4 end after_startup;
5 /
Trigger created.
Elapsed: 00:00:00.19
Lets test this by shutting down and then starting up the CDB.
SQL> shutdown immediate;
Database closed.
Database dismounted.
ORACLE instance shut down.
SQL> startup
ORACLE instance started.
Total System Global Area 839282688 bytes
Fixed Size 2293928 bytes
Variable Size 562040664 bytes
Database Buffers 272629760 bytes
Redo Buffers 2318336 bytes
Database mounted.
Database opened.
SQL> select name,open_mode from v$pdbs;
NAME OPEN_MODE
------------------------------ ----------
PDB$SEED READ ONLY
PDB12c READ WRITE
PDBTEST READ WRITE
Elapsed: 00:00:00.18
Renaming a PDB
You can easily change the global name of a PDB with few very simple commands. This is simple because there is no specific instance with same name attached to PDBs. They use instance attached to CDB. However you will have to log into the specific PDB to change its name. You cannot do this from CDB.First close the database and open it in restricted mode.
SQL> alter pluggable database pdb_test close;
Pluggable database altered.
SQL> alter pluggable database pdb_test open restricted;
Pluggable database altered.
We are currently connected to CDB. If we try to change the global of PDB_TEST, we will get the error message as shown below.
SQL> alter pluggable database pdb_test rename global_name to pdb3;
alter pluggable database pdb_test rename global_name to pdb3
*
ERROR at line 1:
ORA-65046: operation not allowed from outside a pluggable database
To do this we will first connect to PDB_TEST and then change the name from there.
$ sqlplus sys/oracle@localhost:1521/pdb_test as sysdba
SQL*Plus: Release 12.1.0.1.0 Production on Sat Jun 29 01:39:34 2013
Copyright (c) 1982, 2013, Oracle. All rights reserved.
Connected to:
Oracle Database 12c Enterprise Edition Release 12.1.0.1.0 - 64bit Production
With the Partitioning, OLAP, Advanced Analytics and Real Application Testing options
SQL> show con_name
CON_NAME
------------------------------
PDB_TEST
SQL> alter pluggable database pdb_test rename global_name to pdb3;
Pluggable database altered.
Global name has been changed. Close the database and reopen it in Normal Read Write mode.
SQL> alter pluggable database pdb_test rename global_name to pdb3;
Pluggable database altered.
SQL> alter pluggable database close immediate;
Pluggable database altered.
SQL> alter pluggable database open;
Pluggable database altered.
SQL> select name,open_mode from v$pdbs;
NAME OPEN_MODE
------------------------------ ----------
PDB3 READ WRITE
Data Dictionary Views
There are new data dictionary views which start with CDB_* and are only visible to SYSDBA when connected to CDB. They show information about all objects no matter where they are. In CDB or in some PDB. For example the following command will show names of all data files whether they belong to CDB, PDBSEED or to our PDB i.e. PDB12C.SQL> select file_name from cdb_data_files;
FILE_NAME
----------------------------------------------------------------------------------------------------
/u02/app/oracle/oradata/cdb12c/pdb12c/system01.dbf
/u02/app/oracle/oradata/cdb12c/pdb12c/sysaux01.dbf
/u01/app/oracle/oradata/cdb12c/system01.dbf
/u01/app/oracle/oradata/cdb12c/sysaux01.dbf
/u01/app/oracle/oradata/cdb12c/undotbs01.dbf
/u01/app/oracle/oradata/cdb12c/users01.dbf
/u01/app/oracle/oradata/cdb12c/cdata.dbf
/u01/app/oracle/oradata/cdb12c/pdbseed/system01.dbf
/u01/app/oracle/oradata/cdb12c/pdbseed/sysaux01.dbf
9 rows selected.
These data dictionary views have an extra column of CON_ID which can be used to select objects attached to specific database.
SQL> select file_name from cdb_data_files
2 where con_id=2;
FILE_NAME
----------------------------------------------------------------------------------------------------
/u01/app/oracle/oradata/cdb12c/pdbseed/system01.dbf
/u01/app/oracle/oradata/cdb12c/pdbseed/sysaux01.dbf
Almost every data dictionary view have a corresponding CDB_* view. The normal DBA_* views will only show information about objects of current container only.
SQL> select file_name from dba_data_files;
FILE_NAME
----------------------------------------------------------------------------------------------------
/u01/app/oracle/oradata/cdb12c/system01.dbf
/u01/app/oracle/oradata/cdb12c/sysaux01.dbf
/u01/app/oracle/oradata/cdb12c/undotbs01.dbf
/u01/app/oracle/oradata/cdb12c/users01.dbf
/u01/app/oracle/oradata/cdb12c/cdata.dbf