Friday, January 27, 2012

Using Subclipse Behind a Proxy Server

At my day job I sit behind a corporate firewall protecting and caching web traffic (among other things). For the most part it stays out of the way. But sometimes it rears its ugly head and stands firmly in the path of what I am trying to do.

Earlier this week I was trying to look at a cool new general validation system for ColdFusion called Validat, put out by the great guys at Alagad. They don't have a download on the RIAForge site yet, but the files are available via SVN. I loaded up the subclipse plugin into my Eclipse, restarted and began adding the Validat SVN repository. I started getting errors abou the "RA layer request failed" and "svn: PROPFIND request failed on /Validat/trunk", followed by an error about not being able to connect to the SVN server.

I already had Eclipse setup with my proxy settings, so I thought I was doing something wrong or Alagad didn't actually have the subversion repository up-and-available. After going home that night, I tried it from home and wa-la it worked. Stupid proxy server! So the subclipse plugin won't use the Eclipse proxy settings. (Can that be fixed please!). After digging around the subclipse help site and being redirected to the collab.net help, then unproductively searching through the eclipse workspace, plugins, and configuration folders for the settings file, I was finally able to figure out how to set up subclipse to use the proxy server.

In my Windows development environment, I opened the following file: "C:\Documents and Settings\\Application Data\Subversion\servers" in text editor. Near the bottom of that file is a [global] section with http-proxy-host and http-proxy-port settings. I uncommented those two lines, modified them for my corporate proxy server, went back to the SVN Repository view in Eclipse, refreshed the Validat repository and Boom! it worked!

S M A R T - E X E R C I S E - T I P S & ( B M I )

Be sure to consult your doctor before beginning any exercise program.
Books, videotapes, internet and personal trainers are all great sources of information on exercise program. Make sure the information comes from a credible source such as 'The American College of Sports Medicine' (ACSM) or 'The American Council on Exercise' (ACE).

For every good information resource, there is also a gimmick or fad. A simple rule of thumb is that if it sounds too good to be true, then it probably is. The best route to a happier, healthier life is good old-fashioned work - 20 + minutes per day, 3-5 times per week. Several key considerations will help you determine the best program for you.

FIT ( Frequency, intensity, time) , heart rate, exercise variety and setting goals.

  • Frequency: How often you workout. Three to Five time per week is best. 
  • Intensity: Whatever your exercise goals, you need to exercise at the right intensity level. If you don't exercise hard enough, you won't get the results you want. Exercise too hard and you could experience unnecessary pain and risk injury, leading you to abandon your exercise routine altogether. 
  • Time: Time is the duration of your workout. To achieve the results you are looking for, it's important that you exercise for 20 minutes. If you are new to exercise, slowly increase the duration of each workout. A great method is to add one minute to each workout until you reach your desired time.

Heart Rate: Your heart rate is your body's speedometer. The best way to gauge your exercise intensity is by measuring your heart rate.
What should my heart rate be?
To understand exercise intensity you must first determine your theoretical maximum heart rate (TMHR) by substracting your age from 220. The lower limit of your heart rate training zone is 55 % of your TMHR; the upper limit is 90 % of TMHR. You should always exercise within these numbers.

Example: for a 30 year old exerciser:
220-30 = 190 TMHR in beats per minutes (BPM)
Lower Limit: 190 * 0.55 = 104.5  BPM
Upper Limit: 190 * 0.90 =  171.0 BPM

This shows that a 30-year-old exerciser's heart rate should be between 104.5 and 171 beats per minutes during a workout.

If your exercise goal is to burn fat and lose weight, you should exercise in the range of 60 % to 70 % of your TMHR. You should also exercise for a longer period of time, at least 30 minutes. This will maximize the calories being burned from fat stores.
If your goal is to improve your cardiovascular level, then you should train at a higher intensity, in the 75 % to 90 % TMHR range. While exercising in this higher intensity range, you will be conditioning your heart and lungs to maximize your overall cardiovascular fitness.


BMI : Body Mass Index

What is BMI?
Body Mass Index (BMI) is a number calculated from a person's weight and height. BMI is a fairly reliable indicator of body fatness for most people. BMI does not measure body fat directly, but research has shown that BMI correlates to direct measures of body fat, such as underwater weighing and dual energy x-ray absorptiometry (DXA).1, 2 BMI can be considered an alternative for direct measures of body fat. Additionally, BMI is an inexpensive and easy-to-perform method of screening for weight categories that may lead to health problems.

How is BMI used?
BMI is used as a screening tool to identify possible weight problems for adults. However, BMI is not a diagnostic tool. For example, a person may have a high BMI. However, to determine if excess weight is a health risk, a healthcare provider would need to perform further assessments. These assessments might include skinfold thickness measurements, evaluations of diet, physical activity, family history, and other appropriate health screenings.

Why CDC use BMI to measure overweight and obesity ?
Calculating BMI is one of the best methods for population assessment of overweight and obesity. Because calculation requires only height and weight, it is inexpensive and easy to use for clinicians and for the general public. The use of BMI allows people to compare their own weight status to that of the general population.

What are some other ways to measure obesity? Why doesn't CDC use those to determine overweight and obesity among the general public?
Other methods to measure body fatness include skinfold thickness measurements (with calipers), underwater weighing, bioelectrical impedance, dual-energy x-ray absorptiometry (DXA), and isotope dilution. However, these methods are not always readily available, and they are either expensive or need highly trained personnel. Furthermore, many of these methods can be difficult to standardize across observers or machines, complicating comparisons across studies and time periods.

How is BMI Calculated and Interpreted?
BMI is calculated the same way for both adults and children. The calculation is based on the following formulas:
Interpretation of BMI for adults:
For adults 20 years old and older, BMI is interpreted using standard weight status categories that are the same for all ages and for both men and women. For children and teens, on the other hand, the interpretation of BMI is both age- and sex-specific.

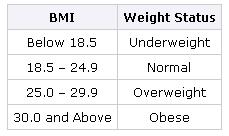
The standard weight status categories associated with BMI ranges for adults are shown in the following table.

Useful Links being in America.

  1. Your access to Free Credit Report - Know Your Rights.
  2. For Indians - 'Consulate General of India' - San Francisco.
  3. Best site with all information about your american immigration.
  4. Tax Filing & Return - IRS 
    1. Get Electronic Filing Pin - IRS Site
    2. HR Block - Create Your Account 
    3. IRS Free File Tax Filing
  5. CAR Buying Tips:
    1. Check Values of CAR on Kelly Blue Book (KBB)
    2. Check CAR History - CARFAX
    3. Take the CAR (with permission from CAR seller) to the CAR Brand Dealer, ask them to inspect - they usually charge small price.
    4. Come up with the price w.r.t. Step #1, Step #2 and Step #3. Reduce your price bit more and bargain with the seller (Seller don't want to go to dealers because they don't want to pay extra money to go through dealers, they prefer to sell to you ;) ).

Sunday, January 22, 2012

Creating the wlfullclient.jar using the WebLogic JarBuilder tool

Creating a wlfullclient.jar for JDK 1.6 client applications


  1. Change directories to the server/lib directory. $ cd WL_HOME/server/lib
  2. Use the following command to create wlfullclient.jar in the server/lib directory:$ java -jar wljarbuilder.jar
  3. You can now copy and bundle the wlfullclient.jar with client applications.
  4. Add the wlfullclient.jar to the client application’s classpath.

 Creating a wlfullclient5.jar for JDK 1.5 client applications


  1.  Change directories to the server/lib directory. $ cd WL_HOME/server/lib
  2. Use the following command to create wlfullclient.jar in the server/lib directory: $ java -jar wljarbuilder.jar -profile wlfullclient5
  3. You can now copy and bundle the wlfullclient5.jar with client applications.
  4. Add the wlfullclient5.jar to the client application’s classpath.

Saturday, January 14, 2012

GIT - GITOSIS & GITWEB - SETUP

Intall Git
After logging into your box, let’s install Git (if not already installed):
"$ sudo apt-get install git-core"
Press enter or type ‘Y’ and press enter and git will be installed. Type the following to confirm:
"$ git --version"
and you’ll see something like: git version 1.6.3.3

Intall python-setuptools
Also install the python-setuptools because we’ll need them (gitosis is written in python):
"$apt-get install python-setuptools"

Download Gitosis
We need to clone the gitosis source locally to install it:
"$ mkdir src && cd src"
"~/src $ git clone git://eagain.net/gitosis.git"
Install Gitosis Now let’s install it:
"~src $ cd gitosis"
"~/src/gitosis $ python setup.py install"
"result": http://gist.github.com/352769
Gist. Gitosis is now installed. Next steps are to create git user and handle a file permission on a git hook.
Create Git User:
"$ sudo adduser --system --shell /bin/bash --gecos --group --disabled-password --home /home/git git"
Use local, public ssh key
You need to initially use your public ssh key (id_rsa.pub). If you have one, it will be at $HOME/.ssh/id_rsa.pub and if you have never generated one, you can do so by running the following command (accept the default location and you don’t need to enter a passphrase when prompted):
"$ ssh-keygen -t rsa"
Now you need to upload it to the server/slice. I usually use the scp (secure copy command):
"$ scp $HOME/.ssh/id_rsa.pub user@192.168.1.1:/tmp/"
This will upload the local id_rsa.pub file to the /tmp/ folder on the server. Why there? So that the git user can use it. How is that possible? The folder has permissions of 777 (drwxrwxrwt) meaning everyone has read and write access to it.
Sidenote: SSH Port
If you have your sshd daemon running on a different port other than 22 (which is the default, but I highly suggest changing), then you need to use scp like this:
"$ scp -P 1234 $HOME/.ssh/id_rsa.pub user@192.168.1.1:/tmp/"
I believe the “-P” option must be capitalized.
Initialize gitosis-admin repository
On the server, issue the following command to set your public ssh key as the first authorized key of a new gitosis-admin repository:
"$ sudo -H -u git gitosis-init < /tmp/id_rsa.pub"
Change Permissions on post-update hook
You have to set the permissions on the post-update git hook of the gitosis-admin repository so that gitosis-admin can add new repository structures when they are added/removed to/from the gitosis.conf file.
"$ sudo chmod 755 /home/git/repositories/gitosis-admin.git/hooks/post-update"
Note: First round of this post, I didn’t make this change. When I added a new project, it failed because this hook didn’t have the right permissions.
Clone gitosis-admin repository
Now we’re going to use Git to administrate this gitosis instance. I think that is pretty ingenius. Let’s clone the gitosis-admin repository locally:
"$ git clone git@YOUR_SERVER_HOSTNAME:gitosis-admin.git"
We are now in the gitosis-admin repository folder locally
Two most common errors
#1> it is because you have used a port for SSH other than port 22 (the default). To fix this, you need to edit your .ssh/config file and add: "HOST YOUR_SERVER_HOSTNAME" / "PORT YOUR_PORT"
Of course, you need to put in your server hostname and port number (i.e., mydomain.com and 12345)
#2> This has usually hit me because I locked down my /etc/ssh/sshd_config file to only allow in certain users or groups. I have to change the AllowUsers line in my file from: "Allowusers dixitgitscm" to "Allowusers dixitgitscm git" and then restart the ssh daemon:
"$ sudo /etc/init.d/ssh restart"
Now the git user has access to reach my server/slice via ssh.
The local gitosis-admin repository
You now have a local clone of the gitosis-admin repository. The contents are only a conf file and key directory:
~/gitosis-admin(master)>ls
total 8
-rw-r--r-- 1 user staff 1148 May 22 21:31 gitosis/conf
drwxr-xr-x 3 user staff 1148 May 22 21:31 keydir
-----------------------------------------------------------------------------------------------
Note: before anyone asks, the (master) notation in my prompt is usage of the __git_ps1
I like knowing which Git branch I’m currently in. I use the git-ps1 function feature that comes with git-core. If you clone or download the git source: "$ git://git.kernel.org/pub/scm/git/git.git" There is a file in the contrib/completion folder called git-completion.bash:
~/code/git/contrib/completion<span class="o">(</span>master<span class="o">)</span> > ls
total 96
-rwxr-xr-x  1 user  staff    44K Apr 14 15:26 git-completion.bash
I copy this file to my $HOME folder as .git-completion.bash and then reference it and the ps1 propt feature in my .bashrc file
<span class="nb">source</span> ~/.git-completion.bash
<span class="nb">export </span><span class="nv">PS1</span><span class="o">=</span><span class="s1">'w$(__git_ps1 "(%s)") > '</span>
And now whenever I cd into a folder that is a Git repository I see something like the following prompt:
~/gitosis-admin<span class="o">(</span>master<span class="o">)</span> >
Notice the (master) notation. That is telling me I’m on the master branch. It’s just easier than issuing a “git branch” command everytime I want to know.
----------------------------------------------------------------

Add Projects and Contributors


Friday, November 11, 2011

Enhancing Security with Manifest Attributes

The following JAR file manifest attributes are available to help ensure the security of your applet or Java Web Start application:
  • The Permissions attribute is used to ensure that the application requests only the level of permissions that is specified in the applet tag or JNLP file used to invoke the application. Use this attribute to help prevent someone from re-deploying an application that is signed with your certificate and running it at a different privilege level.
    This attribute is required in the main JAR file when the Security Level slider in the Java Control panel is set to Very High or High. See Permissions Attribute in the Java RIA Development and Deployment Guide for more information.
  • The Codebase attribute is used to ensure that the code base of the JAR file is restricted to specific domains. Use this attribute to prevent someone from re-deploying your application on another website for malicious purposes. See Codebase Attribute in the Java RIA Development and Deployment Guide for more information.
  • The Application-Name attribute is used to provide the title that is shown in the security prompts for signed applications. See Application-Name Attribute in the Java RIA Development and Deployment Guide for more information.
  • The Application-Library-Allowable-Codebase attribute is used to identify the locations where your application is expected to be found. Use this attribute to reduce the number of locations shown in the security prompt when the JAR file is in a different location than the JNLP file or the HTML page. See Application-Library-Allowable-Codebase Attribute in the Java RIA Development and Deployment Guide for more information.
  • The Caller-Allowable-Codebase attribute is used to identify the domains from which JavaScript code can make calls to your application. Use this attribute to prevent unknown JavaScript code from accessing your application. See Caller-Allowable-Codebase Attribute in the Java RIA Development and Deployment Guide for more information.
  • The Trusted-Only attribute is used to prevent untrusted components from being loaded. See Trusted-Only Attribute in the Java RIA Development and Deployment Guide for more information.
  • The Trusted-Library attribute is used to allow calls between privileged Java code and sandbox Java code without prompting the user for permission. See Trusted-Library Attribute in the Java RIA Development and Deployment Guide for more information.

Sunday, August 7, 2011

Scripts to take multiple thread dump after regular interval - Weblogic

Its always recommended to take multiple thread dumps at close intervals (10 or 20 dumps at 10-30 seconds intervals). Why? A thread dump is a snapshot of threads in execution or various states. Taking multiple thread dumps allows us to peek into the threads as they continue execution.

In order take thread dumps use following script, name this scripts to some values, let's say we name it as td_take.sh and it is intended to make the task of collecting thread dumps easier. Its usage is quite simply and can be seen by running the script with no arguments, e.g.: ./td_take.sh
  1. Start the relevant Server the usual way.
  2. When the issue occurs, use td_take.sh to take thread dumps 10-20 seconds apart.
  3. After the Server has started completely, hung or crashed, provide us with the following:
  • Log file for server, usually located at: <WLS_HOME>/user_projects/domains/<domain_name>/servers/<server_name>/logs
  • Standard output file (.out) for server, usually located at: <WLS_HOME>/user_projects/domains/<domain_name>/servers/<server_name>/logs
  • If using the "nohup" command to start the server than the nohup.out, otherwise discard this last file.
= = = = = = = = = = = = = = = = = = = = = = = = = = = = = = =
 #!/bin/sh

if [ $# -le 1 ]
then
    echo
    echo "Usage:"
    echo "To take threads indefinitely:"
    echo "    ./tdtake.sh <PID> <interval_in_seconds>"
    echo "To take a specific amount of threads:"
    echo "    ./tdtake.sh <PID> <interval_in_seconds> <amount_of_threads>
"
    echo "e.g.: ./tdtake.sh 512 10 5"
    echo "will take 5 thread dumps, 10 seconds apart each for process ID 512.
"

    exit 0
fi

function take_dumps {
    kill -3 $1
    echo Waiting $2 seconds...
    sleep $2
}

if [ -z $3 ]
then
    echo "Taking thread dumps indefinitely."
    echo "Press <Ctrl>+C to terminate."
    i=1
    while [ $i -gt 0 ]
    do
        echo Taking thread dump $i
        take_dumps $1 $2
        i=`expr $i + 1`
    done
else
    echo "Taking a total of $3 threads."
    echo "Press <Ctrl>+C to terminate before completion."
    i=1
    while [ $i -le $3 ]
    do
        echo Taking thread dump $i
        take_dumps $1 $2
        i=`expr $i + 1`
    done
fi

= = = = = = = = = = = = = = = = = = = = = = = = = = = = = = =