- Compaction is used to reduce heap fragmentation, i.e., move objects to form contiguous ‘live regions’ of the heap space. Note when a full compaction is run the stopping of a concurrently running application is inevitable. We can say that compaction is one of the worst garbage collection bottlenecks. If anything is known about fragmentation and object sizes it might be beneficial to tune compaction.
- The compaction algorithm divides the heap into a number of equally large parts. Each of these is subject to separate compaction that can stop the world. The default is 4096 parts. When compaction is too disruptive it might help to increase the number of heap parts. When compaction fails to keep up with fragmentation it might help to decrease the number of heap parts. Note that, for strategies other than throughput the compaction areas are sized dynamically.
- The proper tuning of compaction involves two parameters:
- Compaction ratio (-XX:compaction:percentage:<percentage> or -XX:compaction:internalPercentage=<percentage>,externalPercentage=<percentage>) – the percentage of the heap that the garbage collector compacts at each garbage collection. While the JVM is compacting the heap, all threads that want to access objects need to wait because the JVM is moving the objects around.
- Maximum references (-XX:compaction:maxReferences:<value>) – the maximum number of references to objects in the compaction area. If the number of references exceeds this limit, the compaction is canceled. When compaction has moved objects, the references to these objects must be updated. The pause time introduced by this updating is proprotional to the number of references that have been updated.
- Steps to tune compaction are as follows:
- Set the compaction ratio to 1 and gradually increase the ratio until the pause time becomes too long.
- If the garbage collection time is too long when the compaction ration is 1, the maximum number of references must be adjusted.
- Set the maximum references to 10000 and gradually increase the references until the pause time becomes too long. To monitor compaction behavior, we can add the option -Xverbose:compaction to the command-line. If many compactions are skipped, the maximum references must be increased; if, on the other hand, the compaction pause times are too long the maximum references must be decreased.
- As we are using a dynamic garbage collection that optimizes the pause time (-Xgc:pausetime), we do not need to tune the compaction manually in this case setting the -XpauseTarget is sufficient.
- Each thread allocates objects in a TLA that is promoted to the heap when full. The TLA size can be adjusted by using -XXtlaSize:min=<size>,preferred=<size>,wasteLimit=<size>, in which:
- min – sets the minimum size of a TLA.
- preferred – sets the preferred size of a TLA. The system will try to get TLAs of the preferred size if possible, but accepts TLAs of minimum size as well.
- wasteLimit – sets the waste limit for TLAs. This is the maximum amount of free memory that a TLA is allowed to have when a thread requires a new TLA
Friday, January 2, 2009
Tuning the compaction and thread local area (TLA) size.

Wednesday, December 31, 2008
Java Weblogic SSL
This is a simple WebLogic SSL configuration. If you’re not using WebLogic with SSL you probably should be. Minimally have SSL setup to encrypt your passwords to the administration consoles. I actually force SSL and disable the standard http listen port. My authentication provider is active directory and I’m using SSL there as well. The node manager is also setup using SSL as are the managed servers (JVMs). I’ll get into all that a bit later.
I’ll be using java’s keytool for all of this. We will create two keystores, one for the identity and one for the trust. You could also use the standard java trust and simply add your root certificates to it.
Some Notes (WebLogic Default Keystore Passwords - In case you want to mess with the demo trust or demo keystore)
Trust store password: DemoTrustKeyStorePassPhrase
Key store password: DemoIdentityKeyStorePassPhrase
Private key password: DemoIdentityPassPhrase
Java standard trust store password: changeit
Using java keytool:
Create the identity keystore and keypair.
I cd directly to the directory where WebLogic stores its demo trust and demo identity keystores. In my case /opt/oracle/middleware/wlserver_10.3/server/lib. My two keystores weblogic_identity.jks and weblogic_identity.jks will be created and stored there.
Create the certificate signing request (CSR):
Create the trust keystore & import the root certificate:
WebLogic WSLT script for SSLThis script will setup the above keystores for your admin and all your managed JVMs.
Edit nodemanager.properties
You should make sure you are using SecureListener=true and add the following:
Set node manager type to SSL
Log into your admin console and make sure node manager type is set to SSL.
After all that make sure you save and activate any changes you made and restart everything and you should be good to go. Rock on…..
Weblogic Cluster SSL:
Change cluster address port
I assign addresses and ports on my cluster page, don’t forget to change the port to your secure port.
Secure Replication
Oh yea, if you disable all your regular listen ports and change cluster communication to use SSL make sure you change your cluster replication to “Secure Replication Enabled” or else things wont work. This setting is under clusters > cluster name > replication. You will see an error similar to:
I’ll be using java’s keytool for all of this. We will create two keystores, one for the identity and one for the trust. You could also use the standard java trust and simply add your root certificates to it.
Some Notes (WebLogic Default Keystore Passwords - In case you want to mess with the demo trust or demo keystore)
Trust store password: DemoTrustKeyStorePassPhrase
Key store password: DemoIdentityKeyStorePassPhrase
Private key password: DemoIdentityPassPhrase
Java standard trust store password: changeit
Using java keytool:
Create the identity keystore and keypair.
I cd directly to the directory where WebLogic stores its demo trust and demo identity keystores. In my case /opt/oracle/middleware/wlserver_10.3/server/lib. My two keystores weblogic_identity.jks and weblogic_identity.jks will be created and stored there.
/opt/oracle/middleware/java/bin/keytool -genkey -alias weblogicServer -keyalg RSA -keysize 2048 -keystore weblogic_identity.jks -dname "CN=myhost.domain.com,OU=Middleware, O=MyOrg"Create the certificate signing request (CSR):
/opt/oracle/middleware/java/bin/keytool -certreq -alias weblogicServer -file myhost.csr -keystore weblogic_identity.jksCreate the trust keystore & import the root certificate:
/opt/oracle/middleware/java/bin/keytool -import -trustcacerts -alias myRoot -file /path/to/myRoot.cer -keystore weblogic_trust.jks/opt/oracle/middleware/java/bin/keytool -import -trustcacerts -alias entRoot -file /path/to/entRoot.cer -keystore weblogic_trust.jks/opt/oracle/middleware/java/bin/keytool -import -trustcacerts -alias myRoot -file /path/to/myRoot.cer -keystore weblogic_identity.jks/opt/oracle/middleware/java/bin/keytool -import -trustcacerts -alias entRoot -file /path/to/entRoot.cer -keystore weblogic_identity.jks/opt/oracle/middleware/java/bin/keytool -import -trustcacerts -alias weblogicServer -file /path/to/mySignedCert.cer -keystore weblogic_identity.jksWebLogic WSLT script for SSLThis script will setup the above keystores for your admin and all your managed JVMs.
#!/usr/bin/python
# Read Properties File
loadProperties("/path/to/scripts/my.props")

# Split if more than one.
WLmgdName = WLmgdNameList.split(',')

# Connect String
connect(username,password,'t3://'+adminHost+':'+adminPort)

# Get your edit on son! DO WORK!
edit()
startEdit()

# Admin Server SSL & Keystore
cd('/Servers/'+adminName)
cmo.setKeyStores('CustomIdentityAndCustomTrust')
cmo.setCustomIdentityKeyStoreFileName(wlHome+'/server/lib/weblogic_identity.jks')
cmo.setCustomIdentityKeyStoreType('jks')
cmo.setCustomTrustKeyStoreFileName(wlHome+'/server/lib/weblogic_trust.jks')
cmo.setCustomTrustKeyStoreType('jks')
cd('/Servers/'+adminName+'/SSL/'+adminName)
cmo.setServerPrivateKeyAlias('weblogicServer')

for mgdServer in WLmgdName:
       # Managed Server SSL & Keystore
       cd('/Servers/'+mgdServer)
       cmo.setKeyStores('CustomIdentityAndCustomTrust')
       cmo.setCustomIdentityKeyStoreFileName(wlHome+'/server/lib/weblogic_identity.jks')
       cmo.setCustomIdentityKeyStoreType('jks')
       cmo.setCustomTrustKeyStoreFileName(wlHome+'/server/lib/weblogic_trust.jks')
       cmo.setCustomTrustKeyStoreType('jks')
       cd('/Servers/'+mgdServer+'/SSL/'+mgdServer)
       cmo.setServerPrivateKeyAlias('weblogicServer')

save()
activate()
exit()username=weblogic
password=weblogic123
adminName=my_admin
adminHost=myadmin.domain.com
adminPort=30000
WLmgdNameList=jvm01,jvm02,jvm03,jvm04,jvm05,jvm06
wlHome=/opt/oracle/middleware/wlserver_10.3Edit nodemanager.properties
You should make sure you are using SecureListener=true and add the following:
KeyStores=CustomIdentityAndCustomTrust
CustomIdentityKeyStoreFileName=/opt/oracle/middleware/wlserver_10.3/server/lib/weblogic_identity.jks
CustomIdentityKeyStorePassPhrase=t0ps3cret
CustomIdentityAlias=weblogicServer
CustomIdentityPrivateKeyPassPhrase=t0ps3cret
CustomTrustKeyStoreFileName=/opt/oracle/middleware/wlserver_10.3/server/lib/weblogic_trust.jksSet node manager type to SSL
Log into your admin console and make sure node manager type is set to SSL.
After all that make sure you save and activate any changes you made and restart everything and you should be good to go. Rock on…..
Weblogic Cluster SSL:
Change cluster address port
I assign addresses and ports on my cluster page, don’t forget to change the port to your secure port.
Secure Replication
Oh yea, if you disable all your regular listen ports and change cluster communication to use SSL make sure you change your cluster replication to “Secure Replication Enabled” or else things wont work. This setting is under clusters > cluster name > replication. You will see an error similar to:
server subsystem failed. Reason: java.lang.AssertionError: No replication server channel for osb_01 java.lang.AssertionError: No replication server channel for osb_01Monday, December 29, 2008
HOW TO CLEAR WLI_PROCESS_EVENT
Can I clear WLI_PROCESS_EVENT, the system is using 29 GB of LOB space and I have an idea that WLI_PROCESS_EVENT is responsible for it. The reason of clearing is DB is getting full and we don't want historic data, and when server crash it took longer to come back.
Some Counts from the DB (Those with CLOB's/BLOB's):
SELECT COUNT(*) FROM WLI_CALENDAR
-- 1
SELECT COUNT(*) FROM WLI_PROCESS_DOCUMENT
-- 12
SELECT COUNT(*) FROM WLI_PROCESS_EVENT
-- 638564
SELECT COUNT(*) FROM WLI_PROCESS_TRACKING
-- 81
SELECT COUNT(*) FROM WLI_WORKLIST_DATA
-- 0
SELECT COUNT(*) FROM WLI_MT_CONTENT
-- 0
SELECT COUNT(*) FROM WLI_PROCESS_INSTANCE_INFO;
-- 112
Solution: There are large amount of orphaned events which has a LOB column, so basically get rid of them:
Run this SQL Query and commit
$ Update <DB_SCHEMA_NAME>.WLI_PROCESS_INSTANCE_INFO SET PROCESS_STATUS = 5 WHERE PROCESS_STATUS = 1;
Go to wliconsole and do a manual purge. Run this SQL Query and commit:
Run this SQL Query and commit:
DELETE FROM WLI_PROCESS_EVENT WHERE PROCESS_INSTANCE IN (SELECT WLI_PROCESS_EVENT.PROCESS_INSTANCE FROM WLI_PROCESS_EVENT LEFT OUTER JOIN WLI_PROCESS_INSTANCE_INFO ON WLI_PROCESS_EVENT.PROCESS_INSTANCE = WLI_PROCESS_INSTANCE_INFO.PROCESS_INSTANCE WHERE WLI_PROCESS_INSTANCE_INFO.PROCESS_INSTANCE is NULL)
NOTE: Because I'm using Oracle, the LOB segment did not shrink, it only freed up blocks. To free up space I need to drop the column (which will drop the lobsgment) and recreate the column OR truncate the table.
Some Counts from the DB (Those with CLOB's/BLOB's):
SELECT COUNT(*) FROM WLI_CALENDAR
-- 1
SELECT COUNT(*) FROM WLI_PROCESS_DOCUMENT
-- 12
SELECT COUNT(*) FROM WLI_PROCESS_EVENT
-- 638564
SELECT COUNT(*) FROM WLI_PROCESS_TRACKING
-- 81
SELECT COUNT(*) FROM WLI_WORKLIST_DATA
-- 0
SELECT COUNT(*) FROM WLI_MT_CONTENT
-- 0
SELECT COUNT(*) FROM WLI_PROCESS_INSTANCE_INFO;
-- 112
Solution: There are large amount of orphaned events which has a LOB column, so basically get rid of them:
Run this SQL Query and commit
$ Update <DB_SCHEMA_NAME>.WLI_PROCESS_INSTANCE_INFO SET PROCESS_STATUS = 5 WHERE PROCESS_STATUS = 1;
Go to wliconsole and do a manual purge. Run this SQL Query and commit:
Run this SQL Query and commit:
DELETE FROM WLI_PROCESS_EVENT WHERE PROCESS_INSTANCE IN (SELECT WLI_PROCESS_EVENT.PROCESS_INSTANCE FROM WLI_PROCESS_EVENT LEFT OUTER JOIN WLI_PROCESS_INSTANCE_INFO ON WLI_PROCESS_EVENT.PROCESS_INSTANCE = WLI_PROCESS_INSTANCE_INFO.PROCESS_INSTANCE WHERE WLI_PROCESS_INSTANCE_INFO.PROCESS_INSTANCE is NULL)
NOTE: Because I'm using Oracle, the LOB segment did not shrink, it only freed up blocks. To free up space I need to drop the column (which will drop the lobsgment) and recreate the column OR truncate the table.
Saturday, December 27, 2008
How to enable GUI while connecting to Remote Redhat / Linux machine using Putty.
This post cover details about how we can enable GUI interfacing using Xserver while connecting to Remote Redhat 5.6 / Linux Machine using Putty on Windows based local machine.
First all of you need to install Xserver in your local box. Xserver will be installed using Xming.
After downloading install the Xming server in your localbox and run it with option ":0 -clipboard -multiwindow -ac". To do this, right click the short cut of Xming -> go to properties -> and in target its should look similar to this "C:\Program Files\Xming\Xming.exe" :0 -clipboard -multiwindow -ac (here double quates are part of the string itself), depending on the location of Xming installation path may change.
On Redhat / Linux machine has feature called X11Forwarding, depending on the value of this parameter it enables or disables the display of graphics on the server.
For connecting to Redhat Linux box I am using the most popular SSH client putty. Below are the steps to configure putty on Windows machine.
First all of you need to install Xserver in your local box. Xserver will be installed using Xming.
After downloading install the Xming server in your localbox and run it with option ":0 -clipboard -multiwindow -ac". To do this, right click the short cut of Xming -> go to properties -> and in target its should look similar to this "C:\Program Files\Xming\Xming.exe" :0 -clipboard -multiwindow -ac (here double quates are part of the string itself), depending on the location of Xming installation path may change.
On Redhat / Linux machine has feature called X11Forwarding, depending on the value of this parameter it enables or disables the display of graphics on the server.
- login on Linux/BSD system called myserver.mydomain.com
- Open /etc/ssh/sshd_config file using text editor:
- # vi /etc/ssh/sshd_config
- Find out parameter X11Forwarding and set it to yes:
- X11Forwarding yes
- Save file & exit shell prompt.
- Restart sshd service under Debian Linux:
- # /etc/init.d/ssh restart
- Alternatively, if you are using Fedora / Red Hat Linux restart sshd:
- # /etc/init.d/sshd restart
For connecting to Redhat Linux box I am using the most popular SSH client putty. Below are the steps to configure putty on Windows machine.
- Run the putty.exe
- provide Host Name (or you can use IP address of host machine as well)
- Select SSH as Connection Type.
- Port should be 22 default
- Enter again the same name as you entered in Hostname in to Saved Session Input box.
- In Connection Category, Find out the Connection Tree. In SSH, expand it and you will see "Enable X11 Forwarding"..
- Enable X11 Forwarding by selecting the check box
- X Display location should be set to localhost:0
- Save this entire information as a session by click on Save button
- Now start the Xming Server on location machine
- Now connect to the Redhat / Linux Machine using saved session from putty
- And to verify that Graphics are enable use this command xclock &
- You should be able to new graphical window coming up.
Monday, October 20, 2008
How To Encrypt Clear Text Passwords With WebLogic Server
WebLogic Server encrypts all the plain text passwords stored in its domain configuration XML file(s). This is to prevent access to sensitive information. When passwords are entered using administration console or scripting tools, it will automatically get encrypted before they are stored in the configuration XML files(s).
Prior to WebLogic Server 9.0: If those passwords need to be reset either the configuration tools (Console or scripting tools) can be used which will automatically re-encrypt the passwords or by directly changing the configuration files using a text editor. When files are directly modified using a text editor the passwords will get encrypted during the subsequent restart.
Starting from WebLogic Server 9.0: Using clear text passwords in the configuration files are supported only for Development domain and it will not re-encrypt the passwords. If the domain is a Production domain then you cannot set the passwords in clear text. You have to either use a dedicated command-line utility or WLST to encrypt the clear text passwords. If the server encounters a clear text password when parsing the configuration file(s) while starting in Production Mode, then you will get an error similar to the following:
<Oct 20, 2008 9:05:35 PM UTC> <Critical> <WebLogicServer> <BEA-000362> <Server failed. Reason: [Management:141266]Parsing Failure in config.xml: java.lang.IllegalArgumentException: In production mode, it's not allowed to set a clear text value to the property: PasswordEncrypted of ServerStartMBean>
Depending on the configuration the MBean name value of the error message may change. In this case the ServerStartMBean has clear text value for a password property. Either the dedicated Java utility to encrypt clear text values can be used or WLST cant be used to re-encrypt. To run the encrypt utility follow the instructions below:
Prior to WebLogic Server 9.0: If those passwords need to be reset either the configuration tools (Console or scripting tools) can be used which will automatically re-encrypt the passwords or by directly changing the configuration files using a text editor. When files are directly modified using a text editor the passwords will get encrypted during the subsequent restart.
Starting from WebLogic Server 9.0: Using clear text passwords in the configuration files are supported only for Development domain and it will not re-encrypt the passwords. If the domain is a Production domain then you cannot set the passwords in clear text. You have to either use a dedicated command-line utility or WLST to encrypt the clear text passwords. If the server encounters a clear text password when parsing the configuration file(s) while starting in Production Mode, then you will get an error similar to the following:
<Oct 20, 2008 9:05:35 PM UTC> <Critical> <WebLogicServer> <BEA-000362> <Server failed. Reason: [Management:141266]Parsing Failure in config.xml: java.lang.IllegalArgumentException: In production mode, it's not allowed to set a clear text value to the property: PasswordEncrypted of ServerStartMBean>
Depending on the configuration the MBean name value of the error message may change. In this case the ServerStartMBean has clear text value for a password property. Either the dedicated Java utility to encrypt clear text values can be used or WLST cant be used to re-encrypt. To run the encrypt utility follow the instructions below:
- Change directory to your domain's bin folder (For Eg. cd c:\bea\user_projects\domains\mydomain\bin)
- Execute the setDomainEnv script (For Eg. setDomainEnv.cmd)
- Execute java weblogic.security.Encrypt which will prompt for the password and will print the encrypted value in stdout.
- The following are some sample output from running the utility
- C:\bea\user_projects\domains\mydomain>java weblogic.security.Encrypt
Password:
{3DES}9HWsf87pJTw= - You should execute this utility from the domain folder as it requires the domain's password salt file (SerializedSystemIni.dat) for encrypting the clear text string. You can also pass the clear text string as an argument: C:\bea\user_projects\domains\mydomain>java weblogic.security.Encrypt testpwd
{3DES}9HWsf87pJTw= - You can also use WLST to encrypt clear text strings as below:C:\bea\user_projects\domains\mydomain>java weblogic.WLST
Initializing WebLogic Scripting Tool (WLST) ...
Welcome to WebLogic Server Administration Scripting Shell
Type help() for help on available commands
wls:/offline> es = encrypt('testpwd')
wls:/offline> print es
{3DES}9HWsf87pJTw=
wls:/offline> - When running WLST from a location different than the domain folder you can pass in an argument to specify the domain directory. Once you have the encrypted value, the configuration files can be modified to include this encrypte value instead of clear text passwords. These features will make your domain to operate when resetting the encrypted passwords on a Production domain's configuration XML files. These methods not only can be used to encrypt configuration XML (config.xml) but also the JDBC or JMS descriptor XML files.
Wednesday, February 27, 2008
Use PuTTYgen to generate a private/public key pair
Use PuTTYgen to generate a private/public key on the SSH client PC:
The example installation is from an installation on a Windows Vista Ultimate laptop PC
In the following procedure a 4096-bit RSA private/public key pair will be generated on the SSH clients PC. The public key will be transferred to the copSSH server PC for installation by the copSSH server administrator in the users .ssh folder.
Important Perquisites
Make sure the user is activated on the copSSH server prior to performing this procedure.
Make sure the user can login to the copSSH server PC using PuTTY and/or WinSCP with a password.
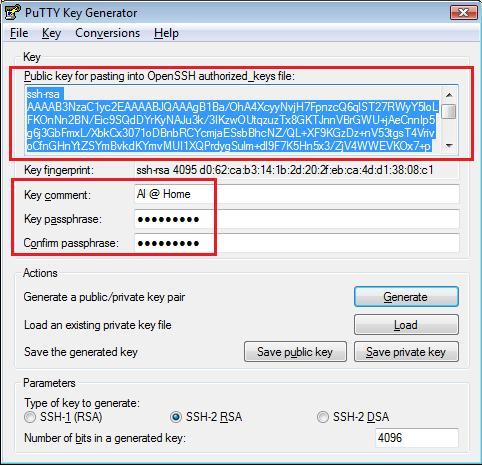
Create a new private/public key pair encrypted with a strong pass phrase using PuTTYgen
PuTTYgen is automatically installed on the client PC when WinSCP is installed or it can be downloaded from the PuTTY site. On the client PC go to Start | Run and run the C:\Program Files\WinSCP\PuTTYgen\puttygen.exe program from the command line.
Select SSH-2 RSA and 4096 bits. Click on the Generate key.

Image 1
Enter an appropriate/descriptive Key comment, enter a strong pass phrase in the Key passphrase window then reenter the pass phrase in the Confirm the passphrase window.
Good pass phrases are 10-30 characters long, are not simple sentences or otherwise easily guessable (English prose has only 1-2 bits of entropy per character, and provides very bad pass phrases), and contain a mix of upper and lowercase letters, numbers, and non-alphanumeric characters.
Do NOT forget the pass phrase. Lost pass phrases can NOT BE RECOVERED.
Highlight and copy the text in the Public key for pasting into OpenSSH authorized_keys file window into a Notepad text file. Name the file with a descriptive file name with a .pub extension and save on the client PC in a temporary folder. For example the user Al might save his public key file as Al.pub in the client C:\Temp folder.

Image 2:
Click on the Save private key button to convert and save the private key in the C:\Program Files\WinSCP\PuTTY\Key Files folder on the client PC. Create the folder if needed.

Image 3:
Move the public key to the copSSH server PC
In order to use a private/public key pair the newly created public key must be moved to the copSSH server PC. Use whatever means required to accomplish this, ie. floppy, flash drive, etc. The copSSH server administrator will then copy the new public key to the users C:\Program Files\copssh\home\\.ssh\authorized_keys file . For example the copSSH server administrator might copy the Al.pub file to the C:\Program Files\copssh\home\Al\.ssh\authorized_keys file on the server PC.
Configure PuTTY and/or WinSCP on the client PC to use the private key file
Open PuTTY and load a previously saved session, or create a new session. Enter the path and file name of the private key file in the Private key file window. I also recommend configuring PuTTY to only use the SSH2 Protocol. Click on SSH and select 2 only as the Preferred SSH protocol version. Continue configuring PuTTY including an alternate Port number for the SSH server (if used) as desired then save the session.

Image 4:
Open WinSCP and load a previously saved session, or create a new session. Enter the path and file name of the private key file in the Private key file window. I also recommend configuring WinSCP to only use the SSH2 Protocol. Click on SSH and select 2 only in the Protocol options window. Continue configuring WinSCP including an alternate Port number for the SSH server (if used) as desired then click on Save.

Image 5
The example installation is from an installation on a Windows Vista Ultimate laptop PC
In the following procedure a 4096-bit RSA private/public key pair will be generated on the SSH clients PC. The public key will be transferred to the copSSH server PC for installation by the copSSH server administrator in the users .ssh folder.
Important Perquisites
Make sure the user is activated on the copSSH server prior to performing this procedure.
Make sure the user can login to the copSSH server PC using PuTTY and/or WinSCP with a password.
Create a new private/public key pair encrypted with a strong pass phrase using PuTTYgen
PuTTYgen is automatically installed on the client PC when WinSCP is installed or it can be downloaded from the PuTTY site. On the client PC go to Start | Run and run the C:\Program Files\WinSCP\PuTTYgen\puttygen.exe program from the command line.
Select SSH-2 RSA and 4096 bits. Click on the Generate key.

Enter an appropriate/descriptive Key comment, enter a strong pass phrase in the Key passphrase window then reenter the pass phrase in the Confirm the passphrase window.
Good pass phrases are 10-30 characters long, are not simple sentences or otherwise easily guessable (English prose has only 1-2 bits of entropy per character, and provides very bad pass phrases), and contain a mix of upper and lowercase letters, numbers, and non-alphanumeric characters.
Do NOT forget the pass phrase. Lost pass phrases can NOT BE RECOVERED.
Highlight and copy the text in the Public key for pasting into OpenSSH authorized_keys file window into a Notepad text file. Name the file with a descriptive file name with a .pub extension and save on the client PC in a temporary folder. For example the user Al might save his public key file as Al.pub in the client C:\Temp folder.
Click on the Save private key button to convert and save the private key in the C:\Program Files\WinSCP\PuTTY\Key Files folder on the client PC. Create the folder if needed.

Move the public key to the copSSH server PC
In order to use a private/public key pair the newly created public key must be moved to the copSSH server PC. Use whatever means required to accomplish this, ie. floppy, flash drive, etc. The copSSH server administrator will then copy the new public key to the users C:\Program Files\copssh\home\
Configure PuTTY and/or WinSCP on the client PC to use the private key file
Open PuTTY and load a previously saved session, or create a new session. Enter the path and file name of the private key file in the Private key file window. I also recommend configuring PuTTY to only use the SSH2 Protocol. Click on SSH and select 2 only as the Preferred SSH protocol version. Continue configuring PuTTY including an alternate Port number for the SSH server (if used) as desired then save the session.

Image 4:
Open WinSCP and load a previously saved session, or create a new session. Enter the path and file name of the private key file in the Private key file window. I also recommend configuring WinSCP to only use the SSH2 Protocol. Click on SSH and select 2 only in the Protocol options window. Continue configuring WinSCP including an alternate Port number for the SSH server (if used) as desired then click on Save.

Wednesday, September 5, 2007
RPM Commands to Install, Uninstall, Upgrade, Query RPM Packages
RPM command is used for installing, uninstalling, upgrading, querying, listing, and checking RPM packages on your Linux system. RPM stands for Red Hat Package Manager.With root privilege, you can use the rpm command with appropriate options to manage the RPM software packages. Let us take an rpm of Mysql Client and run through all our examples.
For example, In the MySQL-client-3.23.57-1.i386.rpm file:
MySQL-client – Package Name
3.23.57 – Version
1 – Release
i386 – Architecture
When you install a RPM, it checks whether your system is suitable for the software the RPM package contains, figures out where to install the files located inside the rpm package, installs them on your system, and adds that piece of software into its database of installed RPM packages.
The following rpm command installs Mysql client package.
# rpm -ivh MySQL-client-3.23.57-1.i386.rpm
Preparing... ########################################### [100%]
1:MySQL-client ########################################### [100%]
rpm command and options
-i : install a package
-v : verbose
-h : print hash marks as the package archive is unpacked.
# rpm -qa
cdrecord-2.01-10.7.el5
bluez-libs-3.7-1.1
setarch-2.0-1.1
-q query operation
-a queries all installed packages
To identify whether a particular rpm package is installed on your system, combine rpm and grep command as shown below. Following command checks whether cdrecord package is installed on your system.
# rpm -qa | grep 'cdrecord'
# rpm -q MySQL-client
MySQL-client-3.23.57-1
# rpm -q MySQL
package MySQL is not installed
Note: To query a package, you should specify the exact package name. If the package name is incorrect, then rpm command will report that the package is not installed.
# rpm -qa --queryformat '%{name-%{version}-%{release} %{size}\n'
cdrecord-2.01-10.7 12324
bluez-libs-3.7-1.1 5634
setarch-2.0-1.1 235563
The following example shows that /usr/bin/mysqlaccess file is part of the MySQL-client-3.23.57-1 rpm.
# rpm -qf /usr/bin/mysqlaccess
MySQL-client-3.23.57-1
-f : file name
# rpm -qdf /usr/bin/mysqlaccess
/usr/share/man/man1/mysql.1.gz
/usr/share/man/man1/mysqlaccess.1.gz
/usr/share/man/man1/mysqladmin.1.gz
/usr/share/man/man1/mysqldump.1.gz
/usr/share/man/man1/mysqlshow.1.gz
-d : refers documentation.
# rpm -qi MySQL-client
Name : MySQL-client Relocations: (not relocatable)
Version : 3.23.57 Vendor: MySQL AB
Release : 1 Build Date: Mon 09 Jun 2003 11:08:28 PM CEST
Install Date: Mon 06 Feb 2010 03:19:16 AM PST Build Host: build.mysql.com
Group : Applications/Databases Source RPM: MySQL-3.23.57-1.src.rpm
Size : 5305109 License: GPL / LGPL
Signature : (none)
Packager : Lenz Grimmer
URL : http://www.mysql.com/
Summary : MySQL - Client
Description : This package contains the standard MySQL clients.
If you have an RPM file that you would like to install, but want to know more information about it before installing, you can do the following:
# rpm -qip MySQL-client-3.23.57-1.i386.rpm
Name : MySQL-client Relocations: (not relocatable)
Version : 3.23.57 Vendor: MySQL AB
Release : 1 Build Date: Mon 09 Jun 2003 11:08:28 PM CEST
Install Date: (not installed) Build Host: build.mysql.com
Group : Applications/Databases Source RPM: MySQL-3.23.57-1.src.rpm
Size : 5305109 License: GPL / LGPL
Signature : (none)
Packager : Lenz Grimmer
URL : http://www.mysql.com/
Summary : MySQL - Client
Description : This package contains the standard MySQL clients.
-i : view information about an rpm
-p : specify a package name
$ rpm -qlp ovpc-2.1.10.rpm
/usr/bin/mysqlaccess
/usr/bin/mysqldata
/usr/bin/mysqlperm
/usr/bin/mysqladmin
q : query the rpm file
l : list the files in the package
p : specify the package name
$ rpm2cpio ovpc-2.1.10.rpm | cpio -idmv
./usr/src/ovpc/-5.10.0
./usr/src/ovpc/ovpc-2.1.10/examples
./usr/src/ovpc/ovpc-2.1.10/examples/bin
./usr/src/ovpc/ovpc-2.1.10/examples/lib
./usr/src/ovpc/ovpc-2.1.10/examples/test
.
.
./usr/src/ovpc/ovpc-2.1.10/pcs
$ ls .
usr
# rpm -qRp MySQL-client-3.23.57-1.i386.rpm
/bin/sh
/usr/bin/perl
# rpm -qsp MySQL-client-3.23.57-1.i386.rpm
normal /usr/bin/msql2mysql
normal /usr/bin/mysql
normal /usr/bin/mysql_find_rows
normal /usr/bin/mysqlaccess
normal /usr/bin/mysqladmin
normal /usr/bin/mysqlbinlog
normal /usr/bin/mysqlcheck
normal /usr/bin/mysqldump
normal /usr/bin/mysqlimport
normal /usr/bin/mysqlshow
normal /usr/share/man/man1/mysql.1.gz
normal /usr/share/man/man1/mysqlaccess.1.gz
normal /usr/share/man/man1/mysqladmin.1.gz
normal /usr/share/man/man1/mysqldump.1.gz
normal /usr/share/man/man1/mysqlshow.1.gz
# rpm -Vp MySQL-client-3.23.57-1.i386.rpm
S.5....T c /usr/bin/msql2mysql
S.5....T c /usr/bin/mysql
S.5....T c /usr/bin/mysql_find_rows
S.5....T c /usr/bin/mysqlaccess
The character in the above output denotes the following:
# rpm -Vf /usr/bin/mysqlaccess
S.5....T c /usr/bin/mysql
# rpm -Uvh MySQL-client-3.23.57-1.i386.rpm
Preparing... ########################################### [100%]
1:MySQL-client ###########################################
# rpm -ev MySQL-client
# rpm -Va
S.5....T c /etc/issue
S.5....T c /etc/issue.net
S.5....T c /var/service/imap/ssl/seed
S.5....T c /home/httpd/html/horde/ingo/config/backends.php
.
.
S.5....T c /home/httpd/html/horde/ingo/config/prefs.php
S.5....T c /etc/printcap
Installing a RPM package Using rpm -ivh
RPM filename has packagename, version, release and architecture name.For example, In the MySQL-client-3.23.57-1.i386.rpm file:
MySQL-client – Package Name
3.23.57 – Version
1 – Release
i386 – Architecture
When you install a RPM, it checks whether your system is suitable for the software the RPM package contains, figures out where to install the files located inside the rpm package, installs them on your system, and adds that piece of software into its database of installed RPM packages.
The following rpm command installs Mysql client package.
# rpm -ivh MySQL-client-3.23.57-1.i386.rpm
Preparing... ########################################### [100%]
1:MySQL-client ########################################### [100%]
rpm command and options
-i : install a package
-v : verbose
-h : print hash marks as the package archive is unpacked.
Query all the RPM Packages using rpm -qa
You can use rpm command to query all the packages installed in your system.# rpm -qa
cdrecord-2.01-10.7.el5
bluez-libs-3.7-1.1
setarch-2.0-1.1
-q query operation
-a queries all installed packages
To identify whether a particular rpm package is installed on your system, combine rpm and grep command as shown below. Following command checks whether cdrecord package is installed on your system.
# rpm -qa | grep 'cdrecord'
Query a Particular RPM Package using rpm -q
The above example lists all currently installed package. After installation of a package to check the installation, you can query a particular package and verify as shown below.# rpm -q MySQL-client
MySQL-client-3.23.57-1
# rpm -q MySQL
package MySQL is not installed
Note: To query a package, you should specify the exact package name. If the package name is incorrect, then rpm command will report that the package is not installed.
Query RPM Packages in a various format using rpm –queryformat
Rpm command provides an option –queryformat, which allows you to give the header tag names, to list the packages. Enclose the header tag with in {}.# rpm -qa --queryformat '%{name-%{version}-%{release} %{size}\n'
cdrecord-2.01-10.7 12324
bluez-libs-3.7-1.1 5634
setarch-2.0-1.1 235563
Which RPM package does a file belong to? – Use rpm -qf
Let us say, you have list of files and you would want to know which package owns all these files. rpm command has options to achieve this.The following example shows that /usr/bin/mysqlaccess file is part of the MySQL-client-3.23.57-1 rpm.
# rpm -qf /usr/bin/mysqlaccess
MySQL-client-3.23.57-1
-f : file name
Locate documentation of a package that owns file using rpm -qdf
Use the following to know the list of documentations, for a package that owns a file. The following command, gives the location of all the manual pages related to mysql package.# rpm -qdf /usr/bin/mysqlaccess
/usr/share/man/man1/mysql.1.gz
/usr/share/man/man1/mysqlaccess.1.gz
/usr/share/man/man1/mysqladmin.1.gz
/usr/share/man/man1/mysqldump.1.gz
/usr/share/man/man1/mysqlshow.1.gz
-d : refers documentation.
Information about Installed RPM Package using rpm -qi
rpm command provides a lot of information about an installed pacakge using rpm -qi as shown below:# rpm -qi MySQL-client
Name : MySQL-client Relocations: (not relocatable)
Version : 3.23.57 Vendor: MySQL AB
Release : 1 Build Date: Mon 09 Jun 2003 11:08:28 PM CEST
Install Date: Mon 06 Feb 2010 03:19:16 AM PST Build Host: build.mysql.com
Group : Applications/Databases Source RPM: MySQL-3.23.57-1.src.rpm
Size : 5305109 License: GPL / LGPL
Signature : (none)
Packager : Lenz Grimmer
URL : http://www.mysql.com/
Summary : MySQL - Client
Description : This package contains the standard MySQL clients.
If you have an RPM file that you would like to install, but want to know more information about it before installing, you can do the following:
# rpm -qip MySQL-client-3.23.57-1.i386.rpm
Name : MySQL-client Relocations: (not relocatable)
Version : 3.23.57 Vendor: MySQL AB
Release : 1 Build Date: Mon 09 Jun 2003 11:08:28 PM CEST
Install Date: (not installed) Build Host: build.mysql.com
Group : Applications/Databases Source RPM: MySQL-3.23.57-1.src.rpm
Size : 5305109 License: GPL / LGPL
Signature : (none)
Packager : Lenz Grimmer
URL : http://www.mysql.com/
Summary : MySQL - Client
Description : This package contains the standard MySQL clients.
-i : view information about an rpm
-p : specify a package name
List all the Files in a Package using rpm -qlp
To list the content of a RPM package, use the following command, which will list out the files without extracting into the local directory folder.$ rpm -qlp ovpc-2.1.10.rpm
/usr/bin/mysqlaccess
/usr/bin/mysqldata
/usr/bin/mysqlperm
/usr/bin/mysqladmin
q : query the rpm file
l : list the files in the package
p : specify the package name
Extracting the files from a RPM package using rpm2cpio and cpio
RPM is a sort of a cpio archive. First, convert the rpm to cpio archive using rpm2cpio command. Next, use cpio command to extract the files from the archive as shown below.$ rpm2cpio ovpc-2.1.10.rpm | cpio -idmv
./usr/src/ovpc/-5.10.0
./usr/src/ovpc/ovpc-2.1.10/examples
./usr/src/ovpc/ovpc-2.1.10/examples/bin
./usr/src/ovpc/ovpc-2.1.10/examples/lib
./usr/src/ovpc/ovpc-2.1.10/examples/test
.
.
./usr/src/ovpc/ovpc-2.1.10/pcs
$ ls .
usr
List the Dependency Packages using rpm -qRP
To view the list of packages on which this package depends,# rpm -qRp MySQL-client-3.23.57-1.i386.rpm
/bin/sh
/usr/bin/perl
Find out the state of files in a package using rpm -qsp
The following command is to find state (installed, replaced or normal) for all the files in a RPM package.# rpm -qsp MySQL-client-3.23.57-1.i386.rpm
normal /usr/bin/msql2mysql
normal /usr/bin/mysql
normal /usr/bin/mysql_find_rows
normal /usr/bin/mysqlaccess
normal /usr/bin/mysqladmin
normal /usr/bin/mysqlbinlog
normal /usr/bin/mysqlcheck
normal /usr/bin/mysqldump
normal /usr/bin/mysqlimport
normal /usr/bin/mysqlshow
normal /usr/share/man/man1/mysql.1.gz
normal /usr/share/man/man1/mysqlaccess.1.gz
normal /usr/share/man/man1/mysqladmin.1.gz
normal /usr/share/man/man1/mysqldump.1.gz
normal /usr/share/man/man1/mysqlshow.1.gz
Verify a Particular RPM Package using rpm -Vp
Verifying a package compares information about the installed files in the package with information about the files taken from the package metadata stored in the rpm database. In the following command, -V is for verification and -p option is used to specify a package name to verify.# rpm -Vp MySQL-client-3.23.57-1.i386.rpm
S.5....T c /usr/bin/msql2mysql
S.5....T c /usr/bin/mysql
S.5....T c /usr/bin/mysql_find_rows
S.5....T c /usr/bin/mysqlaccess
The character in the above output denotes the following:
- S file Size differs
- M Mode differs (includes permissions and file type)
- 5 MD5 sum differs
- D Device major/minor number mismatch
- L readlink(2) path mismatch
- U User ownership differs
- G Group ownership differs
- T mTime differs
Verify a Package Owning file using rpm -Vf
The following command verify the package which owns the given filename.# rpm -Vf /usr/bin/mysqlaccess
S.5....T c /usr/bin/mysql
Upgrading a RPM Package using rpm -Uvh
Upgrading a package is similar to installing one, but RPM automatically un-installs existing versions of the package before installing the new one. If an old version of the package is not found, the upgrade option will still install it.# rpm -Uvh MySQL-client-3.23.57-1.i386.rpm
Preparing... ########################################### [100%]
1:MySQL-client ###########################################
Uninstalling a RPM Package using rpm -e
To remove an installed rpm package using -e as shown below. After uninstallation, you can query using rpm -qa and verify the uninstallation.# rpm -ev MySQL-client
Verifying all the RPM Packages using rpm -Va
The following command verifies all the installed packages.# rpm -Va
S.5....T c /etc/issue
S.5....T c /etc/issue.net
S.5....T c /var/service/imap/ssl/seed
S.5....T c /home/httpd/html/horde/ingo/config/backends.php
.
.
S.5....T c /home/httpd/html/horde/ingo/config/prefs.php
S.5....T c /etc/printcap
Subscribe to:
Posts (Atom)